Git学习实战_yukiyama
本文总结自 progit 。
操作环境为 macOS Monterey 12.6 / git 2.37.3 / IntelliJ IDEA 2022.2.1 (Ultimate Edition) 。
Git概述
Git 是一个开源的 分布式版本控制系统 。
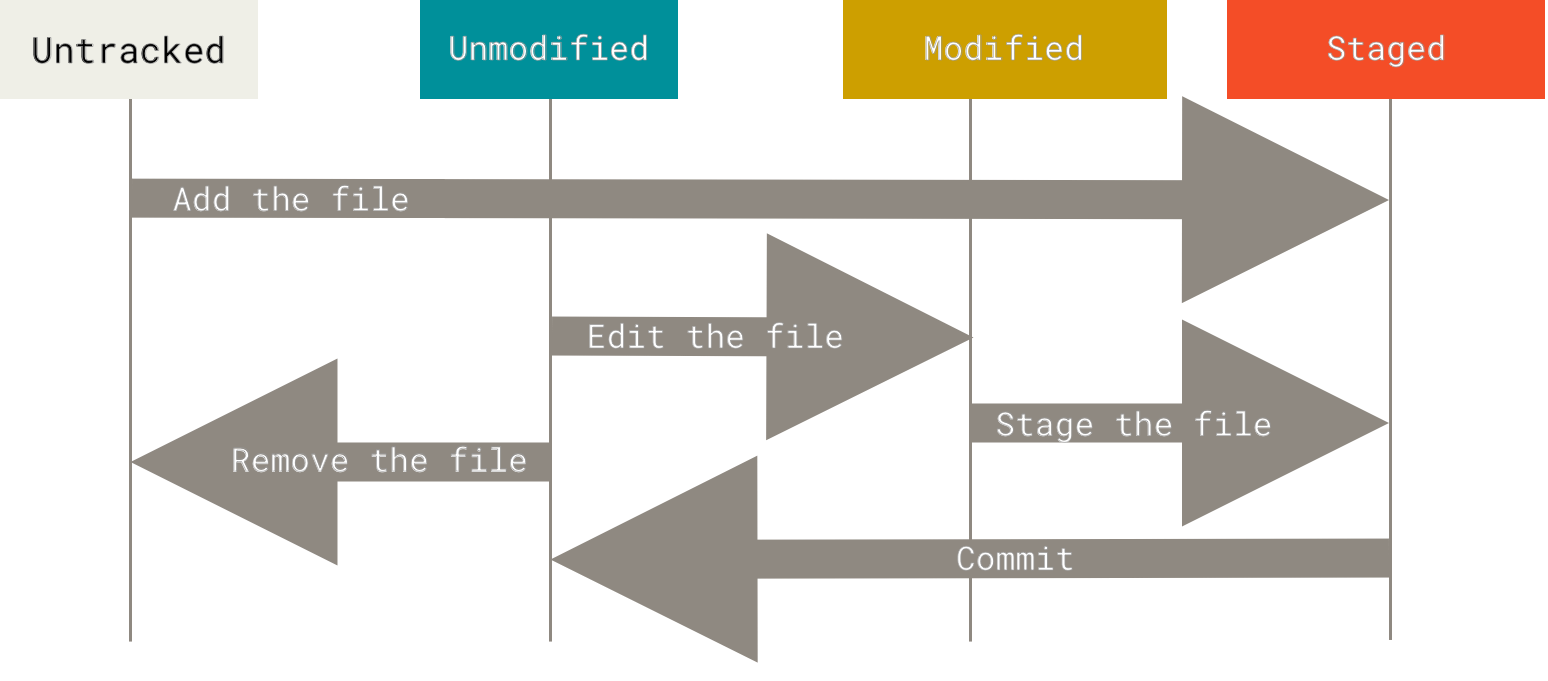
git 文件四种状态: 未跟踪 (untracked)、 未修改 (unmodified)、已修改 (modified) 、已暂存 (staged) 。
状态
描述
untracked
未追踪。文件未被 git 管理,执行 git add 可将其转换为「已追踪」的「未修改状态」。
unmodified
未修改。已追踪,从「已暂存」状态执行 git commit 提交后的状态。因此也被称作「已提交」状态 (commited) 。
modified
已修改。已追踪,并且发生了修改,但还未暂存。
staged
已暂存。已追踪,对一个修改过的文件执行 git add 后的状态。
git 中的三个区域: 仓库、工作目录、暂存区域。
区域
描述
工作目录
对项目的某个版本独立提取出来的内容。从 Git 仓库的压缩数据库中提取出来,放在磁盘上供用户使用和修改。
暂存区 / 索引
实际上是一个文件,保存了下次将提交的文件列表信息,一般在 Git 仓库目录中,有时也被称作「索引」。
Git仓库 / 版本库
Git 用来保存项目的元数据和对象数据库的地方。
Git安装
在装有 homebrew 的 mac 下安装 git ,只需执行如下命令。
安装后执行 git --version 可查看 git 版本。
1
2
3
yukiyama@yukiyama ~ % git --version git version 2.37.3 yukiyama@yukiyama ~ %
命令一览
git 常用命令。使用 git help <verb>, git <verb> --help, man git-<verb> 可查看相关命令的详细用法。
命令
描述
■ 基本操作
git config --[system/global/local] user.name <用户名>
设置不同层级git配置文件中的git用户名
git config --[system/global/local] user.email <邮箱>
设置不同层级git配置文件中的git邮箱
git config --[system/global/local] --list
查看不同层级git配置内容
git config --[system/global/local] --edit
编辑不同层级git配置内容
git config --[system/global/local] <变量组名.变量>
查看不同层级下的git配置中的变量值
git init
将当前文件夹初始化为本地库
git add <文件名>
添加到暂存区
git add <目录>
添加指定目录及其子目录到暂存区
git add .
添加当前目录下的所有文件和所有子目录到暂存区.gitignore
git add *
添加当前目录下的所有文件和所有子目录到暂存区.gitignore ,一般不使用该命令。
git ls-files
查看当前目录下已跟踪的文件
git commit -m “<本次提交的附带信息>”
提交到本地库
git status
本地库状态
git status -s
本地库状态缩略信息
git diff <文件名>
列出指定文件在工作目录中修改前后的差异。
git diff --staged <文件名>
列出指定文件在暂存区与当前仓库版本间的差异。
git diff <版本号> <文件名>
列出指定文件在工作目录及指定仓库版本间的差异。
git reflog
查看历史记录缩略信息
git rm <文件名>
从已经跟踪的文件清单中 (暂存区域) 移除指定文件,同时删除该文件
git mv <文件名1> <文件名2>
将文件名1改成文件名2
git log
查看历史记录完整信息
git log -p
查看历史记录完整信息并展示每次提交的差异
git log -2
查看2条历史记录完整信息
git log --oneline --graph --all
以图形形式 (分支流) 查看提交历史
git reflog
查看历史记录缩略信息
git reflog -p
查看历史记录缩略信息并展示每次提交的差异
git reflog -2
查看2条历史记录缩略信息
■ 撤销操作
git commit --amend
修改 message 后提交暂存区,替换掉最后一次提交,即提交数不变 (commit id不同)。
git commit --amend -m “<提交信息>”
同上,但不会打开编辑器编辑提交信息,而是直接写上提交信息。
git restore --staged <文件名>
将暂存区的指定文件移出暂存区
git restore <文件名>
都在工作目录下,将已修改状态的指定文件回退到未修改的状态。
git rest HEAD <文件名>
同 git restore --staged <文件名>
git checkout –
同 git restore <文件名>
■ 切换操作
git reset --soft <版本号>
将 HEAD 指向指定的版本 (commit) ,不改动 index 和 working tree。
git reset --mixed <版本号>
不指定文件。将 HEAD 指向指定的版本 (commit) ,并使得暂存区与指定版本一致,即在指定版本之后加入暂存区的所有文件都移出暂存区。--mixed 参数是默认的,也可不写。
git reset --mixed <版本号> <文件名>
指定文件。HEAD 指针不变,但指定的文件对应的暂存区内容将切换到指定版本的状态,其他文件在暂存区的内容不变。
git reset --hard <版本号>
将 HEAD, index 和 working tree 都切换到指定版本号的状态。
■ 分支操作
git branch
列出本地所有分支名
git branch -r
列出远程所有分支名
git branch -a
列出本地及远程的所有分支名
git branch <分支名>
以指定分支名创建新分支
git branch -d <分支名>
删除指定分支
git switch <分支名>
切换到指定分支
git switch -c <分支名>
创建并切换分支
git checkout <分支名>
切换到指定分支
git checkout -b <分支名>
创建并切换分支
git merge <分支名>
将指定分支合并入当前分支
git rebase <分支名>
以当前分支为基底,将指定分支在分歧后的修改合入当前分支
■ 远程操作
git remote add <远程仓库地址别名> <远程仓库地址>
关联本地仓库与远程仓库
git remote
列出远程仓库 (别名)
git remove -v
列出远程仓库详细信息 (别&原地址 fetch&push)
git remote show <远程仓库地址别名>
查看远程仓库详细信息
git remote rename <当前别名> <新别名>
修改远程仓库地址别名
git clone <远程仓库地址>
将远程仓库克隆到当前目录下
git push <远程仓库地址> <本地分支名>:<远程分支名>
推送本地当前分支版本到远程仓库指定分支
git push -u <远程仓库地址别名> <远程仓库分支名>
将本地仓库当前分支内容推送到指定远程仓库的指定分支-u 是 --set-upstream 的缩略,关联当前分支与指定的远程仓库分支,方便之后仅使用 git push 完成推送。
git push <远程仓库地址> <分支名>
当本地分支名与远程分支名相同时的略写
git push
若当前本地分支已与远程仓库某分支通过 --set-upstream 参数绑定过,则可直接将本地分支当前版本推送到该远程分支
git fetch <远程仓库别名> <远程仓库分支名>
从指定远程仓库获取指定分支的最新版本到当前仓库中,但不 merge
git fetch <远程仓库别名>
从指定远程仓库的获取所有分支中的最新版本到当前仓库中,但不 merge
git fetch
类似 push ,若已经设置了 --set-upstream ,则可省略后续参数
git pull <远程仓库别名> <远程分支名>:<本地分支名>
从指定远程仓库获取指定分支的最新版本到指定本地分支中,并 merge
git pull <远程仓库别名> <分支名>
远程分支名与本地分支名相同时的简写
git pull
类似 push ,若已经设置了 --set-upstream ,则可省略后续参数
基本操作
git config
git 有三个层级的配置文件。
配置文件
描述
系统级 (system)
配置对OS系统下所有用户有效。/usr/local/etc/config
系统用户级 (global)
配置对OS系统下当前用户有效。/Users/yukiyama/.gitconfig
当前仓库级别 (local)
配置对当前仓库有效。.git 文件夹下的 .gitconfig
如下,可通过 cat 命令查看三个层级下的 git 配置内容。
1
2
3
4
5
6
7
8
9
10
11
12
13
14
15
16
17
18
19
20
21
22
23
24
25
26
yukiyama@yukiyama ~ % cat /usr/local/etc/gitconfig [credential] helper = osxkeychain yukiyama@yukiyama ~ % cat ~/.gitconfig [filter "lfs"] clean = git-lfs clean -- %f smudge = git-lfs smudge -- %f process = git-lfs filter-process required = true [user] name = yukiyama email = yukiyama@yuki.com [init] defaultBranch = master yukiyama@yukiyama ~ % cat iCloud/study/tech/git/git-demo/.git/config [core] repositoryformatversion = 0 filemode = true bare = false logallrefupdates = true ignorecase = true precomposeunicode = true [user] name = iyukiyama email = yukiyama@yama.com yukiyama@yukiyama ~ %
也可以通过 git config --[system/global/local] --list 查看。
1
2
3
4
5
6
7
8
9
10
11
12
13
14
15
16
17
18
19
20
21
yukiyama@yukiyama ~ % git config --system --list credential.helper=osxkeychain yukiyama@yukiyama ~ % git config --global --list filter.lfs.clean=git-lfs clean -- %f filter.lfs.smudge=git-lfs smudge -- %f filter.lfs.process=git-lfs filter-process filter.lfs.required=true user.name=yukiyama user.email=yukiyama@yuki.com init.defaultbranch=master yukiyama@yukiyama ~ % cd iCloud/study/tech/git/git-demo/ yukiyama@yukiyama git-demo % git config --local --list core.repositoryformatversion=0 core.filemode=true core.bare=false core.logallrefupdates=true core.ignorecase=true core.precomposeunicode=true user.name=iyukiyama user.email=yukiyama@yama.com yukiyama@yukiyama git-demo %
需要注意带有 --local 参数的 git config 命令要在仓库内执行,否则返回如下错误提示。
1
2
3
yukiyama@yukiyama ~ % git config --local user.name fatal: --local can only be used inside a git repository yukiyama@yukiyama ~ %
配置用户签名
可以通过 vim 命令或者带 --edit 参数的 git config 命令打开配置文件完成编辑,更好的方式是直接使用 git config 命令指定具体的变量。通常在使用 git 进行版本控制管理前,需要设置用户名及邮箱,即「用户签名」,用于标识操作者信息,无该信息则无法提交。
如下设置 global 层级的 user.name 及 user.email。
1
2
3
4
5
6
yukiyama@yukiyama git-demo % git config --global user.name yukiyama yukiyama@yukiyama git-demo % git config --global user.name yukiyama yukiyama@yukiyama git-demo % git config --global user.email yukiyama@gmail.com yukiyama@yukiyama git-demo % git config --global user.email yukiyama@gmail.com
当我们希望对某个具体的 git 项目 (即 .git 所在目录) 使用不同于 global 的用户签名时,使用 --local 参数单独设置,如下。
1
2
3
4
5
6
yukiyama@yukiyama git-demo % git config --local user.name yukiyama123 yukiyama@yukiyama git-demo % git config --local user.name yukiyama123 yukiyama@yukiyama git-demo % git config --local user.email yukiyama@outlook.com yukiyama@yukiyama git-demo % git config --local user.email yukiyama@outlook.com
需要注意的是,「用户签名」与在「远程操作」中使用远程库平台 (如 github) 的账户信息无关,只不过我们也可以将用户签名设置为远程库平台的账号名及邮箱。
配置全局忽略
使用 MacOS 时,本地 git 仓库中可能会出现 MacOS 中特有的 .DS_Store 文件。类似这样的文件或文件夹,我们可以针对每一个本地 git 仓库,在 .git 所在目录下设置相应地 .gitignore 文件来忽略指定的文件和文件夹,也可以设置一个全局忽略配置文件 .gitignore_global (通常与全局配置文件 .gitconfig 放置在同一目录下,即 ~/ 下) 。例如新建一个 ~/.gitignore_global 文件如下。
1
2
3
4
yukiyama@yukiyama ~ % cat ~/.gitignore_global # MacOS .DS_Store **/.DS_Store yukiyama@yukiyama ~ %
** 表示子目录子子目录等多层匹配
然后使用 git config --global core.excludesfile ~/.gitignore_global 命令配置到全局配置文件中。
1
2
3
4
5
6
7
8
9
10
11
12
yukiyama@yukiyama git-demo % git config --global core.excludesfile ~/.gitignore_global yukiyama@yukiyama git-demo % git config --global --list filter.lfs.clean=git-lfs clean -- %f filter.lfs.smudge=git-lfs smudge -- %f filter.lfs.process=git-lfs filter-process target/ filter.lfs.required=true user.name=yukiyama user.email=yukiyama@163.com init.defaultbranch=master core.excludesfile=/Users/yukiyama/.gitignore_global yukiyama@yukiyama git-demo %
对于已经在 .gitignore_global 中的忽略规则,之后就不需要再针对每一个 git 仓库设置单独设置了。
配置忽略转义
使用 git 命令时,命令行回显信息的中文字符会被转义。如下,中文.md 被显示为 \344\270\255\346\226\207.md 。
1
2
3
4
5
6
7
8
9
10
11
yukiyama@yukiyama pics % vim 中文.md yukiyama@yukiyama pics % git status On branch master Your branch is up to date with 'origin/master'. Untracked files: (use "git add <file>..." to include in what will be committed) "\344\270\255\346\226\207.md" nothing added to commit but untracked files present (use "git add" to track) yukiyama@yukiyama pics %
可以将 core.quotepath 设置为 false 禁止转义,以便显示中文。
1
2
3
4
5
6
7
8
9
10
11
yukiyama@yukiyama pics % git config --global core.quotepath false yukiyama@yukiyama pics % git status On branch master Your branch is up to date with 'origin/master'. Untracked files: (use "git add <file>..." to include in what will be committed) 中文.md nothing added to commit but untracked files present (use "git add" to track) yukiyama@yukiyama pics %
core.quotePath 参数的作用如下 (来自 官方文档 )。
Commands that output paths (e.g. ls-files , diff ), will quote “unusual” characters in the pathname by enclosing the pathname in double-quotes and escaping those characters with backslashes in the same way C escapes control characters (e.g. \t for TAB, \n for LF, \\ for backslash) or bytes with values larger than 0x80 (e.g. octal \302\265 for “micro” in UTF-8). If this variable is set to false, bytes higher than 0x80 are not considered “unusual” any more. Double-quotes, backslash and control characters are always escaped regardless of the setting of this variable. A simple space character is not considered “unusual”. Many commands can output pathnames completely verbatim using the -z option. The default value is true.
git init
使用在文件夹下目录下执行 git init ,将此文件夹作为 git 本地仓库管理。执行后将出现 .git 隐藏文件夹,其内保存了 git 用于版本管理的各种信息文件。
1
2
3
yukiyama@yukiyama git-demo % git init Initialized empty Git repository in /Users/yukiyama/Library/Mobile Documents/com~apple~CloudDocs/study/tech/git/git-demo/.git/ yukiyama@yukiyama git-demo %
可以随时使用 git status 查看仓库文件状态。
1
2
3
4
5
6
7
yukiyama@yukiyama git-demo1 % git status On branch master No commits yet nothing to commit (create/copy files and use "git add" to track) yukiyama@yukiyama git-demo1 %
git add
文件夹初始化为 git 仓库后,尚未有文件被 git 追踪管理,此时使用 git add <文件名> 命令将指定文件放入「暂存区」。暂存区本质上是一个文件,它保存了下次将提交的文件列表信息。如下,新增一个 hello.txt 文件后,使用 git status 查看仓库内文件所属状态,可以看到 Untracked files 信息。
1
2
3
4
5
6
7
8
9
10
11
12
yukiyama@yukiyama git-demo % git status On branch master No commits yet Untracked files: (use "git add <file>..." to include in what will be committed) .DS_Store hello.txt nothing added to commit but untracked files present (use "git add" to track) yukiyama@yukiyama git-demo %
此时使用 git add helle.txt 即可将文件放入「暂存区」(标记为追踪文件)。
1
2
3
4
5
6
7
8
9
10
11
12
13
14
15
yukiyama@yukiyama git-demo % git add hello.txt yukiyama@yukiyama git-demo % git status On branch master No commits yet Changes to be committed: (use "git rm --cached <file>..." to unstage) new file: hello.txt Untracked files: (use "git add <file>..." to include in what will be committed) .DS_Store yukiyama@yukiyama git-demo %
git add . 会把本地所 有 untrack 的 (包括追踪过但又修改了的) 文件都加入暂存区,并且会根据 .gitignore 过滤忽略文件。git add * 会忽略 .gitignore 把任何文件都加入。执行时会出现如下提示,加上 -f 参数后可强制加入,但显然通常我们不会这么做。
1
2
3
4
5
6
7
8
yukiyama@yukiyama hello-git % git add * The following paths are ignored by one of your .gitignore files: test test.txt hint: Use -f if you really want to add them. hint: Turn this message off by running hint: "git config advice.addIgnoredFile false" yukiyama@yukiyama hello-git %
git commit
使用 git commit -m "<message>" <filename>提交指定文件。
1
2
3
4
5
6
7
8
9
10
11
12
yukiyama@yukiyama git-demo % git commit -m "first commit" hello.txt [master (root-commit) 3d542ed] first commit 1 file changed, 3 insertions(+) create mode 100644 hello.txt yukiyama@yukiyama git-demo % git status On branch master Untracked files: (use "git add <file>..." to include in what will be committed) .DS_Store nothing added to commit but untracked files present (use "git add" to track) yukiyama@yukiyama git-demo %
修改文件
修改文件后 git 会检测到被修改的文件。
1
2
3
4
5
6
7
8
9
10
11
12
13
yukiyama@yukiyama git-demo % git status On branch master Changes not staged for commit: (use "git add <file>..." to update what will be committed) (use "git restore <file>..." to discard changes in working directory) modified: hello.txt Untracked files: (use "git add <file>..." to include in what will be committed) .DS_Store no changes added to commit (use "git add" and/or "git commit -a") yukiyama@yukiyama git-demo %
再次添加并提交
1
2
3
4
5
6
7
8
9
10
11
12
13
14
15
yukiyama@yukiyama git-demo % git add hello.txt yukiyama@yukiyama git-demo % git status On branch master Changes to be committed: (use "git restore --staged <file>..." to unstage) modified: hello.txt Untracked files: (use "git add <file>..." to include in what will be committed) .DS_Store yukiyama@yukiyama git-demo % git commit -m "first changed" [master c246db6] first changed 1 file changed, 1 insertion(+), 1 deletion(-) yukiyama@yukiyama git-demo %
也可以使用 git commit -am "<message>" 将所有已跟踪的文件 暂存并提交 (即 add 与 commit 一起完成)。
git status
git status 命令可以添加 -s (--short) 参数以紧凑形式返回状态信息。如下,添加 untracked.txt, added.txt 和 modified.txt 文件演示处于 untracked(??), added(A) , modified(_M) (M在右侧) 以及 modifiedAdded(M_) (M在左侧) 状态的情况。
untracked.txt 新建后尚未通过 git add 添加到暂存区。added.txt 新建后通过 git add 添加到了暂存区,但未 git commit 提交。modified.txt 新建后添加到了暂存区,且已提交,并在提交后做了修改。modifiedAdded.txt 新建后添加到了暂存区,且已提交,并在提交后做了修改,之后又提交到了暂存区。
1
2
3
4
5
6
7
8
9
10
11
12
13
14
15
16
17
18
19
20
21
22
23
24
yukiyama@yukiyama git-demo % git status On branch master Changes to be committed: (use "git restore --staged <file>..." to unstage) new file: added.txt modified: modifiedAdded.txt Changes not staged for commit: (use "git add <file>..." to update what will be committed) (use "git restore <file>..." to discard changes in working directory) modified: .DS_Store modified: modified.txt Untracked files: (use "git add <file>..." to include in what will be committed) untracked.txt yukiyama@yukiyama git-demo % git status -s M .DS_Store A added.txt M modified.txt M modifiedAdded.txt ?? untracked.txt yukiyama@yukiyama git-demo %
git diff
命令
描述
git diff <文件名>
列出指定文件在工作目录中修改前后的差异。
git diff --staged <文件名>
列出指定文件在暂存区与当前仓库版本间的差异。
git diff <版本号> <文件名>
列出指定文件在工作目录及指定仓库版本间的差异。
※ --staged 也可以使用 --cached 代替。
※ 上述命令均针对被 git 管理的文件,即被 git add 过的文件。当不指定具体文件时,列出所有文件的差异。
※ 「版本号」可以用 HEAD, HEAD^, HEAD^^, HEAD~1, HEAD~2 等形式表示。HEAD 表示当前版本,HEAD^ 表示当前版本的前一个版本,有多少个 ^ 就往前多少个版本,~1 表示当前版本的前一个版本,数字是多少,就表示往前多少个版本。
新建 diff.txt 且该文件只有一行「only first line when created」。可以看到由于尚未对 compare.txt 执行 git add ,即此文件还未被 git 管理,因此 三条 git diff 命令均无回显。
1
2
3
4
yukiyama@yukiyama hello-git % vim compare.txt yukiyama@yukiyama hello-git % git diff yukiyama@yukiyama hello-git % git diff --staged compare.txt yukiyama@yukiyama hello-git % git diff HEAD compare.txt
执行 git add compare.txt 之后。可以看到如下。
git diff 命令无回显,因为是初次被 git 管理,即第一次出现在 git 的工作目录,此文件在工作目录中无历史可比较版本。git diff --staged 列出首行差异,因为此时暂存区比当前仓库版本多一行 (多了此文件,并且有一行差异) 。git diff HEAD 列出首行差异,因为此时工作目录比当前仓库版本多一行 (多了此文件,并且有一行差异) 。
1
2
3
4
5
6
7
8
9
10
11
12
13
14
15
16
17
18
19
yukiyama@yukiyama hello-git % git add compare.txt yukiyama@yukiyama hello-git % git diff yukiyama@yukiyama hello-git % git diff --staged compare.txt diff --git a/compare.txt b/compare.txt new file mode 100644 index 0000000..80dd23d --- /dev/null +++ b/compare.txt @@ -0,0 +1 @@ +only first line when created yukiyama@yukiyama hello-git % git diff HEAD compare.txt diff --git a/compare.txt b/compare.txt new file mode 100644 index 0000000..80dd23d --- /dev/null +++ b/compare.txt @@ -0,0 +1 @@ +only first line when created yukiyama@yukiyama hello-git %
执行 git commit -m "add compare.txt" 提交 compare.txt 之后。可看到如下。此时工作目录、暂存区和当前版本均无差异。
1
2
3
4
5
6
7
8
9
yukiyama@yukiyama hello-git % git commit -m "add compare.txt" [master 1e05a4f] add compare.txt 2 files changed, 1 insertion(+), 1 deletion(-) create mode 100644 compare.txt delete mode 100644 diff.txt yukiyama@yukiyama hello-git % git diff yukiyama@yukiyama hello-git % git diff --staged compare.txt yukiyama@yukiyama hello-git % git diff HEAD compare.txt yukiyama@yukiyama hello-git %
增加第二行 「second line added」之后。可以看到如下。
git diff 列出第二行差异,因为此时工作目录下该文件多了一行 。git diff --staged 由于暂存区与当前仓库版本无差异,因此无回显。git diff HEAD 由于工作目录与当前仓库版本无差异,因此无回显。
1
2
3
4
5
6
7
8
9
10
11
12
13
14
15
16
17
18
yukiyama@yukiyama hello-git % git diff compare.txt diff --git a/compare.txt b/compare.txt index 80dd23d..3d555a6 100644 --- a/compare.txt +++ b/compare.txt @@ -1 +1,2 @@ only first line when created +second line added yukiyama@yukiyama hello-git % git diff --staged compare.txt yukiyama@yukiyama hello-git % git diff HEAD compare.txt diff --git a/compare.txt b/compare.txt index 80dd23d..3d555a6 100644 --- a/compare.txt +++ b/compare.txt @@ -1 +1,2 @@ only first line when created +second line added yukiyama@yukiyama hello-git %
「版本号」的不同写法。
1
2
3
4
5
6
7
8
9
10
11
12
13
14
15
16
17
18
19
20
21
22
23
24
25
26
27
28
29
30
31
yukiyama@yukiyama hello-git % git diff HEAD~1 compare.txt diff --git a/compare.txt b/compare.txt new file mode 100644 index 0000000..3d555a6 --- /dev/null +++ b/compare.txt @@ -0,0 +1,2 @@ +only first line when created +second line added yukiyama@yukiyama hello-git % git diff HEAD^ compare.txt diff --git a/compare.txt b/compare.txt new file mode 100644 index 0000000..3d555a6 --- /dev/null +++ b/compare.txt @@ -0,0 +1,2 @@ +only first line when created +second line added yukiyama@yukiyama hello-git % git reflog -2 1e05a4f (HEAD -> master) HEAD@{0}: commit: add compare.txt f08b6a1 HEAD@{1}: commit: add diff.txt yukiyama@yukiyama hello-git % git diff f08b6a1 compare.txt diff --git a/compare.txt b/compare.txt new file mode 100644 index 0000000..3d555a6 --- /dev/null +++ b/compare.txt @@ -0,0 +1,2 @@ +only first line when created +second line added yukiyama@yukiyama hello-git %
git rm
使用 git rm <filename> 从已跟踪的文件清单中移除指定文件 (即从暂存区域移除) 并提交,同时删除该文件。如果只是 使用 rm ,虽然文件被删除,但 git status 后还是能看到已被删除的文件。
1
2
3
4
5
6
7
8
9
10
11
12
13
14
15
16
17
18
yukiyama@yukiyama git-demo % git rm hello.txt error: the following file has staged content different from both the file and the HEAD: hello.txt (use -f to force removal) yukiyama@yukiyama git-demo % git status On branch master Changes to be committed: (use "git restore --staged <file>..." to unstage) modified: hello.txt Changes not staged for commit: (use "git add <file>..." to update what will be committed) (use "git restore <file>..." to discard changes in working directory) modified: .DS_Store modified: hello.txt yukiyama@yukiyama git-demo %
如上,在 git rm 删除指定文件前,若该文件有过修改,则拒绝删除,这样做的目的是防止删除未添加到仓库中的数据,这样的数据无法被 git 恢复。确定要删除时可以使用 -f 参数强制删除 (force) 。
1
2
3
4
5
6
7
8
9
10
11
12
13
14
yukiyama@yukiyama git-demo % git rm -f hello.txt rm 'hello.txt' yukiyama@yukiyama git-demo % git status On branch master Changes to be committed: (use "git restore --staged <file>..." to unstage) deleted: hello.txt Changes not staged for commit: (use "git add <file>..." to update what will be committed) (use "git restore <file>..." to discard changes in working directory) modified: .DS_Store yukiyama@yukiyama git-demo %
git mv
使用 git mv 命令修改文件名,例如 git mv a.txt b.txt 相当于如下三行命令。
1
2
3
mv a.txt b.txt git rm a.txt git add b.txt
git log
使用 git log 查看提交历史。
1
2
3
4
5
6
7
8
9
10
11
12
yukiyama@yukiyama git-demo % git log commit b8d829123843fe1d760983ed5bfc9f2cbcc22d13 (HEAD -> master) Author: iyukiyama <youremail@yama.com> Date: Mon Sep 26 19:54:50 2022 +0800 modified one line commit 5f3d03819d450b534153b90531393efd38e6a0a1 Author: iyukiyama <youremail@yama.com> Date: Mon Sep 26 19:53:32 2022 +0800 first commit
使用 git log -p 查看每次提交的差异,使用 git log -p -2 查看最近 2 次提交的差异。
1
2
3
4
5
6
7
8
9
10
11
12
13
14
15
16
17
18
19
20
21
22
23
24
25
26
27
28
29
30
31
32
yukiyama@yukiyama git-demo % git log -p commit b8d829123843fe1d760983ed5bfc9f2cbcc22d13 (HEAD -> master) Author: iyukiyama <youremail@yama.com> Date: Mon Sep 26 19:54:50 2022 +0800 modified one line diff --git a/hello.txt b/hello.txt index 40f4dc0..06227ce 100644 --- a/hello.txt +++ b/hello.txt @@ -1,3 +1,3 @@ -hello 1 +hello 1 modified hello 2 hello 3 commit 5f3d03819d450b534153b90531393efd38e6a0a1 Author: iyukiyama <youremail@yama.com> Date: Mon Sep 26 19:53:32 2022 +0800 first commit diff --git a/hello.txt b/hello.txt new file mode 100644 index 0000000..40f4dc0 --- /dev/null +++ b/hello.txt @@ -0,0 +1,3 @@ +hello 1 +hello 2 +hello 3
git log 命令有许多参数可用于调整输出历史记录的信息。
git reflog
也可以使用 git reflog 查看缩略的提交历史信息。git reflog -p, git reflog -2 的作用与 git log -p 和 git log -2 类似。
1
2
3
yukiyama@yukiyama git-demo % git reflog b8d8291 (HEAD -> master) HEAD@{0}: commit: modified one line 5f3d038 HEAD@{1}: commit: first commit
撤销操作
撤销操作
执行前状态
区域变化
描述
git commit --amend
未修改
暂存区 > 仓库
修改 message 后提交暂存区,替换掉最后一次提交,即提交数不变 (commit id不同)。
git commit --amend -m “<提交信息>”
未修改
暂存区 > 仓库
同上,但不会打开编辑器编辑提交信息,而是直接写上提交信息。
git restore --staged <文件名>
已暂存
暂存区 > 工作区
将指定文件移出暂存区
git restore <文件名>
已修改
不变
都在工作目录下,将已修改状态的指定文件回退到未修改的状态,即丢弃指定文件的所有修改。
git rest HEAD <文件名>
已暂存
暂存区 > 工作区
同 git restore --staged <文件名>
git checkout – <文件名>
已修改
不变
同 git restore <文件名>
git commit --amend
在某次提交后发现该提交的 message 描述有误,想要修改该 message ,或者想要再 add 一些文件,可以使用 git commit --amend 。
如下先完成两次提交。
1
2
3
4
5
6
7
8
9
10
11
12
13
14
15
16
17
18
19
20
21
22
23
24
25
26
27
commit 6d70b38bd6becddcd2b70fb1a5bc3ee929070497 (HEAD -> master) Author: yukiyama <yukiyama@163.com> iiiiiiiiiiiiiiiiiiiiiiiiiiiiiiiijjjiiiiiiiiiiiixx Date: Wed Sep 28 20:11:01 2022 +0800 first commit yukiyama@yukiyama hello-git % vim hello.txt yukiyama@yukiyama hello-git % git add . yukiyama@yukiyama hello-git % git commit -m "second commit" [master 6eefb40] second commit 1 file changed, 1 insertion(+), 1 deletion(-) yukiyama@yukiyama hello-git % git log commit 6eefb4065d6b3f02cedf9edce05d3de2afaace87 (HEAD -> master) Author: yukiyama <yukiyama@163.com> Date: Wed Sep 28 20:11:37 2022 +0800 second commit commit 6d70b38bd6becddcd2b70fb1a5bc3ee929070497 Author: yukiyama <yukiyama@163.com> Date: Wed Sep 28 20:11:01 2022 +0800 first commit yukiyama@yukiyama hello-git % git status On branch master nothing to commit, working tree clean yukiyama@yukiyama hello-git %
修改文件并执行 git add 后,将 message 修改为 “second commit (amend)” 来取代上一次提交。再次执行 git log 可以看到前次提交 (6eefb) 已不显示,取而代之的是新提交 (b299e) ,message 发生变化但提交时间和作者信息与之前是一致的。
1
2
3
4
5
6
7
8
9
10
11
12
13
14
15
16
17
18
19
20
21
22
23
24
25
yukiyama@yukiyama hello-git % vim hello.txt yukiyama@yukiyama hello-git % git add hello.txt yukiyama@yukiyama hello-git % git status On branch master Changes to be committed: (use "git restore --staged <file>..." to unstage) modified: hello.txt yukiyama@yukiyama hello-git % git commit --amend -m "second commit (amend)" [master b299e54] second commit (amend) Date: Wed Sep 28 20:11:37 2022 +0800 1 file changed, 1 insertion(+), 1 deletion(-) yukiyama@yukiyama hello-git % git log commit b299e542f8677f2c1e55b17cd9aa24bb2241ebad (HEAD -> master) Author: yukiyama <yukiyama@163.com> Date: Wed Sep 28 20:11:37 2022 +0800 second commit (amend) commit 6d70b38bd6becddcd2b70fb1a5bc3ee929070497 Author: yukiyama <yukiyama@163.com> Date: Wed Sep 28 20:11:01 2022 +0800 first commit yukiyama@yukiyama hello-git %
每次提交时都可以使用 git commit --amend -m "<message>" 来取代上一次提交,这样无论有多少次提交, git log 都只显示最后一次提交。(但是 git reflog 仍会显示每一次提交) 。
1
2
3
4
5
yukiyama@yukiyama hello-git % git reflog b299e54 (HEAD -> master) HEAD@{0}: commit (amend): second commit (amend) 6eefb40 HEAD@{1}: commit: second commit 6d70b38 HEAD@{2}: commit (initial): first commit yukiyama@yukiyama hello-git %
git restore
主要有两种用法,两种用法都必须指定文件名,可以一次指定多个文件 (文件名用空格分开) 。
使用 git restore --staged <文件名> 将指定的暂存区中的文件移出暂存区。
使用 git restore <文件名> 将工作目录下的「已修改」文件恢复为未修改状态。
1
2
3
4
5
6
7
8
9
10
11
12
13
14
15
16
17
18
19
20
21
yukiyama@yukiyama hello-git % git add hello.txt yukiyama@yukiyama hello-git % git status On branch master Changes to be committed: (use "git restore --staged <file>..." to unstage) modified: hello.txt yukiyama@yukiyama hello-git % git restore --staged hello.txt yukiyama@yukiyama hello-git % git status On branch master Changes not staged for commit: (use "git add <file>..." to update what will be committed) (use "git restore <file>..." to discard changes in working directory) modified: hello.txt no changes added to commit (use "git add" and/or "git commit -a") yukiyama@yukiyama hello-git % git restore hello.txt yukiyama@yukiyama hello-git % git status On branch master nothing to commit, working tree clean yukiyama@yukiyama hello-git %
git reset
使用 git rest HEAD <filename> 将指定的已暂存的文件移出暂存区 (同 git restore --staged <filename> ), 若不指定文件,则取消所有文件的暂存内容 (清空暂存区)。其中,HEAD 表示当前版本,退回到上一个版本可用 HEAD^ 。
git rest HEAD <filename> 与 git restore --staged <filename> 效果相同,但 git 的提示推荐使用 git restore <文件名> 用法。
如下展示 hello.txt 加入暂存区后,执行 git rest HEAD 取消暂存的过程。
1
2
3
4
5
6
7
8
9
10
11
12
13
14
15
16
17
18
19
yukiyama@yukiyama hello-git % git add hello.txt yukiyama@yukiyama hello-git % git status On branch master Changes to be committed: (use "git restore --staged <file>..." to unstage) modified: hello.txt yukiyama@yukiyama hello-git % git reset HEAD hello.txt Unstaged changes after reset: M hello.txt yukiyama@yukiyama hello-git % git status On branch master Changes not staged for commit: (use "git add <file>..." to update what will be committed) (use "git restore <file>..." to discard changes in working directory) modified: hello.txt no changes added to commit (use "git add" and/or "git commit -a") yukiyama@yukiyama hello-git %
git checkout –
使用 git checkout -- <filename> 将工作目录下的「已修改」文件恢复为未修改状态,同 git restore <文件名> ,git 的提示推荐使用 git restore <文件名> 用法。
如下,接上一节的操作。
1
2
3
4
5
yukiyama@yukiyama hello-git % git checkout -- hello.txt yukiyama@yukiyama hello-git % git status On branch master nothing to commit, working tree clean yukiyama@yukiyama hello-git %
切换操作
切换操作也属于广义上的撤销,但更强调在版本间穿梭的特点。git reset 的主要能力特点就是能够实现版本之间穿梭的操作,即「切换操作」。
在介绍命令之前有必要先说明如下三个「切换目标」的概念。
切换目标
描述
HEAD
指向当前分支的当前版本 (commit) 的指针,可以理解为就是当前版本。
index
可以理解为当前暂存区
working tree
可以理解为当前工作目录
git reset 命令有三种常用模式 --mixed (默认,不显式写出时即为此模式)、--soft 以及 --hard ,分别实现对不同「切换目标」的操作。
命令
描述
git reset --soft <版本号>
将 HEAD 指向指定的版本 (commit) ,不改动 index 和 working tree。
git reset --mixed <版本号>
不指定文件。将 HEAD 指向指定的版本 (commit) ,并使得暂存区与指定版本一致,即在指定版本之后加入暂存区的所有文件都移出暂存区。--mixed 参数是默认的,也可不写。
git reset --mixed <版本号> <文件名>
指定文件。HEAD 指针不变,但指定的文件对应的暂存区内容将切换到指定版本的状态,其他文件在暂存区的内容不变。
git reset --hard <版本号>
将 HEAD, index 和 working tree 都切换到指定版本号的状态。
※ 「版本号」可以用 HEAD, HEAD^, HEAD^^, HEAD~1, HEAD~2 等形式表示。HEAD 表示当前版本,HEAD^ 表示当前版本的前一个版本,有多少个 ^ 就往前多少个版本,~1 表示当前版本的前一个版本,数字是多少,就表示往前多少个版本。
※ 在「撤销操作」中,我们说过 git 2.23 版本加入 git restore 命令后,推荐使用 git restore --staged <文件名> 来代替 git reset HEAD <filename> ,原因之一就是 git reset 承担的功能太多,有必要引入新的更直观的命令来取代一部分功能。
git reset --soft
git reset --soft <commit id> 将 HEAD 指向指定的版本 (commit) ,不改动 index 和 working tree。简单直观的理解即执行后,在版本历史中的第一条 (当前版本) 即为指定的那个版本,除此之外无其他变化。
如下演示 --soft 模式的效果。
首先,依次提交 1.txt , 2.txt 和 3.txt 之后git add 4.txt 但不提交,则当前有 3 个版本,暂存区中有四个文件 (通过 git ls-files 查看)。
1
2
3
4
5
6
7
8
9
10
11
12
13
14
15
16
17
18
19
20
21
22
23
24
25
yukiyama@yukiyama hello-git % git reflog 5bff39f (HEAD -> master) HEAD@{0}: commit: add 3 d287e4b HEAD@{1}: commit: add 2 c97c40e HEAD@{2}: commit (initial): add 1 yukiyama@yukiyama hello-git % yukiyama@yukiyama hello-git % yukiyama@yukiyama hello-git % yukiyama@yukiyama hello-git % git ls-files 1.txt 2.txt 3.txt yukiyama@yukiyama hello-git % vim 4.txt yukiyama@yukiyama hello-git % git add 4.txt yukiyama@yukiyama hello-git % git status On branch master Changes to be committed: (use "git restore --staged <file>..." to unstage) new file: 4.txt yukiyama@yukiyama hello-git % git ls-files 1.txt 2.txt 3.txt 4.txt yukiyama@yukiyama hello-git %
然后软切换回 (--soft) 第一个版本 (c97c40e),此时当前分支 (master) 的 HEAD 确实指向了指定的版本。通过 git status 和 git ls-files 可以看到,在暂存区的内容无变化,只不过因为切回了若干个版本,暂存区「领先」了当前版本 (c97c40e) ,因此 2.txt, 3.txt, 4.txt 都是「Changes to be committed」。
1
2
3
4
5
6
7
8
9
10
11
12
13
14
15
16
17
18
19
20
yukiyama@yukiyama hello-git % git reset --soft c97c40e yukiyama@yukiyama hello-git % git reflog c97c40e (HEAD -> master) HEAD@{0}: reset: moving to c97c40e 5bff39f HEAD@{1}: commit: add 3 d287e4b HEAD@{2}: commit: add 2 c97c40e (HEAD -> master) HEAD@{3}: commit (initial): add 1 yukiyama@yukiyama hello-git % git status On branch master Changes to be committed: (use "git restore --staged <file>..." to unstage) new file: 2.txt new file: 3.txt new file: 4.txt yukiyama@yukiyama hello-git % git ls-files 1.txt 2.txt 3.txt 4.txt yukiyama@yukiyama hello-git %
由此我们验证了 --soft 模式确实只是将 HEAD 指向指定的版本,暂存区与工作目录无变化。
git reset --mixed
git reset --mixed <commit id> 命令,可以指定文件或不指定文件,效果不同。
不指定文件时。即包含了 --soft 实现的功能,即 HEAD 指针指向指定的版本,又实现了「暂存区」的切换,即使得暂存区与指定版本一致。
指定文件时。HEAD 指针不变,但指定的文件对应的暂存区内容将切换到指定版本的状态。
首先,提交 1.txt 作为第一个版本 (fc746eb) ,提交 2-1.txt 和 2-2.txt 作为第二个版本 (d3f6a97) ,提交 3.txt 作为第三个版本 (23a6441) ,将 4.txt 放入暂存区但不提交。
1
2
3
4
5
6
7
8
9
10
11
12
13
14
15
16
17
18
19
20
21
22
23
24
25
26
27
28
29
yukiyama@yukiyama hello-git % vim 1.txt yukiyama@yukiyama hello-git % git add 1.txt yukiyama@yukiyama hello-git % git commit -m "add 1.txt" [master (root-commit) fc746eb] add 1.txt 1 file changed, 1 insertion(+) create mode 100644 1.txt yukiyama@yukiyama hello-git % vim 2-1.txt yukiyama@yukiyama hello-git % vim 2-2.txt yukiyama@yukiyama hello-git % git add 2-1.txt 2-2.txt yukiyama@yukiyama hello-git % git commit -m "add 2-1.txt 2-2.txt" [master d3f6a97] add 2-1.txt 2-2.txt 2 files changed, 2 insertions(+) create mode 100644 2-1.txt create mode 100644 2-2.txt yukiyama@yukiyama hello-git % vim 3.txt yukiyama@yukiyama hello-git % git add 3.txt yukiyama@yukiyama hello-git % git commit -m "add 3.txt" [master 23a6441] add 3.txt 1 file changed, 1 insertion(+) create mode 100644 3.txt yukiyama@yukiyama hello-git % vim 4.txt yukiyama@yukiyama hello-git % git add 4.txt yukiyama@yukiyama hello-git % git status On branch master Changes to be committed: (use "git restore --staged <file>..." to unstage) new file: 4.txt yukiyama@yukiyama hello-git %
可以看到暂存区中有五个文件,提交历史有三次,当前 HEAD 指向的是提交了 3.txt 的版本。
1
2
3
4
5
6
7
8
9
10
11
yukiyama@yukiyama hello-git % git ls-files 1.txt 2-1.txt 2-2.txt 3.txt 4.txt yukiyama@yukiyama hello-git % git reflog 23a6441 (HEAD -> master) HEAD@{0}: commit: add 3.txt d3f6a97 HEAD@{1}: commit: add 2-1.txt 2-2.txt fc746eb HEAD@{2}: commit (initial): add 1.txt yukiyama@yukiyama hello-git %
接着执行混合切换 (--mixed) 到第二个版本,即提交了 2-1.txt 和 2-2.txt 的版本 (d3f6a97) ,由于未指定文件,因此实现的效果是 HEAD 指向 d3f6a97 ,且暂存区也恢复到 d3f6a97 的状态。查看提交历史,HEAD 确实为 d3f6a97,且 message 提示了是通过 reset 切换而来的。通过 git ls-files 看到此时暂存区里的文件也确实是第二个版本对应的三个文件 1.txt, 2-1.txt, 2-2.txt ,即相当于把指定版本之后才放到暂存区的文件都移出了暂存区,导致这些文件出现在 git status 的提示中,即他们此时是 「Untracked files」(在指定版本之后才创建的)。
1
2
3
4
5
6
7
8
9
10
11
12
13
14
15
16
17
18
19
yukiyama@yukiyama hello-git % git reset --mixed d3f6a97 yukiyama@yukiyama hello-git % git reflog d3f6a97 (HEAD -> master) HEAD@{0}: reset: moving to d3f6a97 23a6441 HEAD@{1}: commit: add 3.txt d3f6a97 (HEAD -> master) HEAD@{2}: commit: add 2-1.txt 2-2.txt fc746eb HEAD@{3}: commit (initial): add 1.txt yukiyama@yukiyama hello-git % git status On branch master Untracked files: (use "git add <file>..." to include in what will be committed) 3.txt 4.txt nothing added to commit but untracked files present (use "git add" to track) yukiyama@yukiyama hello-git % git ls-files 1.txt 2-1.txt 2-2.txt yukiyama@yukiyama hello-git %
接着再测试指定文件的效果,如下,由于 --mixed 是默认的参数,可以省略。执行 git reset fc746eb 2-1.txt 将指定文件 2-1.txt 对应的暂存区内容切换回 fc746eb 版本 (提交了 1.txt 的第一个版本) ,即只将此文件对应暂存区的内容移除对应到指定的版本状态 (对这个例子来说,即移除,因为 1.txt 提交的时候尚未创建 2-1.txt),其他文件在暂存区的内容保留。
首先通过 git reflog 可以看到 HEAD 不变。
1
2
3
4
5
6
7
yukiyama@yukiyama hello-git % git reset fc746eb 2-1.txt yukiyama@yukiyama hello-git % git reflog d3f6a97 (HEAD -> master) HEAD@{0}: reset: moving to d3f6a97 23a6441 HEAD@{1}: commit: add 3.txt d3f6a97 (HEAD -> master) HEAD@{2}: commit: add 2-1.txt 2-2.txt fc746eb HEAD@{3}: commit (initial): add 1.txt yukiyama@yukiyama hello-git %
接着,通过 git ls-files 看到当前暂存区已无 2-1.txt ,但却有 2-2.txt ,说明只是移除了指定的文件对应的暂存区内容。另外执行 git status 可以看到移出的 2-1.txt 以及在前一次不带文件名的混合切换后移出的 3.txt 和 4.txt 都变为了 「Untracked files」。
1
2
3
4
5
6
7
8
9
10
11
12
13
14
15
16
yukiyama@yukiyama hello-git % git status On branch master Changes to be committed: (use "git restore --staged <file>..." to unstage) deleted: 2-1.txt Untracked files: (use "git add <file>..." to include in what will be committed) 2-1.txt 3.txt 4.txt yukiyama@yukiyama hello-git % git ls-files 1.txt 2-2.txt yukiyama@yukiyama hello-git %
git reset --hard
git reset --hard <commit id> 命令将 HEAD, index 和 working tree 都切换到指定版本号的状态
接着之前 git reset --mixed 的操作后继续演示,首先执行 git reset 23a6441 恢复到提交了 3.txt 之后的版本状态。
1
2
3
4
5
6
7
8
9
10
11
12
13
14
15
16
17
18
yukiyama@yukiyama hello-git % git reset 23a6441 yukiyama@yukiyama hello-git % git status On branch master Untracked files: (use "git add <file>..." to include in what will be committed) 4.txt nothing added to commit but untracked files present (use "git add" to track) yukiyama@yukiyama hello-git % git ls-files 1.txt 2-1.txt 2-2.txt 3.txt yukiyama@yukiyama hello-git % git log --oneline 23a6441 (HEAD -> master) add 3.txt d3f6a97 add 2-1.txt 2-2.txt fc746eb add 1.txt yukiyama@yukiyama hello-git %
然后执行 git reset --hard fc746eb 硬切换回提交了 1.txt 之后的版本。可以看到如下效果,即 HEAD, index (暂存区) 和工作目录确实都切换到了 fc746eb 的状态。略有不同的是此时还存在新建状态但未 git add 的 4.txt,这是因为执行此次硬切换时 4.txx 是未 git add 的状态,不被 git 所管控。
1
2
3
4
5
6
7
8
9
10
11
12
13
14
15
16
17
18
19
20
21
22
23
24
25
26
27
28
yukiyama@yukiyama hello-git % git reset --hard fc746eb HEAD is now at fc746eb add 1.txt yukiyama@yukiyama hello-git % git log --oneline fc746eb (HEAD -> master) add 1.txt yukiyama@yukiyama hello-git % git reflog fc746eb (HEAD -> master) HEAD@{0}: reset: moving to fc746eb 23a6441 HEAD@{1}: reset: moving to 23a6441 d3f6a97 HEAD@{2}: reset: moving to d3f6a97 23a6441 HEAD@{3}: commit: add 3.txt d3f6a97 HEAD@{4}: commit: add 2-1.txt 2-2.txt fc746eb (HEAD -> master) HEAD@{5}: commit (initial): add 1.txt yukiyama@yukiyama hello-git % git status On branch master Untracked files: (use "git add <file>..." to include in what will be committed) 4.txt nothing added to commit but untracked files present (use "git add" to track) yukiyama@yukiyama hello-git % git ls-files 1.txt yukiyama@yukiyama hello-git % ls -al total 16 drwxr-xr-x@ 5 yukiyama staff 160 Sep 29 16:21 . drwxr-xr-x@ 10 yukiyama staff 320 Sep 29 16:21 .. drwxr-xr-x@ 13 yukiyama staff 416 Sep 29 16:20 .git -rw-r--r-- 1 yukiyama staff 3 Sep 29 15:34 1.txt -rw-r--r-- 1 yukiyama staff 4 Sep 29 15:35 4.txt yukiyama@yukiyama hello-git %
如果这时候我们再次硬切换回提交了 3.txt 的版本 (23a6441),可以看到如下效果,即恢复到了该版本状态,不同的也是 4.txt 仍然存在,原因同前述。
1
2
3
4
5
6
7
8
9
10
11
12
13
14
15
16
17
18
19
20
21
22
23
24
25
26
27
28
29
30
31
32
33
34
35
36
37
yukiyama@yukiyama hello-git % git reset --hard 23a6441 HEAD is now at 23a6441 add 3.txt yukiyama@yukiyama hello-git % ls -al total 40 drwxr-xr-x@ 8 yukiyama staff 256 Sep 29 16:21 . drwxr-xr-x@ 10 yukiyama staff 320 Sep 29 16:21 .. drwxr-xr-x@ 13 yukiyama staff 416 Sep 29 16:21 .git -rw-r--r-- 1 yukiyama staff 3 Sep 29 15:34 1.txt -rw-r--r-- 1 yukiyama staff 2 Sep 29 16:21 2-1.txt -rw-r--r-- 1 yukiyama staff 4 Sep 29 16:21 2-2.txt -rw-r--r-- 1 yukiyama staff 4 Sep 29 16:21 3.txt -rw-r--r-- 1 yukiyama staff 4 Sep 29 15:35 4.txt yukiyama@yukiyama hello-git % git status On branch master Untracked files: (use "git add <file>..." to include in what will be committed) 4.txt nothing added to commit but untracked files present (use "git add" to track) yukiyama@yukiyama hello-git % git ls-files 1.txt 2-1.txt 2-2.txt 3.txt yukiyama@yukiyama hello-git % git log --oneline 23a6441 (HEAD -> master) add 3.txt d3f6a97 add 2-1.txt 2-2.txt fc746eb add 1.txt yukiyama@yukiyama hello-git % git reflog 23a6441 (HEAD -> master) HEAD@{0}: reset: moving to 23a6441 fc746eb HEAD@{1}: reset: moving to fc746eb 23a6441 (HEAD -> master) HEAD@{2}: reset: moving to 23a6441 d3f6a97 HEAD@{3}: reset: moving to d3f6a97 23a6441 (HEAD -> master) HEAD@{4}: commit: add 3.txt d3f6a97 HEAD@{5}: commit: add 2-1.txt 2-2.txt fc746eb HEAD@{6}: commit (initial): add 1.txt yukiyama@yukiyama hello-git %
分支操作
分支本质上是指向提交对象的可变指针。
git branch
新建分支本质上是 git 创建了一个可以移动的指向当前提交对象的新指针。
使用 git branch <分支名> 创建分支。
1
2
3
4
5
6
7
yukiyama@yukiyama hello-git % git branch testing yukiyama@yukiyama hello-git % git branch -a * master remote testing remotes/origin/master yukiyama@yukiyama hello-git %
使用 git branch -d <分支名> 删除分支,执行 git branch 查看本地仓库分支列表, * 表示当前分支。
1
2
3
4
5
6
yukiyama@yukiyama hello-git % git branch -d testing Deleted branch testing (was 070472d). yukiyama@yukiyama hello-git % git branch * master remote yukiyama@yukiyama hello-git %
git switch
使用 git switch <分支名> 切换分支。
1
2
3
4
5
6
7
8
9
10
11
12
13
14
15
16
yukiyama@yukiyama hello-git % git branch testing yukiyama@yukiyama hello-git % git branch * master testing yukiyama@yukiyama hello-git % git switch testing Switched to branch 'testing' yukiyama@yukiyama hello-git % git status On branch testing nothing to commit, working tree clean yukiyama@yukiyama hello-git % git switch -c fix Switched to a new branch 'fix' yukiyama@yukiyama hello-git % git branch * fix master testing yukiyama@yukiyama hello-git %
使用 git switch -c <分支名> 创建并切换分支。
git checkout
使用 git checkout <分支名> 切换分支。
1
2
3
4
5
6
yukiyama@yukiyama hello-git % git checkout testing Switched to branch 'testing' yukiyama@yukiyama hello-git % git status On branch testing nothing to commit, working tree clean yukiyama@yukiyama hello-git %
使用 git checkout -b <分支名> 创建并切换分支。
git merge
git merge <分支名> 将指定分支合并到当前分支中。合并通常有「快进」和
新建并切换到 testing 分支后,在 testing 分支上完成若干次 commit,且 master 无新的 commit,此时切回 master 分支,并执行 git merge 将 testing 合并到当前分支中。
1
2
3
4
5
6
7
8
9
10
yukiyama@yukiyama hello-git % git checkout master Switched to branch 'master' Your branch is ahead of 'origin/master' by 3 commits. (use "git push" to publish your local commits) yukiyama@yukiyama hello-git % git merge testing Updating 44f99a2..b4552ad Fast-forward hello.txt | 2 +- 1 file changed, 1 insertion(+), 1 deletion(-) yukiyama@yukiyama hello-git %
由于 master 是 testing 的直接祖先,master 可顺着 testing 分支的历次 commit 直接到达当前 testing,此情况下的合并无需解决分歧,因此 master 可以「快进」直达 testing,而不会产生新的版本 (快照),回显中的 Fast-forwad 反映了这一特点。
若从分歧点开始 master 和 testing 都各自前进了若干个 commit,则此时合并为「三方合并」。若产生冲突,则有如下提示。
1
2
3
4
5
6
7
8
9
10
11
yukiyama@yukiyama hello-git % git log --oneline --graph --all * 4a3e876 (HEAD -> testing) testing 1 | * b6c50b9 (master) master 1 |/ * b4552ad modified hello.txt 3 ...(略)... yukiyama@yukiyama hello-git % git merge testing Auto-merging hello.txt CONFLICT (content): Merge conflict in hello.txt Automatic merge failed; fix conflicts and then commit the result. yukiyama@yukiyama hello-git %
解决冲突后,执行 git status 可以看到 All conflicts fixed but you are still merging. ,即说明冲突已解决,根据提示再次提交即完成合并。与「快进」合并不同的是,「三方合并」会生成一个新的快照。
1
2
3
4
5
6
7
8
9
10
11
12
13
14
15
16
17
18
19
yukiyama@yukiyama hello-git % git status On branch master Your branch is ahead of 'origin/master' by 7 commits. (use "git push" to publish your local commits) All conflicts fixed but you are still merging. (use "git commit" to conclude merge) yukiyama@yukiyama hello-git % yukiyama@yukiyama hello-git % git commit [master b8da922] Merge branch 'testing' yukiyama@yukiyama hello-git % git log --oneline --graph --all * b8da922 (HEAD -> master) Merge branch 'testing' |\ | * 4a3e876 (testing) testing 1 * | b6c50b9 master 1 |/ * b4552ad modified hello.txt 3 ...(略)...
使用如下命令随时以图形形式查看不同分支的前进和合并过程。
1 git log --oneline --decorate --graph --all
git rebase
两分支从分叉处开始各自有若干提交,合并这两个分支的另一种方式是 git rebase (变基),与 git merge 执行「三方合并」不同的是,git rebase 会在当前分支下重放另一个分支在分叉处后的历次提交,最终得到一个新提交,结果与 git merge 相同,但提交历史更整洁,分支虽并行,但变基之后的提交历史是一条串行的直线。
当前分叉后 master 分支和 testing 分支各有一个提交版本。
1
2
3
4
5
6
7
8
9
yukiyama@yukiyama hello-git % git log --oneline --decorate --graph --all * e2f517c (HEAD -> testing) testing modified 1 | * ae47d2e (master) master modified 1 | * b8da922 Merge branch 'testing' | |\ | |/ |/| * | 4a3e876 testing 1 ...(略)...
切回 master ,执行变基,如下,有冲突,根据提示先解决冲突。
1
2
3
4
5
6
7
8
9
10
11
yukiyama@yukiyama hello-git % git checkout master Switched to branch 'master' yukiyama@yukiyama hello-git % git rebase testing Auto-merging hello.txt CONFLICT (content): Merge conflict in hello.txt error: could not apply b6c50b9... master 1 hint: Resolve all conflicts manually, mark them as resolved with hint: "git add/rm <conflicted_files>", then run "git rebase --continue". hint: You can instead skip this commit: run "git rebase --skip". hint: To abort and get back to the state before "git rebase", run "git rebase --abort". Could not apply b6c50b9... master 1
解决冲突后,对冲突文件执行 git add 后,再次执行变基 git rebase --continue 。
1
2
3
4
5
6
yukiyama@yukiyama hello-git % git rebase --continue Successfully rebased and updated refs/heads/master. yukiyama@yukiyama hello-git % git log --oneline --decorate --graph --all * e2f517c (HEAD -> master, testing) testing modified 1 * 4a3e876 testing 1 ...(略)...
也可以直接执行 git rebase <basebranch> <topicbranch> 将 topicbranch 分叉后的修改在 basebranch 上重放,省去了 git checkout 切换到 basebranch 的操作。
变基的原则 :只对尚未推送的本地修改执行变基,而不对本地仓库外有副本的分支执行变基。
远程操作
本地仓库与远程仓库之间建立关联的方式如下。
方式一(本地到远程):先建立本地仓库,然后将本地仓库推送到远程仓库。
方式二(远程到本地):先建立远程仓库,然后在本地克隆远程仓库。
git remote
实现从本地到远程的方式一,首先要使用 git remote add <仓库别名> <url/ssh> 关联本地仓库与远程 github 仓库。根据通信协议的不同,分为 https 方式和 ssh 方式。
https方式
【1. 关联本地仓库与远程仓库】
执行如下命令完成关联,并检查关联结果。
1
2
3
4
5
6
7
yukiyama@yukiyama git-demo % git remote add origin https://github.com/iyukiyama/git-demo.git yukiyama@yukiyama git-demo % git remote origin yukiyama@yukiyama git-demo % git remote -v origin https://github.com/iyukiyama/git-demo.git (fetch) origin https://github.com/iyukiyama/git-demo.git (push) yukiyama@yukiyama git-demo %
【2. 在 github 上创建远程仓库】
仓库名通常与本地仓库相同,但也可以不同。
【3. 推送】
关联后执行 git push -u origin master 推送本地仓库到远程仓库中。其中 -u 参数是 --set-upstream 的缩略,使得当前本地分支 master 与远程仓库分支 master 关联起来,后续再推送,就只需要执行 git push 即可。
1
2
3
4
5
6
7
yukiyama@yukiyama git-demo % git push -u origin master Username for 'https://github.com': iyukiyama Password for 'https://iyukiyama@github.com': remote: Support for password authentication was removed on August 13, 2021. remote: Please see https://docs.github.com/en/get-started/getting-started-with-git/about-remote-repositories#cloning-with-https-urls for information on currently recommended modes of authentication. fatal: Authentication failed for 'https://github.com/iyukiyama/git-demo.git/' yukiyama@yukiyama git-demo %
注意,根据如上提示,github 从 2021年8月13日起,https 方式的接入校验不再支持使用 普通密码 的方式,目前支持使用 Personal Access Token 来完成认证,即 Password for 'https://...' 处应当填写目标 github 账号的 Personal Access Token (PAT) ,设置方式在 这里 查看。
填入正确的 PAT 后即可成功推送,如下。
1
2
3
4
5
6
7
8
9
10
11
12
13
14
yukiyama@yukiyama git-demo % git push -u origin master Username for 'https://github.com': iyukiyama Password for 'https://iyukiyama@github.com': Enumerating objects: 57, done. Counting objects: 100% (57/57), done. Delta compression using up to 8 threads Compressing objects: 100% (37/37), done. Writing objects: 100% (57/57), 5.02 KiB | 642.00 KiB/s, done. Total 57 (delta 5), reused 0 (delta 0), pack-reused 0 remote: Resolving deltas: 100% (5/5), done. To https://github.com/iyukiyama/git-demo.git * [new branch] master -> master branch 'master' set up to track 'origin/master'. yukiyama@yukiyama git-demo %
注意,如果没有事先在 github 上创建目标关联远程仓库的话,推送将会失败,并显示失败原因是找不到指定的远程仓库。
1
2
3
4
yukiyama@yukiyama git-demo % git push -u origin master remote: Repository not found. fatal: repository 'https://github.com/iyukiyama/git-demo.git/' not found yukiyama@yukiyama git-demo
【4. 查看远程库信息】
执行 git remote show origin 查看远程库信息。
1
2
3
4
5
6
7
8
9
10
11
12
yukiyama@yukiyama hello-git % git remote show origin * remote origin Fetch URL: https://github.com/iyukiyama/hello-git.git Push URL: https://github.com/iyukiyama/hello-git.git HEAD branch: master Remote branch: master tracked Local branch configured for 'git pull': master merges with remote master Local ref configured for 'git push': master pushes to master (up to date) yukiyama@yukiyama hello-git %
ssh方式
https 方式每次推送都需要认证,可以采用 ssh 方式约定本地仓库与远程仓库的公私钥,即可自动认证。
通常情况下客户端环境只需要一对公私钥建立到 github 远程库的 ssh 通信。若希望在同一个客户端下与多个 github 账号下的仓库建立 ssh 通信,则由于 github 不同账号下的公钥必须不同,相应地,在本地创建公私钥对时,也需要创建多对。
如下演示如何创建两对不同的公私钥,并应用到对不同的 github 账号的 ssh 连接中。
【1. ssh-keygen 命令生成公私钥对】
执行 ssh-keygen -t rsa -C "yuki.com" 命令生成公私钥对。-t 选择加密算法, -C 添加备注,习惯上会填写一个邮箱地址,也可以填写其他字符串。
设置
描述
Enter file in which to save the key ()
括号后是默认公私钥路径和名称
Enter passphrase
加密串,即 ssh 通信时的口令,通常不使用,回车即可
1
2
3
4
5
6
7
8
9
10
11
12
13
14
15
16
17
18
19
20
21
22
yukiyama@yukiyama ~ % ssh-keygen -t rsa -C "yuki.com" Generating public/private rsa key pair. Enter file in which to save the key (/Users/yukiyama/.ssh/id_rsa): /Users/yukiyama/.ssh/id_rsa_163 Enter passphrase (empty for no passphrase): Enter same passphrase again: Your identification has been saved in /Users/yukiyama/.ssh/id_rsa_163 Your public key has been saved in /Users/yukiyama/.ssh/id_rsa_163.pub The key fingerprint is: SHA256:rS6a3ou3HauNl0w+1Y5v6oTzbVo7xu/PKaOVIQbMCoI yuki.com The key's randomart image is: +---[RSA 3072]----+ | | | . o | | E . . + | | . . ... | | .S .+ . | | .oo o o | | +=o.+.o | | +o=**.oO+ ..| | .=o**=o=O=+=oo| +----[SHA256]-----+ yukiyama@yukiyama ~ %
接着执行 ssh-keygen -t rsa -C "yama.com" 生成另一对公私钥对,在 ~/.ssh 下可以看到如下两对公私钥对。
1
2
3
4
id_rsa_163 id_rsa_163.pub id_rsa_outlook id_rsa_outlook.pub
【2. 在 .ssh 下创建 config 文件】
创建如下 config 文件。
1
2
3
4
5
6
7
8
9
10
11
# github-163 Host github.com.163 HostName github.com PreferredAuthentications publickey IdentityFile ~/.ssh/id_rsa_163 # github-outlook Host github.com.outlook HostName github.com PreferredAuthentications publickey IdentityFile ~/.ssh/id_rsa_outlook
后面我们会看到,将指定的公私钥对与指定的账户的 github 相关联的关键时 Host ,它是服务器端的别名,在使用 git@<host> 方式执行 ssh 连接时,<host> 填入的即 Host 。
Host 与 IdentityFile 决定了公私钥对与具体账户的对应 (该账户下用公钥与 IdentifyFile 中指定的一样) ,而实际上会连接 Hostname 。
【3. 将公钥添加对应的 github 账户中】
在 github 的 setting > SSH and GPG keys > SSH keys 中点击 New SSH key 添加。
使用 ssh -T git@github.com.outlook 命令测试 ssh 连接,出现如下提示即说明可通过 ssh 方式通信。
1
2
3
yukiyama@yukiyama hello-git % ssh -T git@github.com.outlook Hi iyukiyama! You've successfully authenticated, but GitHub does not provide shell access. yukiyama@yukiyama hello-git %
【4. 关联本地仓库与远程仓库】
使用 git remote add 命令关联本地仓库与远程仓库。若当前存在 https 方式的关联,先执行 git remote rm origin 删除。
1
2
3
4
yukiyama@yukiyama hello-git % git remote add origin git@github.com.outlook:iyukiyama/hello-git.git yukiyama@yukiyama hello-git % git remote -v origin git@github.com.outlook:iyukiyama/hello-git.git (fetch) origin git@github.com.outlook:iyukiyama/hello-git.git (push)
【5. 推送】
与 https 方式一样,推送前也要提前在 github 中创建好目标远程仓库,否则会报如下错 ERROR: Repository not found. 。
1
2
3
yukiyama@yukiyama hello-git % git push -u origin master ERROR: Repository not found. fatal: Could not read from remote repository.
创建后再次推送成功,远程库中也出现了本地库推送的文件。
1
2
3
4
5
6
7
8
9
10
11
12
yukiyama@yukiyama hello-git % git push -u origin master Enumerating objects: 57, done. Counting objects: 100% (57/57), done. Delta compression using up to 8 threads Compressing objects: 100% (32/32), done. Writing objects: 100% (57/57), 5.02 KiB | 5.02 MiB/s, done. Total 57 (delta 5), reused 57 (delta 5), pack-reused 0 remote: Resolving deltas: 100% (5/5), done. To github.com.outlook:iyukiyama/hello-git.git * [new branch] master -> master branch 'master' set up to track 'origin/master'. yukiyama@yukiyama hello-git %
【6. 查看远程库信息】
执行 git remote show origin 查看远程库信息。
1
2
3
4
5
6
7
8
9
10
11
12
yukiyama@yukiyama hello-git % git remote show origin * remote origin Fetch URL: git@github.com.outlook:iyukiyama/hello-git.git Push URL: git@github.com.outlook:iyukiyama/hello-git.git HEAD branch: master Remote branch: master tracked Local branch configured for 'git pull': master merges with remote master Local ref configured for 'git push': master pushes to master (up to date) yukiyama@yukiyama hello-git %
rename
可以通过 git remote rename <当前别名> <新别名> 来修改远程仓库地址别名。下面是一些修改后的操作,可以看到远程仓库地址别名已经变为 main ,原先的 origin 已不可用,且远程仓库分支也相应变为 main/master 。
1
2
3
4
5
6
7
8
9
10
11
12
13
14
15
16
17
18
19
20
21
22
23
24
25
26
27
28
29
30
31
32
33
34
35
36
37
38
39
40
41
42
43
44
45
yukiyama@yukiyama hello-git % git remote rename origin main Renaming remote references: 100% (1/1), done. yukiyama@yukiyama hello-git % git remote main yukiyama@yukiyama hello-git % git remote -v main git@github.com.outlook:iyukiyama/hello-git.git (fetch) main git@github.com.outlook:iyukiyama/hello-git.git (push) yukiyama@yukiyama hello-git % git branch -r main/master yukiyama@yukiyama hello-git % git branch -a * master remote remotes/main/master yukiyama@yukiyama hello-git % git push Everything up-to-date yukiyama@yukiyama hello-git % git push main master Everything up-to-date yukiyama@yukiyama hello-git % git remote show origin fatal: 'origin' does not appear to be a git repository fatal: Could not read from remote repository. Please make sure you have the correct access rights and the repository exists. yukiyama@yukiyama hello-git % git remote show main * remote main Fetch URL: git@github.com.outlook:iyukiyama/hello-git.git Push URL: git@github.com.outlook:iyukiyama/hello-git.git HEAD branch: master Remote branch: master tracked Local branch configured for 'git pull': master merges with remote master Local ref configured for 'git push': master pushes to master (up to date) yukiyama@yukiyama hello-git % git reflog main/master be33e38 (HEAD -> master, main/master) refs/remotes/main/master@{0}: remote: renamed refs/remotes/origin/master to refs/remotes/main/master be33e38 (HEAD -> master, main/master) refs/remotes/main/master@{1}: update by push ad50bf4 refs/remotes/main/master@{2}: fetch: fast-forward edf13a1 refs/remotes/main/master@{3}: fetch: fast-forward b0c4efa (remote) refs/remotes/main/master@{4}: update by push de2bb32 refs/remotes/main/master@{5}: fetch: fast-forward a343286 refs/remotes/main/master@{6}: update by push eeeea6f refs/remotes/main/master@{7}: pull: fast-forward 2464feb refs/remotes/main/master@{8}: update by push yukiyama@yukiyama hello-git %
remove
使用 git remote remove <远程仓库地址别名> 来解除本地仓库与远程仓库的关联。remove 也可以简写为 rm 。
1
2
3
4
5
6
7
8
yukiyama@yukiyama hello-git % git remote remove main yukiyama@yukiyama hello-git % git remote yukiyama@yukiyama hello-git % git branch -r yukiyama@yukiyama hello-git % git reflog main/master fatal: ambiguous argument 'main/master': unknown revision or path not in the working tree. Use '--' to separate paths from revisions, like this: 'git <command> [<revision>...] -- [<file>...]' yukiyama@yukiyama hello-git %
git clone
使用 git clone 命令将远程仓库克隆到当前本地目录下。可以看到该命令将远程仓库拉取到当前路径下 (即相当于下载了 hello-git) ,并且完成了 git init 管理已经下载到本地的 hello-git (有 .git 隐藏文件夹),也完成了 git remote add 关联,并且远程仓库地址也已简写也已自动设置为 origin 。
1
2
3
4
5
6
7
8
9
10
11
12
13
14
15
16
17
18
19
20
yukiyama@yukiyama git % git clone https://github.com/iyukiyama/hello-git.git Cloning into 'hello-git'... remote: Enumerating objects: 57, done. remote: Counting objects: 100% (57/57), done. remote: Compressing objects: 100% (32/32), done. remote: Total 57 (delta 5), reused 57 (delta 5), pack-reused 0 Receiving objects: 100% (57/57), 5.02 KiB | 733.00 KiB/s, done. Resolving deltas: 100% (5/5), done. yukiyama@yukiyama git % cd hello-git yukiyama@yukiyama hello-git % ls -la total 24 drwxr-xr-x@ 5 yukiyama staff 160 Sep 27 05:53 . drwxr-xr-x@ 10 yukiyama staff 320 Sep 27 05:53 .. -rw-r--r-- 1 yukiyama staff 6148 Sep 27 05:53 .DS_Store drwxr-xr-x@ 12 yukiyama staff 384 Sep 27 05:53 .git -rw-r--r-- 1 yukiyama staff 31 Sep 27 05:53 hello.txt yukiyama@yukiyama hello-git % git remote -v origin https://github.com/iyukiyama/hello-git.git (fetch) origin https://github.com/iyukiyama/hello-git.git (push) yukiyama@yukiyama hello-git %
git push
执行 git push <远程仓库地址> <本地分支名>:<远程分支名> 推送当前仓库到远程库。
远程仓库地址在 git remote add 命令中已经设置了 origin 别名,因此可以填入 origin 。
当「本地分支名」与「远程分支名」相同时,本例中为 master ,可以写为 git push origin master 。
在第一次推送时,我们使用了 -u 参数指定了本地分支到指定远程分支的通道 (master -> master) 。因此可以直接执行 git push ,效果等同如下。
1 git push git@github.com.outlook:iyukiyama/hello-git.git master:master
如果本地仓库当前分支比远程分支要落后,例如远程分支上的文件有更新,本地在尚未拉取合并该更新的情况下尝试推送本地的新提交,则会出现失败,如下。可以使用 git pull 先行拉取合并,或者执行 git merger <远程仓库地址>/<远程分支> 来将「本地的远程分支」合并到本地当前分支。
1
2
3
4
5
6
7
8
To github.com.outlook:iyukiyama/hello-git.git ! [rejected] master -> master (non-fast-forward) error: failed to push some refs to 'github.com.outlook:iyukiyama/hello-git.git' hint: Updates were rejected because the tip of your current branch is behind hint: its remote counterpart. Integrate the remote changes (e.g. hint: 'git pull ...') before pushing again. hint: See the 'Note about fast-forwards' in 'git push --help' for details. yukiyama@yukiyama hello-git %
如果本地和远程分支是同一个版本,即无更新,则推送后显示 Everything up-to-date 。
1
2
yukiyama@yukiyama hello-git % git push Everything up-to-date
若有更新,且正常推送,则显示如下。
1
2
3
4
5
6
7
8
9
10
yukiyama@yukiyama hello-git % git push Enumerating objects: 5, done. Counting objects: 100% (5/5), done. Delta compression using up to 8 threads Compressing objects: 100% (3/3), done. Writing objects: 100% (3/3), 312 bytes | 312.00 KiB/s, done. Total 3 (delta 0), reused 0 (delta 0), pack-reused 0 To github.com.outlook:iyukiyama/hello-git.git eeeea6f..a343286 master -> master yukiyama@yukiyama hello-git %
git fetch
将远程库当前版本拉取到本地,但不合并 (git merge) 。若本地分支与远程分支版本相同,则无回显,若不同,则如下。
1
2
3
4
5
6
7
8
9
yukiyama@yukiyama hello-git % git fetch remote: Enumerating objects: 5, done. remote: Counting objects: 100% (5/5), done. remote: Compressing objects: 100% (3/3), done. remote: Total 3 (delta 1), reused 0 (delta 0), pack-reused 0 Unpacking objects: 100% (3/3), 683 bytes | 170.00 KiB/s, done. From github.com.outlook:iyukiyama/hello-git edf13a1..ad50bf4 master -> origin/master yukiyama@yukiyama hello-git %
可通过 git log origin/master 或 git reflog origin/master 查看本地的远程分支提交历史来确认确实拉取了远程分支当前版本。
1
2
3
4
5
6
7
8
9
yukiyama@yukiyama hello-git % git reflog origin/master ad50bf4 (origin/master) refs/remotes/origin/master@{0}: fetch: fast-forward edf13a1 (HEAD -> master) refs/remotes/origin/master@{1}: fetch: fast-forward b0c4efa (remote) refs/remotes/origin/master@{2}: update by push de2bb32 refs/remotes/origin/master@{3}: fetch: fast-forward a343286 refs/remotes/origin/master@{4}: update by push eeeea6f refs/remotes/origin/master@{5}: pull: fast-forward 2464feb refs/remotes/origin/master@{6}: update by push yukiyama@yukiyama hello-git %
可通过 git branch -a 查看本地和远程分支,或者通过 git branch -r 查看远程分支。
git merge
git fetch 之后要通过 git merge 将远程分支合并到本地分支,相当于 git merge origin/master 。从回显中还能看到这是一次「快进」 (Fast-forward) 合并。
1
2
3
4
5
6
yukiyama@yukiyama hello-git % git merge Updating b0c4efa..edf13a1 Fast-forward hello.txt | 1 + 1 file changed, 1 insertion(+) yukiyama@yukiyama hello-git %
git pull
将远程库当前版本拉取到本地并合并 (git merge) 。格式如下。
1 git pull <远程仓库别名> <远程分支名>:<本地分支名>
若远程分支名与本地分支名相同,可简写如下。
若已经配置过 upstream ,可简写如下。
若版本相同,则显示 Already up to date. 。
1
2
3
yukiyama@yukiyama hello-git % git pull Already up to date. yukiyama@yukiyama hello-git %
若有冲突,则显示如下。此时需要先解决冲突,接着 git add, git commit ,然后再 git pull 。
1
2
3
4
5
6
yukiyama@yukiyama hello-git % git pull error: Pulling is not possible because you have unmerged files. hint: Fix them up in the work tree, and then use 'git add/rm <file>' hint: as appropriate to mark resolution and make a commit. fatal: Exiting because of an unresolved conflict. yukiyama@yukiyama hello-git %
若拉取后可正常合并,则显示如下。
1
2
3
4
5
6
7
8
9
10
11
12
13
yukiyama@yukiyama hello-git % git pull remote: Enumerating objects: 5, done. remote: Counting objects: 100% (5/5), done. remote: Compressing objects: 100% (2/2), done. remote: Total 3 (delta 0), reused 0 (delta 0), pack-reused 0 Unpacking objects: 100% (3/3), 686 bytes | 171.00 KiB/s, done. From github.com.outlook:iyukiyama/hello-git 2464feb..eeeea6f master -> origin/master Updating 2464feb..eeeea6f Fast-forward hello.txt | 1 + 1 file changed, 1 insertion(+) yukiyama@yukiyama hello-git %
使用 git fetch 是更好的实践 (参考 ) 。
IDEA Git
在 idea 上使用 git。
集成Git
添加Git
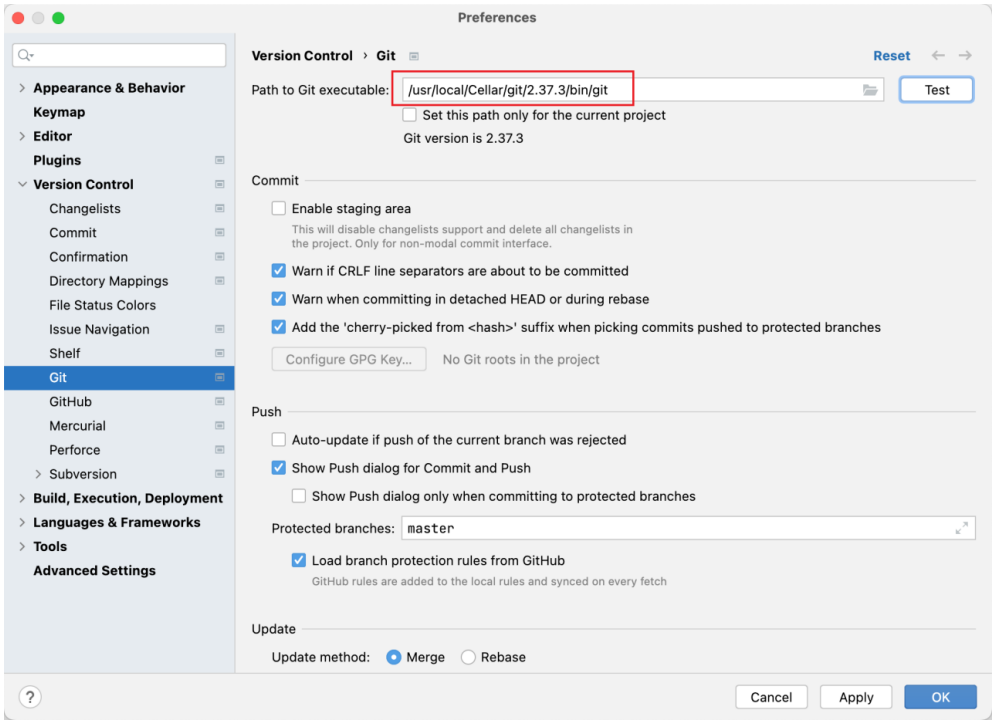
在 IntellJ IDEA > Preferences > Version Control > Git 中设置 git 执行文件路径 Path to Git executable 。例如 /usr/local/Cellar/git/2.37.3.bin/git 。
git init
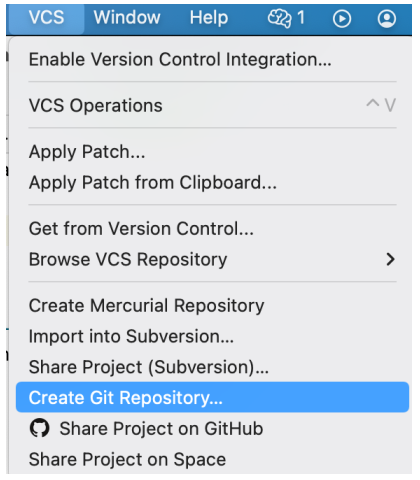
点击 VCS > Create Git Repository ,选择项目根目录,即可将项目根目录作为本地 git 仓库 (即 idea 在该目录下创建了 .git 文件夹)。
.gitignore
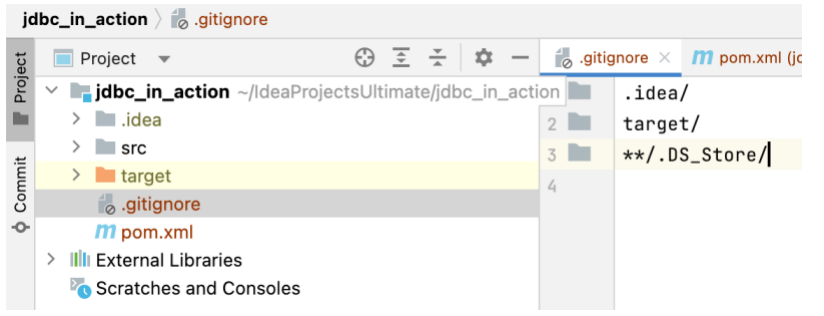
在项目根目录下创建 .gitignore 文件,设置忽略文件和忽略文件夹。
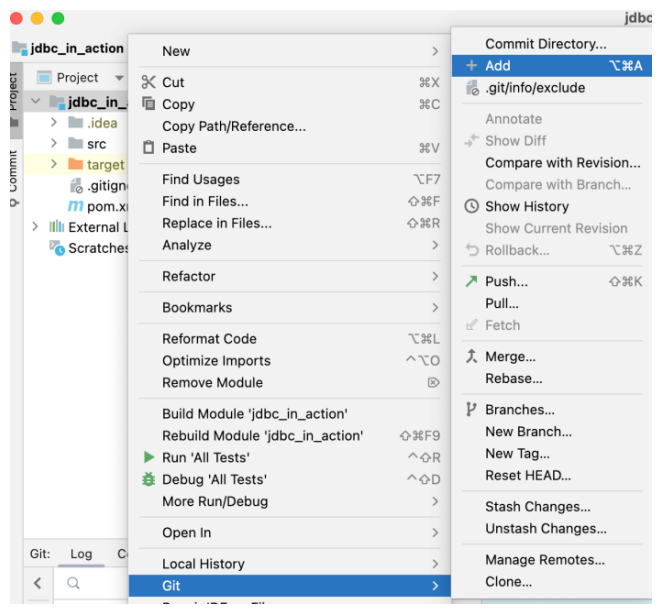
可以手动编辑该文件,也可以选中希望忽略的文件或文件夹,右键选择 Git > Add to .gitignore > .gitignore ,则选中的文件或文件夹会自动配置到 .gitignore 文件中。
git add
选中希望加入到暂存区的文件或文件夹 (如项目根文件夹),右键 Git > Add ,即可将已追踪的已修改状态的文件加入到暂存区中。
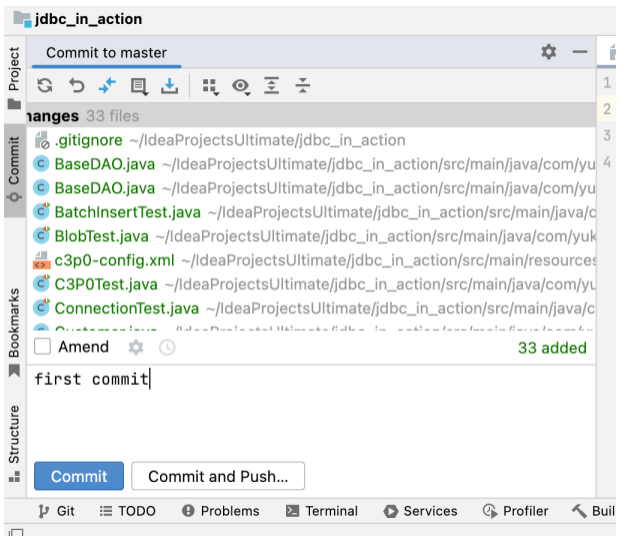
git commit
选中要提交的文件或文件夹 (如项目根文件夹),右键 Git > Commit Directory ,即可提交暂存区中对应的文件 (见上一张图,Add 的上一条菜单即为 Commit Directory) 。
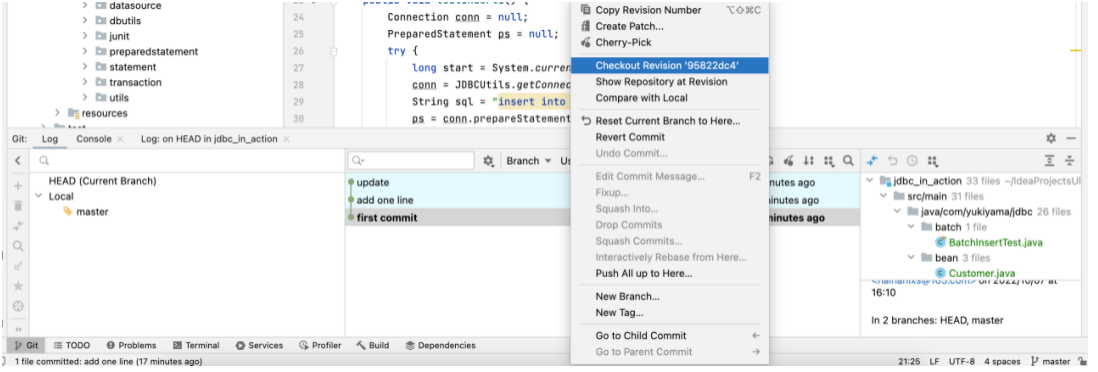
git reset --soft
左下角 Git 栏目中的 Log 页签下,选择需要切换的版本,右键 Checkout Revision <commit id> 即可移动 HEAD 指针到该提交版本,等同于命令行 git reset --soft 。
git branch
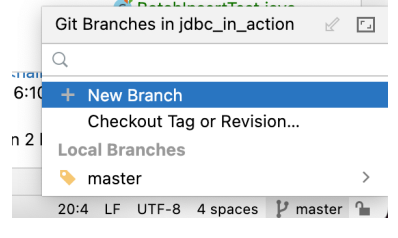
右键 Git > Branches 或者点击页面右下角当前分支栏目,例如 master ,可以看到一些分支操作的选项。
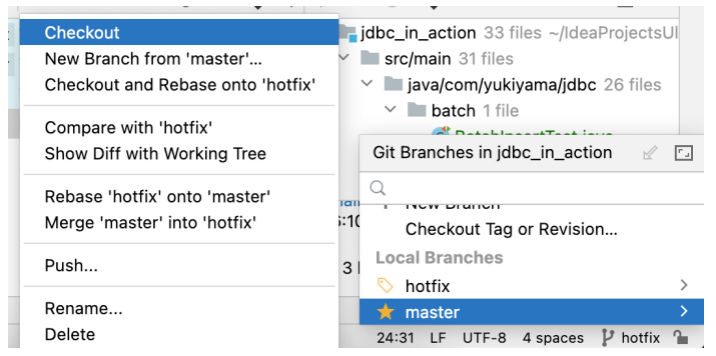
git switch
通过 New Branch 创建新分支后,上述弹窗界面会多出该分支的菜单选项。例如创建一个 hotfix 分支,进行若改修并提交后,选择 master > checkout 切回 master 分支。
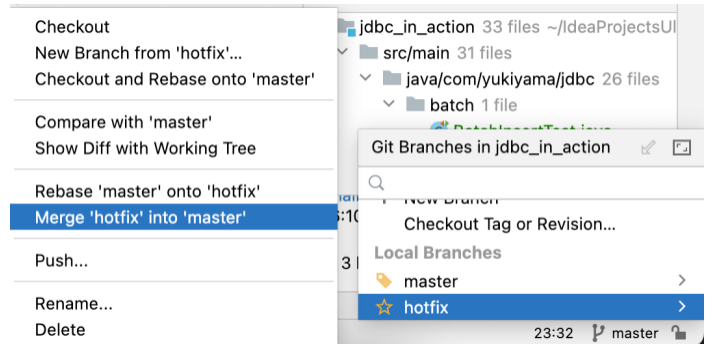
git merge
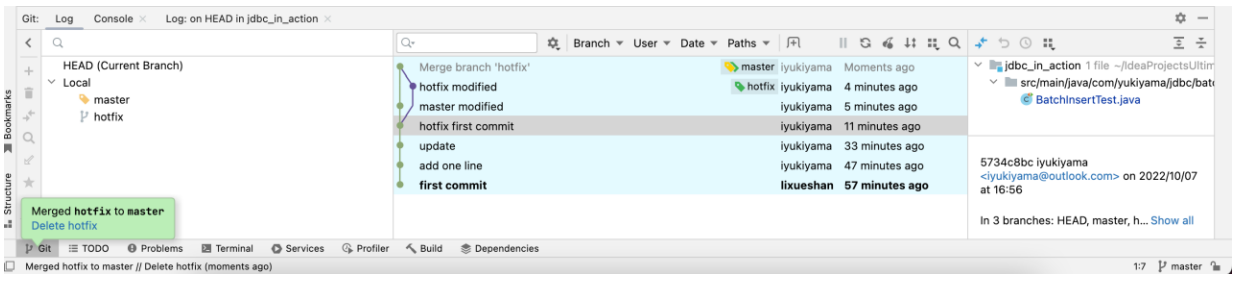
再次打开 Branches 界面,选择 hotfix > Merge “hotfix” into “master” 完成合并。
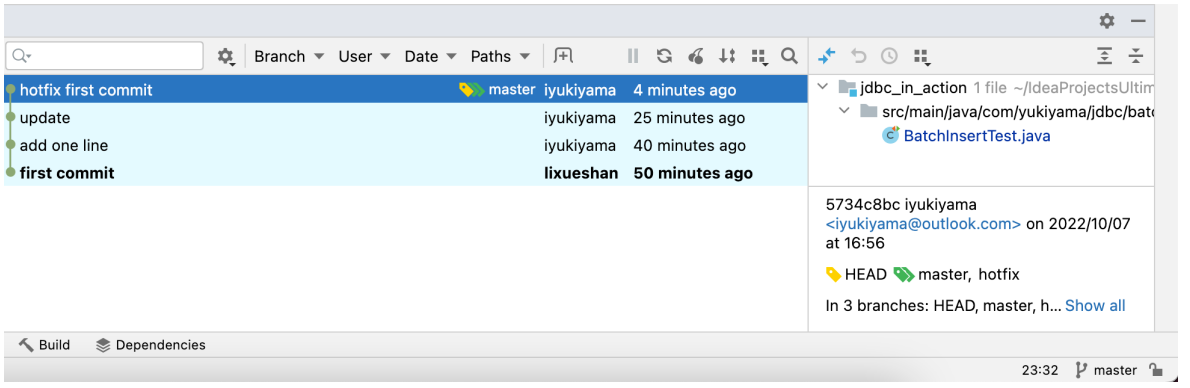
可以看到完成合并后 HEAD, master, hotfix 指针都指向当前最新版本。
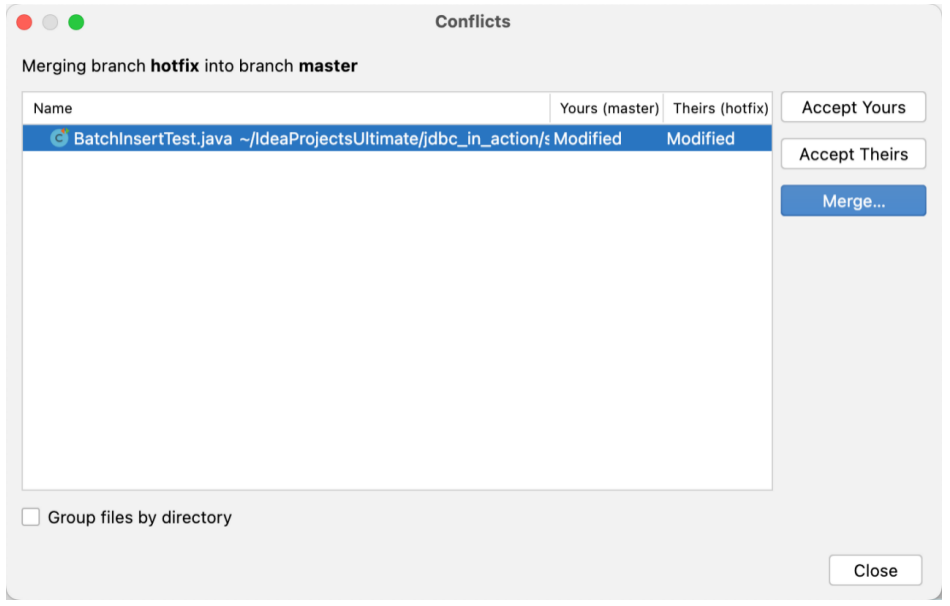
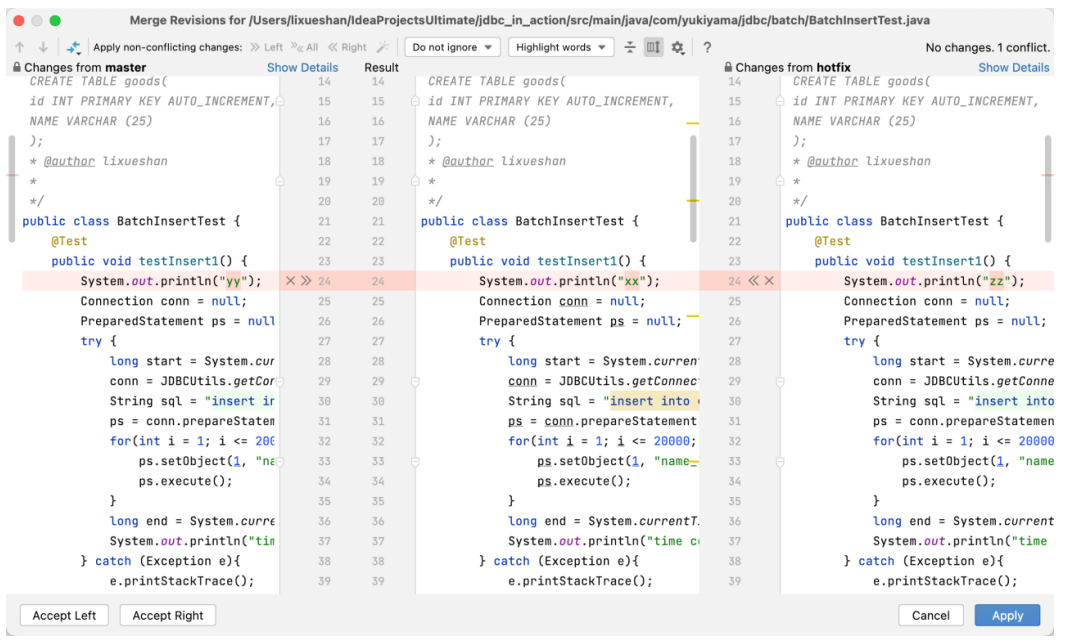
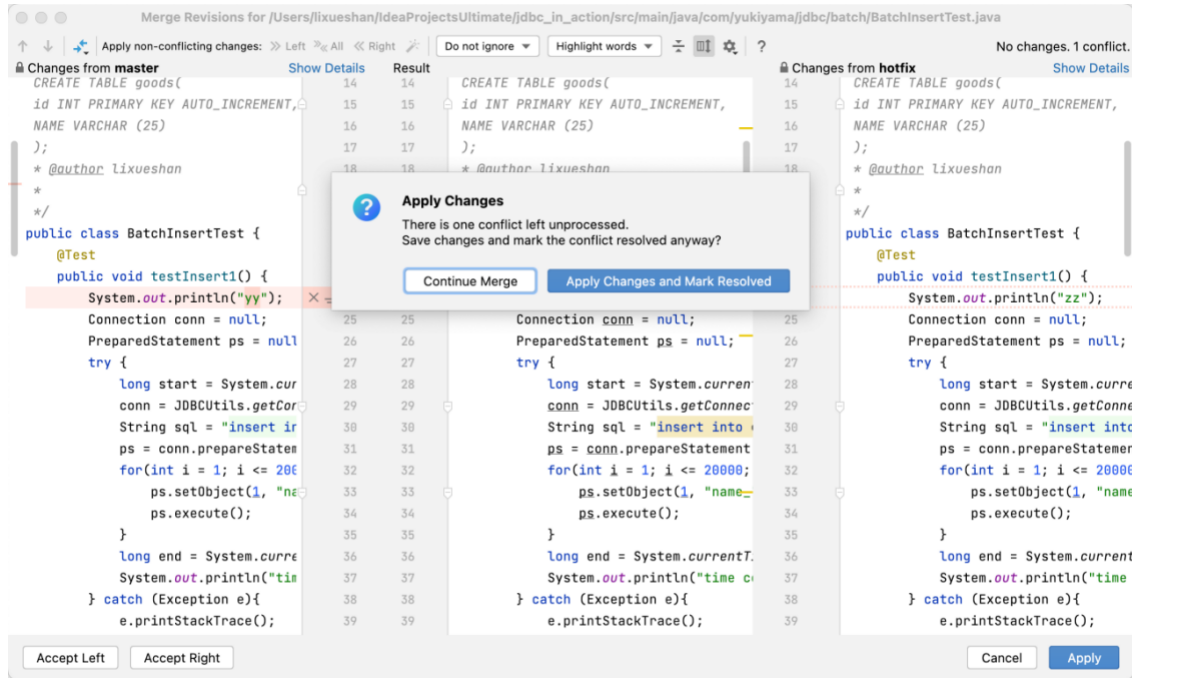
若出现冲突,则弹出「Conflicts」界面,点击「Merge…」解决冲突。
在如下冲突解决界面中解决冲突。
解决冲突后。
集成Github
添加github账号
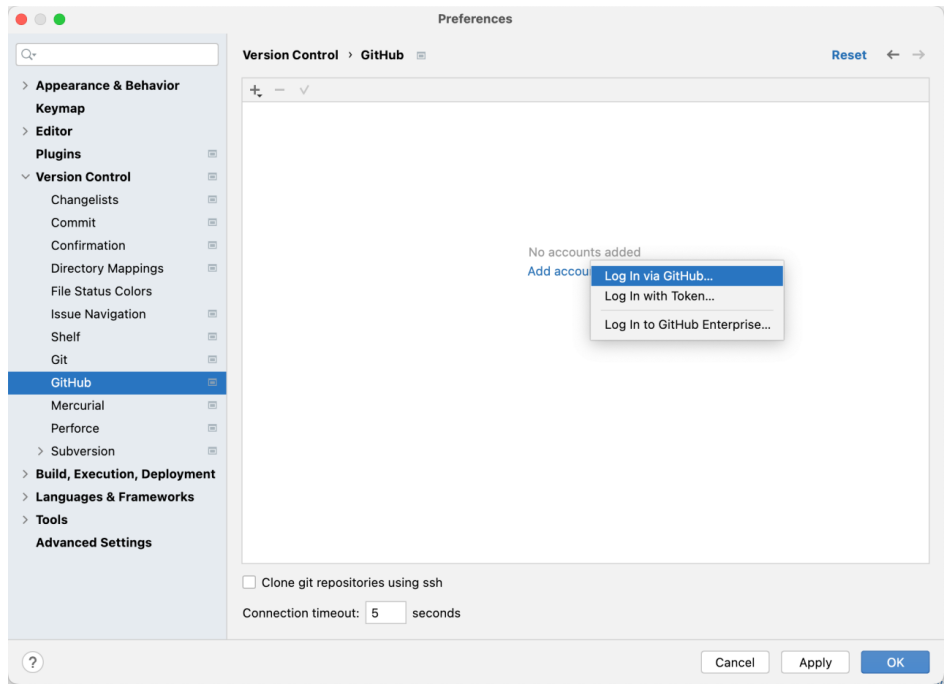
在 IntellJ IDEA > Preferences > Version Control > Github 中添加 Github 账号。「Log in via GitHub… 」方式是通过账号密码方式登陆,「Log in with Token…」 是通过 Token 方式登陆。
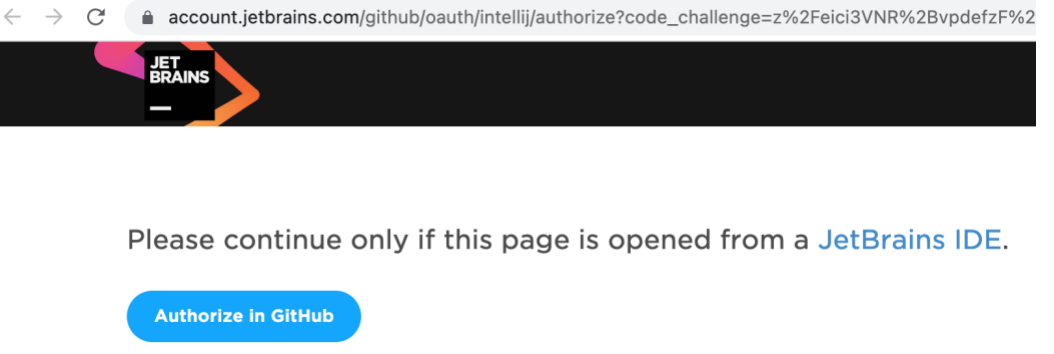
若选择通过账号密码方式登陆,则弹出认证界面,点击「Authorize in GitHub」 在 GitHub 关联第三方的界面中完成认证即可。
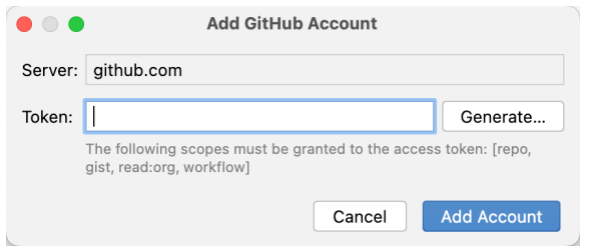
若选择 Token 方式,则需要填写已经在 Github 账户中生成过的 Token 。
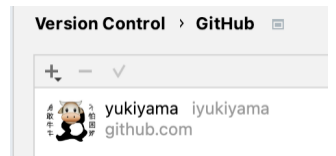
完成登陆后。
首次推送
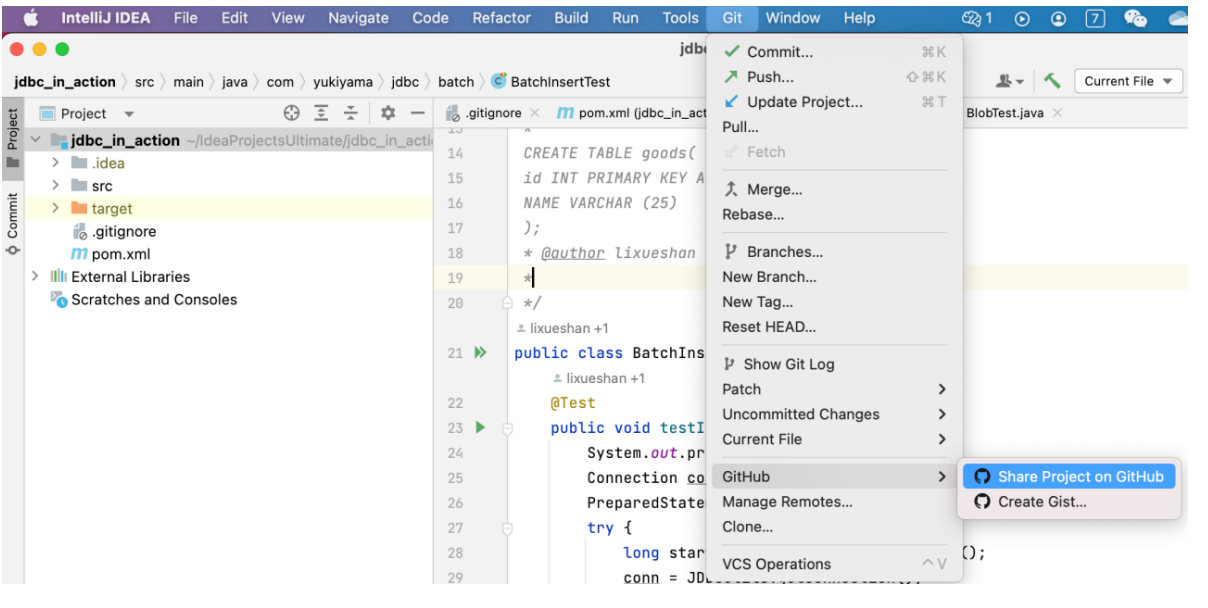
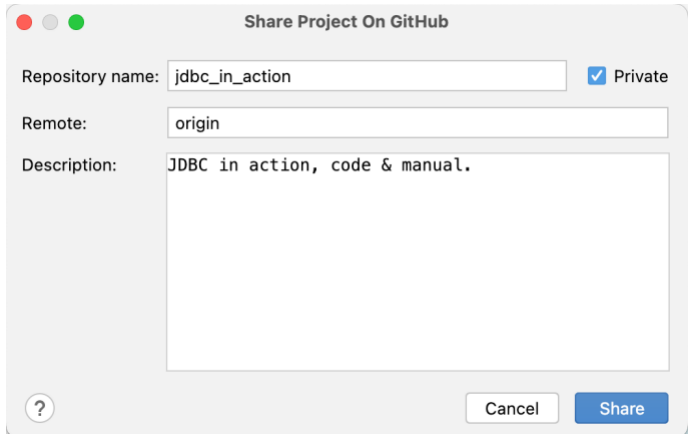
在登陆 Github 的状态下,一级菜单栏中的 VCS 变为了 Git ,点击 Git > Github > Share Project on GitHub 将所选项目关联并推送到远程 Github 仓库。
设置仓库名称,远程仓库别名,仓库描述,以及选择是否设置为私有仓库 (Private) 后,点击「Share」完成推送。
需要注意的是,使用命令行完成本地仓库和远程仓库的关联操作时,必须先在 Github 个人页面中创建好远程仓库,否则推送失败。但是在 idea 中首次推送时,远程仓库可不必提前创建,若无远程仓库,则 idea 会帮我们创建和关联远程仓库,并完成首次推送。
git push
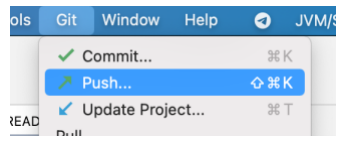
通过 Git > Push 菜单推送当前版本到远程仓库。
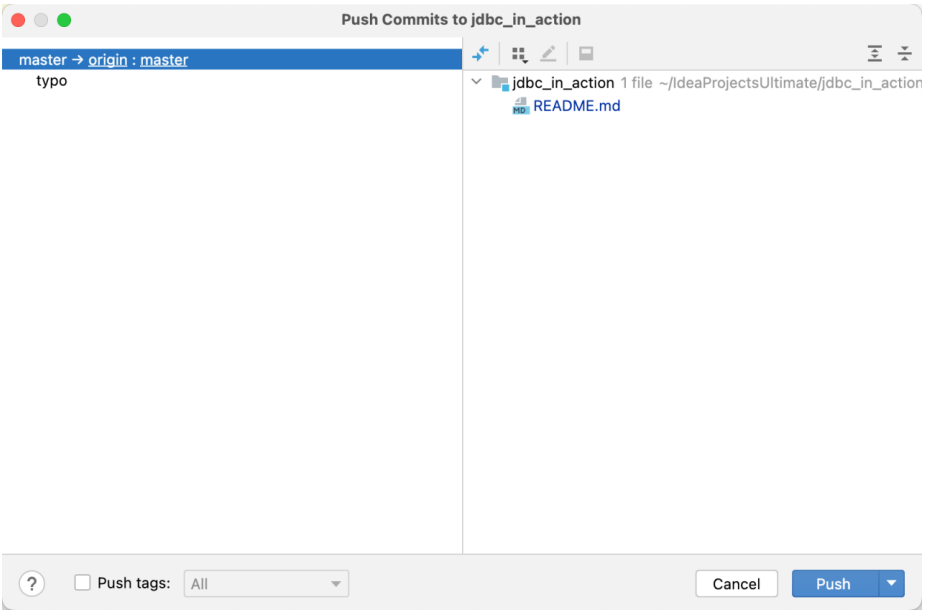
在 「Push Commits to xxx」 界面中确认推送的本地分支和远程分支以及推送内容,点击「Push」完成推送。
git fetch
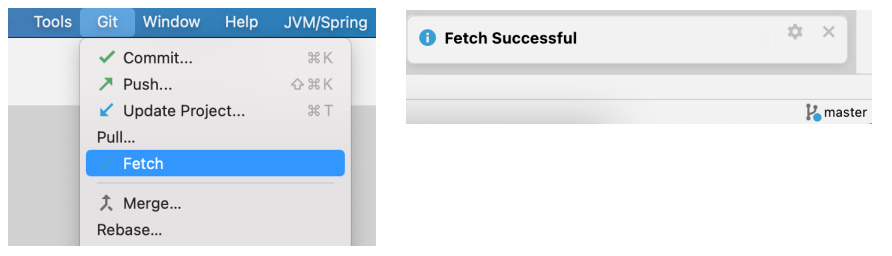
通过 Git > Push 菜单抓取 (fetch) 远程仓库到本地 (但不合并)。
git merge
Fetch 之后通过 Git > Merge 菜单完成合并。
git pull
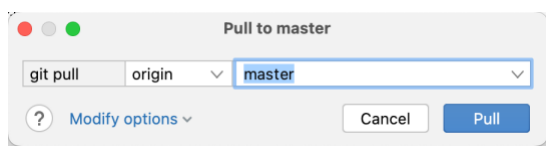
通过 Git > Pull 菜单拉取 (pull) 远程仓库到本地 (并完成合并) 。
若有冲突,则需像之前介绍的那样,先解决冲突。
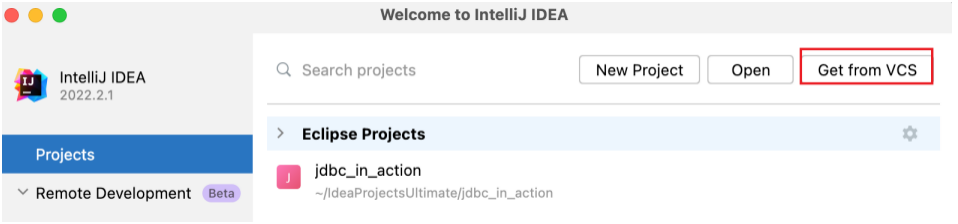
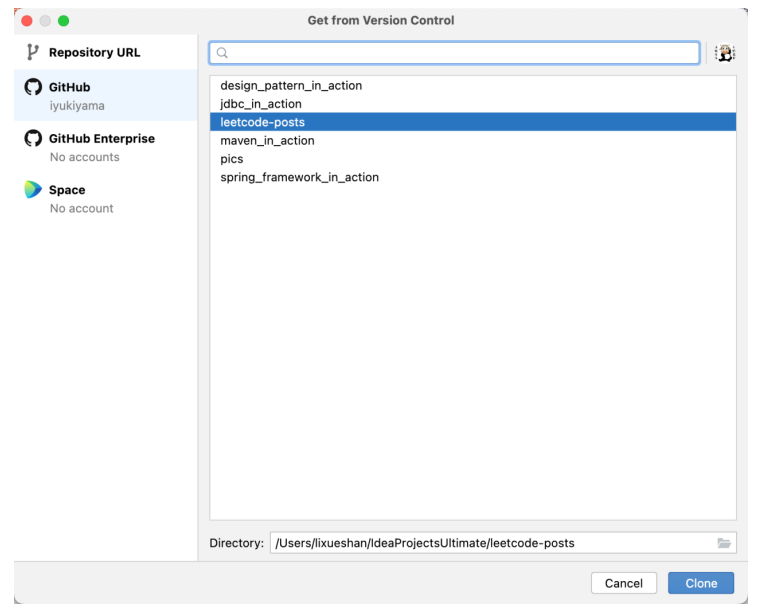
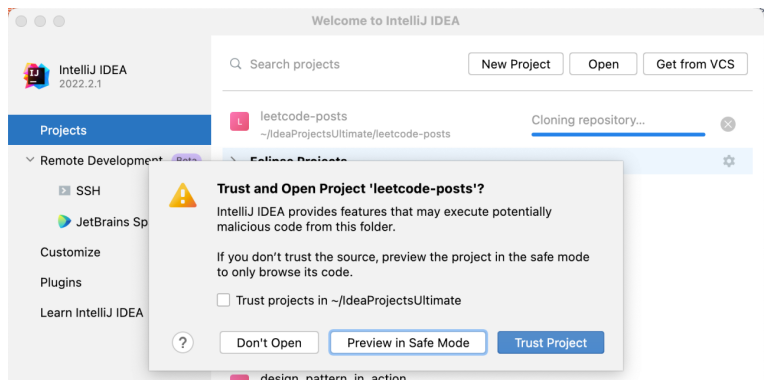
git clone
通过 File > New > Project from Version Control… 或者在打开 idea 时选择 「Get from VCS」 来克隆远程仓库到本地。