JavaWeb学习实战_yukiyama
学习自: 尚硅谷丨2022版JavaWeb教程(全新技术栈,全程实战) , 配套文档 。
本文是基于上述视频教程和视频配套文档的文字总结,本文所有代码及其他实验演示素材均存放于 javaweb_in_action 仓库中。
建议先克隆该仓库到本地,一边阅读本文,一边对照每一个工程代码进行学习。
JavaWeb 一般指使用 Java 开发 Web 服务的 技术栈 。
所谓「Web 服务」即泛指客户端以 HTTP/HTTPS 协议与服务端通信以获得服务端提供的服务。服务的形式是多样的,例如搜索信息服务 (百度)、资料存储服务 (网盘)、网购服务 (淘宝) 、影音娱乐资源 (音乐视频网站) 等等。无论具体的服务形式为何,交互的方式都是类似的,即通常由浏览器 (客户端) 发起请求,由服务提供商的服务器 (服务端) 处理请求,或返回相应的数据、资源,或处理计算,或存储数据等等,这种交互形式通常称为 Browser/Server (BS) 架构。
当采用 Java 来实现 Web 服务时,所涉及的技术即可统称为 JavaWeb 技术,包括但不限于 Web 服务器 (如 Tomcat) 、Servlet 、JSP 、HTTP协议 、框架 (如 SpringMVC) 等等。
以在浏览器上输入 http://www.baidu.com 访问百度为例,概述最简单的 Web 服务场景:
从客户端浏览器发出的请求,通过 URL ,找到提供百度首页的服务器 (略过包封装、ARP、路由、DNS等底层过程)。该服务器针对请求,返回百度首页资源 (页面) 给浏览器,浏览器解析后呈现首页搜索框等元素。
本文后续内容,我们将以 Servlet 技术为重点,讲解 JavaWeb 相关技术,展示包括客户端浏览器发起请求,服务器响应请求,服务器与数据库交互等过程及其代码实现。
Tomcat
Tomcat 是 Apache 开源基金会维护的项目,该项目提供支持 jsp 和 Servlet 的轻量级的 Web 服务器 (即 Tomcat Server)。Tomcat Server 是当前最流行的 Web 服务器之一。
安装
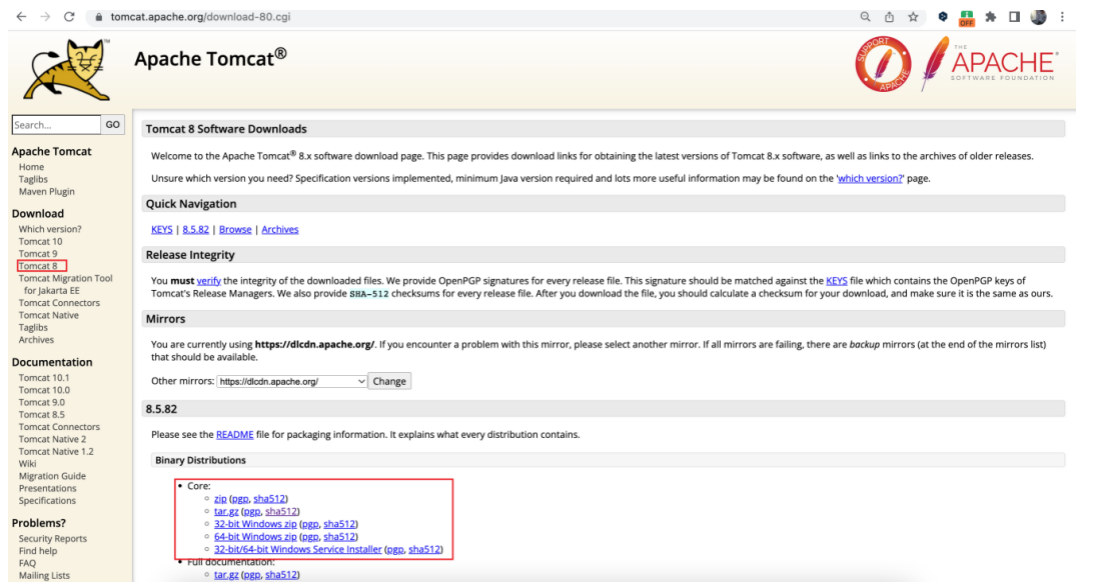
通过 tomcat官网 首页左侧导航栏找到需要的 Tomcat 版本,下载解压即可。如下一般选择 zip 或 tar.gz 下载到本地解压即完成安装 (绿色安装)。
解压后根目录 (如 apache-tomcat-8.5.82) 下的主要子目录及其存放内容如下。
子目录
存放内容
bin
存放 Tomcat 的可执行程序
conf
存放 Tomcat 的配置文件
lib
存放 Tomcat 用到的 jar 包
logs
存放 Tomcat 运行时的日志
temp
存放 Tomcat 运行时产生的临时数据
webapps
存放部署到 Tomcat 的 Web 工程
work
Tomcat 工作时的目录
bin 目录下的 startup.sh 和 shutdown.sh 分别为 (MacOS 和 Linux) 启动和关闭 Tomcat 的脚本 (若为 Windows 系统,则为 startup.bat 和 shutdown.bat ) 。执行相应的文件即可启动或关闭 Tomcat 服务器。例如 MacOS 上在启动脚本目录下执行 ./startup.sh 启动 Tomcat 服务器如下。
1
2
3
4
5
6
7
8
9
10
11
yukiyama@yukiyama bin % pwd /Users/yukiyama/apache-tomcat-8.5.82/bin yukiyama@yukiyama bin % ./startup.sh Using CATALINA_BASE: /Users/yukiyama/apache-tomcat-8.5.82 Using CATALINA_HOME: /Users/yukiyama/apache-tomcat-8.5.82 Using CATALINA_TMPDIR: /Users/yukiyama/apache-tomcat-8.5.82/temp Using JRE_HOME: /Library/Java/JavaVirtualMachines/jdk-16.0.1.jdk/Contents/Home Using CLASSPATH: /Users/yukiyama/apache-tomcat-8.5.82/bin/bootstrap.jar:/Users/yukiyama/apache-tomcat-8.5.82/bin/tomcat-juli.jar Using CATALINA_OPTS: Tomcat started. yukiyama@yukiyama bin %
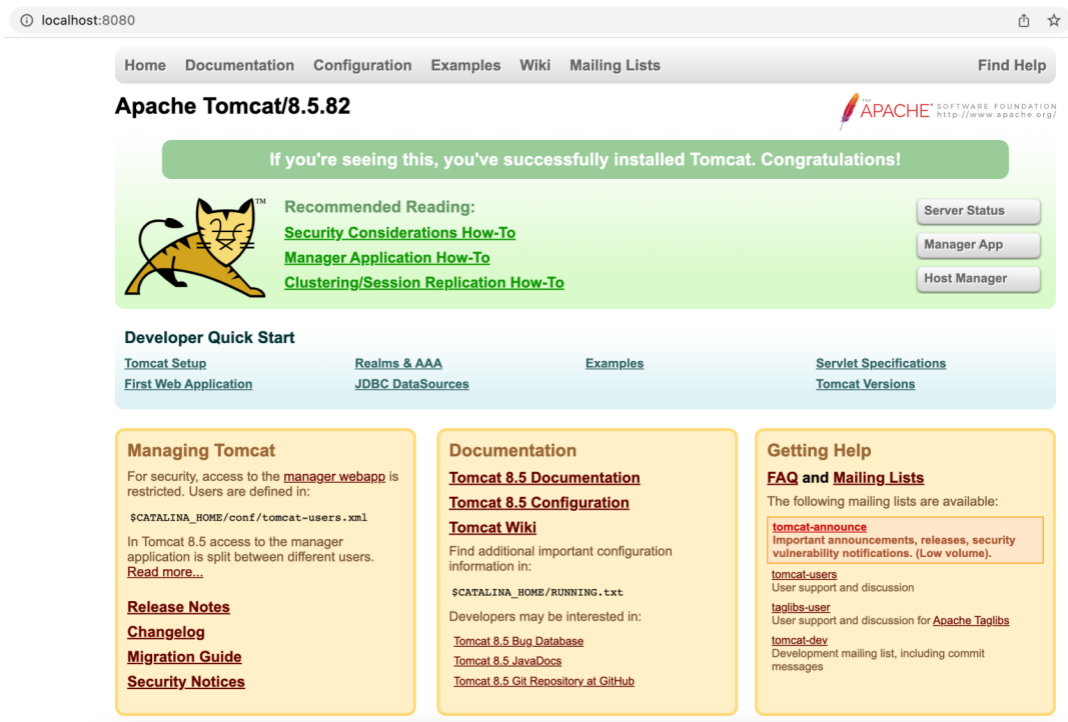
出现 Tomcat started 表示启动成功,此时访问 http://localhost:8080/ ,可打开如下页面。
执行 ./shutdown.sh 可停止 Tomcat 服务器。
1
2
3
4
5
6
7
8
9
yukiyama@yukiyama bin % ./shutdown.sh Using CATALINA_BASE: /Users/yukiyama/apache-tomcat-8.5.82 Using CATALINA_HOME: /Users/yukiyama/apache-tomcat-8.5.82 Using CATALINA_TMPDIR: /Users/yukiyama/apache-tomcat-8.5.82/temp Using JRE_HOME: /Library/Java/JavaVirtualMachines/jdk-16.0.1.jdk/Contents/Home Using CLASSPATH: /Users/yukiyama/apache-tomcat-8.5.82/bin/bootstrap.jar:/Users/yukiyama/apache-tomcat-8.5.82/bin/tomcat-juli.jar Using CATALINA_OPTS: NOTE: Picked up JDK_JAVA_OPTIONS: --add-opens=java.base/java.lang=ALL-UNNAMED --add-opens=java.base/java.io=ALL-UNNAMED --add-opens=java.base/java.util=ALL-UNNAMED --add-opens=java.base/java.util.concurrent=ALL-UNNAMED --add-opens=java.rmi/sun.rmi.transport=ALL-UNNAMED yukiyama@yukiyama bin %
由于 Tomcat 需要 JRE 环境的支持,因此 Tomcat 能够正常运行的前提是已经安装了 JDK (或 JRE) ,并配置好了 JAVA_HOME 环境变量。
部署应用
手动
将创建好的应用项目 (application) 文件夹放置在 Tomcat 安装目录 (解压缩目录) 下的 webapps 子目录中。例如 web 应用项目 demo 如下。
1
2
3
4
5
6
7
8
demo ├── css │ └── demo05.css ├── demo09.html ├── imgs │ └── del.jpg └── js └── demo09.js
将 demo 放置到 ~/apache-tomcat-8.5.82/webapps 中,此时的 demo 为一个 context root,接着在 demo 下新建一个 WEB-INF 目录,如下。
1
2
3
4
5
6
7
8
9
10
webapps ├── demo ├── WEB-INF ├── css │ └── demo05.css ├── demo09.html ├── imgs │ └── del.jpg └── js └── demo09.js
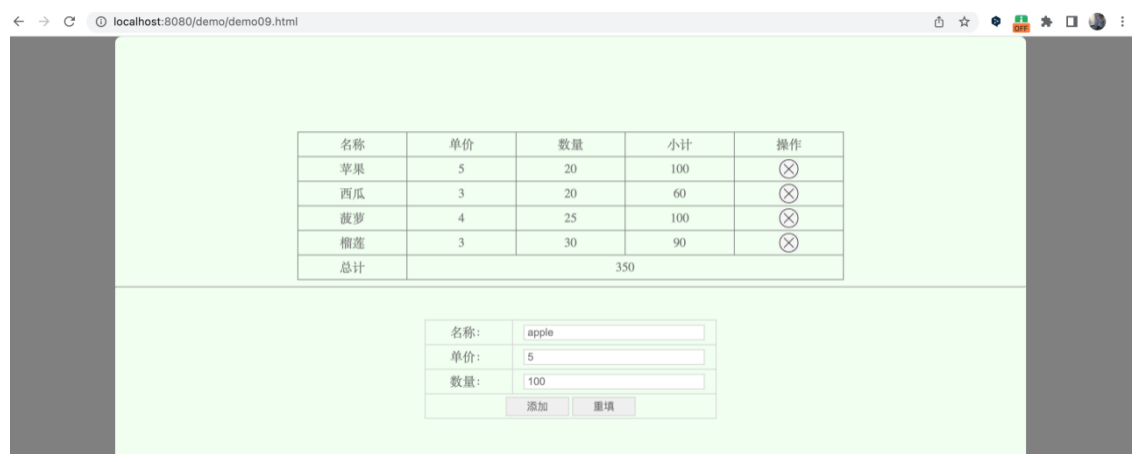
Tomcat 服务运行状态下,在浏览器中输入 http://localhost:8080/demo/demo09.html ,Tomcat 会在 webapps 目录下寻找相应的 context root demo,然后找到 demo09.html , 即可以 http 方式访问该页面。
这个简单的例子反映了「Web Server」的核心,即 基于 HTTP 协议对外提供资源 。主要过程如下。
浏览器 URL 中的 http 明确了客户端与 Web 服务器交互的协议。
localhost 即本机 IP (因为 Tomcat 此时运行在本机上)。如果运行在其他主机上,则需为该主机 IP 地址。8080 是 Tomcat 服务端口,浏览器的请求报文到达 Tomcat 所在主机后 (本机) ,根据该端口找到具体的 Tomcat 程序。Tomcat 程序继续根据 URL 中的 demo 在 webapp 目录下找到对应的 demo 目录,然后进一步找到 demo09.html ,最终将此「资源」发回到客户端浏览器,由浏览器解析呈现出上述页面。
自动
使用 idea 自动部署。
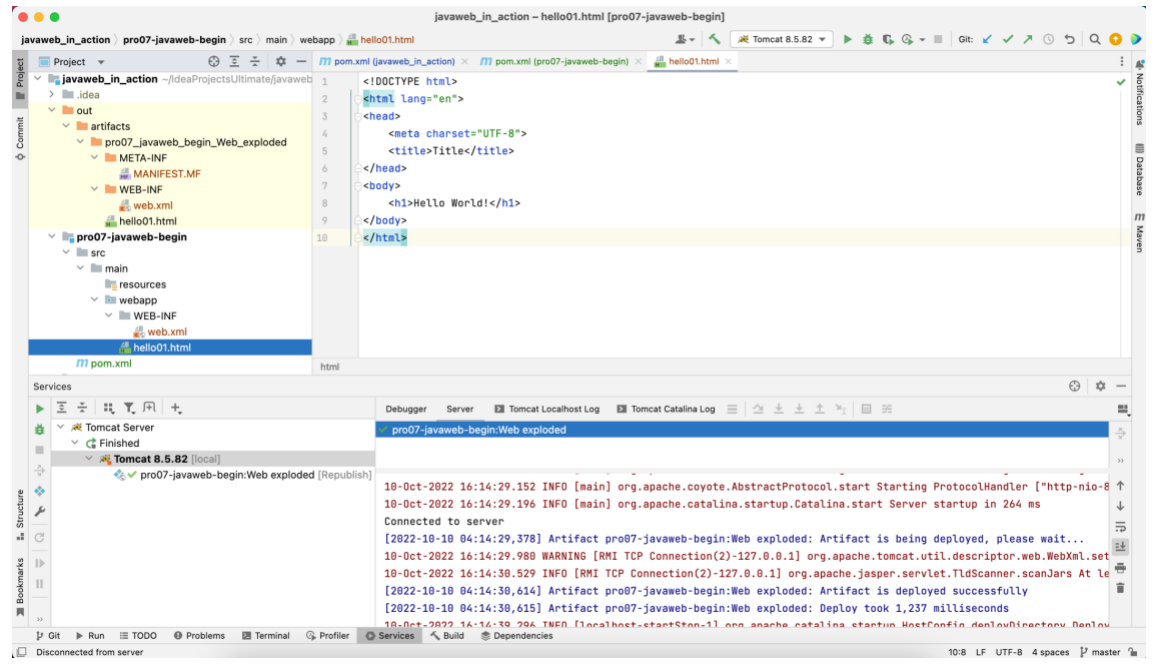
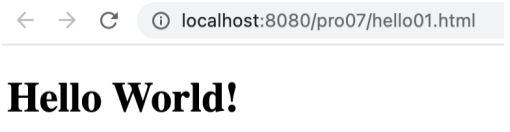
首先在 idea 中创建 javaweb_in_action 父工程 (archetype: quickstart) ,然后再创建名为 pro07-javaweb-begin 的 web 子工程 (archetype: webapp)。在该子工程的 webapp 目录下创建名为 hello01.html 的 html 文件。
1
2
3
4
5
6
7
8
9
10
<!DOCTYPE html > <html lang ="en" > <head > <meta charset ="UTF-8" > <title > Title</title > </head > <body > <h1 > Hello World!</h1 > </body > </html >
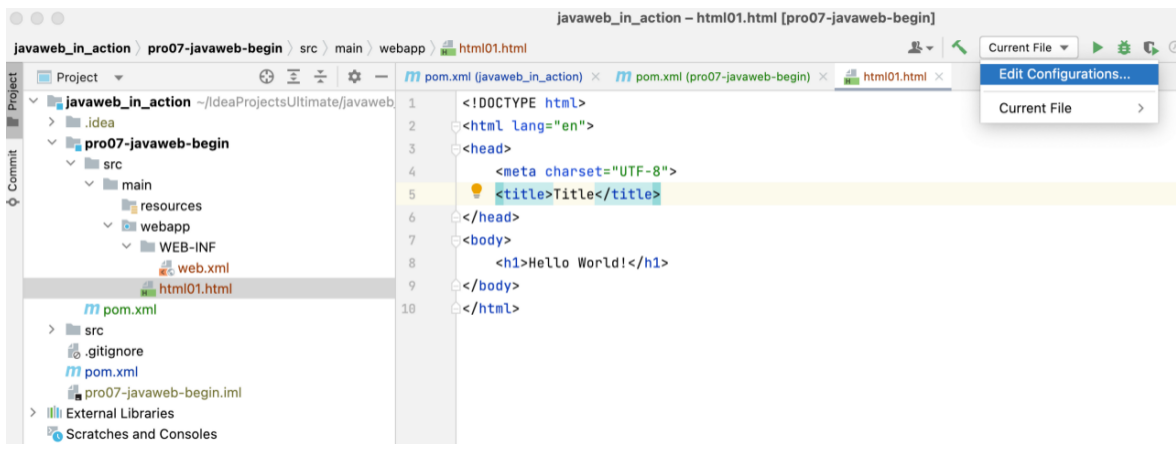
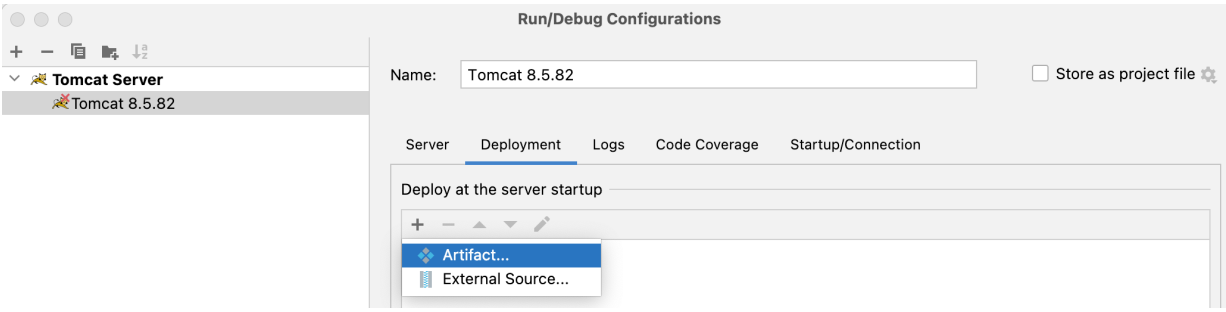
我们将以 pro07-javaweb-begin 项目演示部署和运行过程。首先在项目界面右上侧选择 「Edit Configurations…」,在弹出的页面中完成部署。
在弹出页面的左上侧点击「+」,选择「Tomcat Server > Local」。
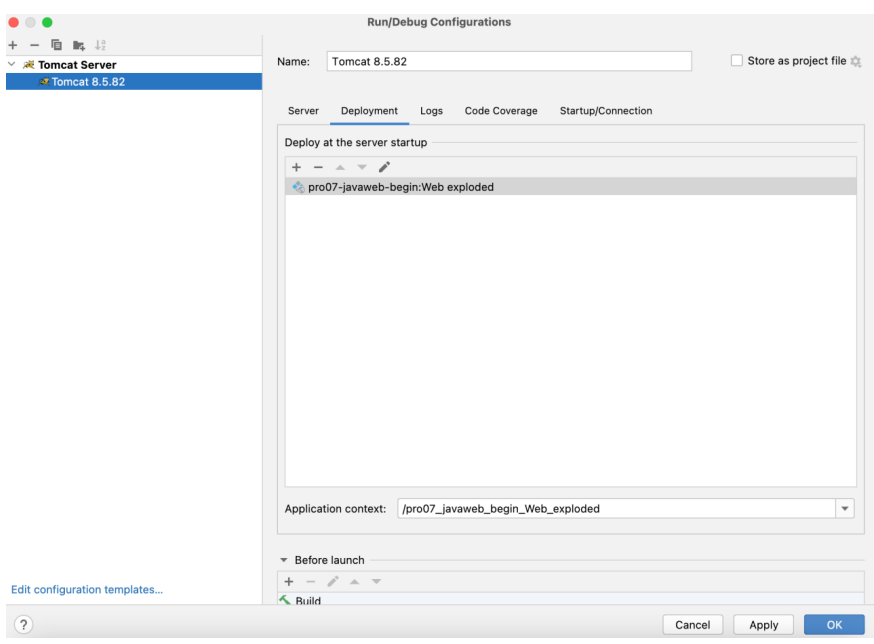
选择本地 Tomcat Server,即 「Name: Tomcat 8.5.82」 。接着先在「Deployment」页签下添加 pro07-javaweb-begin ,可以将 「Application context」改为较简短的「/pro07」(此处即为用于与浏览器 URL 端口号后的字符串对应的 context root) 。
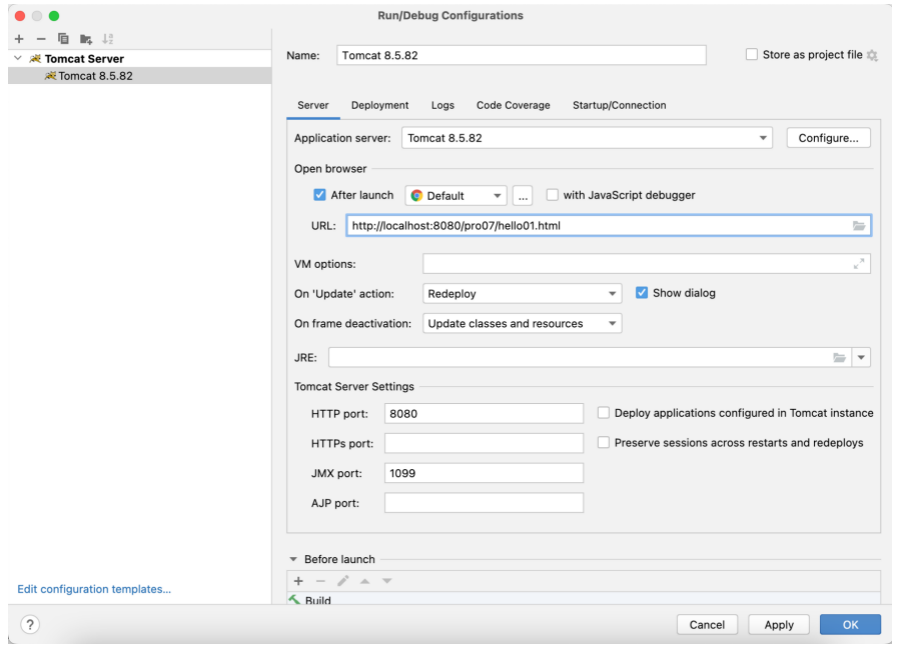
接着在「Server」页签中完成如下设置。
上述主要设置的详细说明 (参考1 , 参考2 ) 。
设置
描述
Open browser
After launch
勾选 After launch ,选择一个浏览器,表示在启动 Tomcat 运行指定的 web 项目后,自动唤起指定浏览器
URL
唤起浏览器时指定打开的 URL
On ‘Update’ action
若项目代码有更新,采取何种动作
Update Resources
若更新的是资源文件 (.jsp,.xml等,不包括 java 文件) ,则这些更新立即生效
Update classes and resources
包括资源文件和 java 文件在内,若有更新,则立即生效
Redeploy
重新部署应用
Restart Server
重启 Tomcat 服务器
On frame deactivation
失去焦点时 (例如最小化 IDEA 窗口),采取何种动作
Do nothing
无动作
Update resources
资源文件 (.jsp,.xml等,不包括 java 文件) 的更新立即生效
Update classes and resources
包括资源文件和 java 文件在内的更新立即生效
接着运行 (或 debug) 。
正常情况下,默认浏览器会弹出「hello01.html」页面,如下表示部署成功。
Servlet
现在我们已经知道如何部署一个最简单的 web 项目,并看到 Tomcat 作为 Web 服务器,在浏览器发起请求后能够处理请求并发回对应的资源。实际上 真正处理请求的是 Servlet 。
Servlet (Serv er Applet ): Server 与 Applet 的合成词,即「服务器小程序」。Server 即 Web Server,也即我们使用的 Tomcat Server,所谓「小程序」,本质上是 Servlet 接口实现类的对象实例 。当 Tomcat 接收到浏览器请求时,会根据请求信息创建预先对应了此请求的 Servlet 实现类实例。详细过程后述。
相比此前介绍的简单的请求,对于一般的 web 项目,Tomcat 需要响应的资源远不止静态页面,它还会与数据库交互,使得我们可以在浏览器页面的操作 (请求),经由不同的 Servlet,向数据库中写入数据或获取数据库信息发回到浏览器页面等,因此 Servlet 通常会由开发人员针对具体请求编写。
在前面的例子中我们并没有编写具体的 Servlet 类,这是因为当 Tomcat 找不到与请求相对应的 Servlet 时,会使用一个名为 default 的默认 Servlet 来处理请求。关于这一点后续也会详细说明。
入门示例
我们通过实现下述功能,讲解如何针对具体的请求编写相对应的 servlet ,并说明 servlet 处理该请求的过程。我们在前面已经创建的 pro07-javaweb-begin 项目中实现该功能。
功能:通过「水果库存信息」页面,输入水果名称、价格、库存以及备注信息,点击提交后将这些信息加入到后台水果库存数据库中。
引入依赖
在本示例中我们使用的 Servlet 需要依赖第三方库 javax.servlet-api 的类,需引入 该依赖 。此外连接 MySQL 数据库要引入 mysql-connector-java 依赖。在 「Tomcat」一节中,我们已经创建了 javaweb_in_action 这个 Maven 项目,也创建了 pro07-javaweb-begin 这个子项目,maven 会自动将前者作为父工程,后者作为子工程,我们在父工程的 pom.xml 文件中使用 <dependenciesManager> 标签统一管理子工程的依赖。
※ Maven 的使用以及父子工程间依赖继承相关的知识可参考 该仓库 的 Maven学习实战_yukiyama 教程。
父工程 javaweb_in_action 的 pom.xml 。
1 2 3 4 5 6 7 8 9 10 11 12 13 14 15 16 17 18 19 20 21 22 23 24 25 26 27 28 29 30 31 32 33 34 35 36 37 38 39 40 41 42 43 44 45 46 47 <project xmlns ="http://maven.apache.org/POM/4.0.0" xmlns:xsi ="http://www.w3.org/2001/XMLSchema-instance" xsi:schemaLocation ="http://maven.apache.org/POM/4.0.0 http://maven.apache.org/xsd/maven-4.0.0.xsd" > <modelVersion > 4.0.0</modelVersion > <groupId > com.yukiyama.javaweb</groupId > <artifactId > javaweb_in_action</artifactId > <version > 1.0-SNAPSHOT</version > <modules > <module > pro07-javaweb-begin</module > </modules > <packaging > pom</packaging > <name > javaweb_in_action</name > <url > http://maven.apache.org</url > <properties > <project.build.sourceEncoding > UTF-8</project.build.sourceEncoding > </properties > <dependencyManagement > <dependencies > <dependency > <groupId > junit</groupId > <artifactId > junit</artifactId > <version > 4.13.2</version > <scope > test</scope > </dependency > <dependency > <groupId > javax.servlet</groupId > <artifactId > javax.servlet-api</artifactId > <version > 3.1.0</version > <scope > provided</scope > </dependency > </dependencies > </dependencyManagement > </project >
子工程 pro07-javaweb-begin 的 pom.xml 。
1 2 3 4 5 6 7 8 9 10 11 12 13 14 15 16 17 18 19 20 21 22 23 24 25 26 27 28 29 30 31 32 33 34 35 36 37 38 39 40 <project xmlns ="http://maven.apache.org/POM/4.0.0" xmlns:xsi ="http://www.w3.org/2001/XMLSchema-instance" xsi:schemaLocation ="http://maven.apache.org/POM/4.0.0 http://maven.apache.org/maven-v4_0_0.xsd" > <parent > <artifactId > javaweb_in_action</artifactId > <groupId > com.yukiyama.javaweb</groupId > <version > 1.0-SNAPSHOT</version > </parent > <modelVersion > 4.0.0</modelVersion > <artifactId > pro07-javaweb-begin</artifactId > <packaging > war</packaging > <name > pro07-javaweb-begin Maven Webapp</name > <url > http://maven.apache.org</url > <dependencies > <dependency > <groupId > javax.servlet</groupId > <artifactId > javax.servlet-api</artifactId > </dependency > <dependency > <groupId > junit</groupId > <artifactId > junit</artifactId > </dependency > </dependencies > <build > <finalName > pro07-javaweb-begin</finalName > </build > </project >
但是在实际使用中,通过父工程继承的 mysql-connector-java 依赖并不生效,会报此错 java.lang.ClassNotFoundException: com.mysql.jdbc.Driver 。作者暂时还不知道为什么引用无法生效,即便直接在子工程中添加完整坐标的依赖也存在同样的问题。目前解决这个问题的办法是在 WEB-INF 下新建一个 lib 文件夹,将 mysql-connector-java-x.x.x.jar 放入其中,并手动添加到依赖中 (若使用的 IDE 为 idea,选中该 jar 包,右键,点击 「Add as Library…」,或者在 File > Project Structure > Modules 的 Dependencies 页签下完成添加) 。
准备数据库
按如下 SQL 语句准备数据库 fruitdb 以及 t_fruit 表。
TODO: 导入方法和DBeaver软件
1
2
3
4
5
6
7
8
9
10
11
12
13
14
15
16
17
18
19
20
CREATE DATABASE fruitdb charset utf8;USE fruitdb; CREATE TABLE `t_fruit` ( `fid` int (11 ) NOT NULL AUTO_INCREMENT, `fname` varchar (20 ) NOT NULL , `price` int (11 ) DEFAULT NULL , `fcount` int (11 ) DEFAULT NULL , `remark` varchar (50 ) DEFAULT NULL , PRIMARY KEY (`fid`) ) ENGINE= InnoDB AUTO_INCREMENT= 33 DEFAULT CHARSET= utf8; insert into `t_fruit`(`fid`,`fname`,`price`,`fcount`,`remark`) values (1 ,'红富士' ,5 ,16 ,'红富士也是苹果!' ), (2 ,'大瓜' ,5 ,100 ,'王校长的瓜真香' ), (3 ,'南瓜' ,4 ,456 ,'水果真好吃' ), (4 ,'苦瓜' ,5 ,55 ,'苦瓜很好吃' ), (5 ,'莲雾' ,9 ,99 ,'莲雾是一种神奇的水果' ), (6 ,'羊角蜜' ,4 ,30 ,'羊角蜜是一种神奇的瓜' ), (7 ,'啃大瓜' ,13 ,123 ,'孤瓜' );
编写浏览器页面
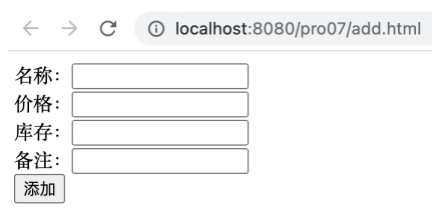
首先编写如下浏览器页面 add.html 。
1
2
3
4
5
6
7
8
9
10
11
12
13
14
15
16
<!DOCTYPE html > <html lang ="en" > <head > <meta charset ="UTF-8" > <title > Title</title > </head > <body > <form action ="add" method ="post" > 名称:<input type ="text" name ="fname" /> <br /> 价格:<input type ="text" name ="price" /> <br /> 库存:<input type ="text" name ="fcount" /> <br /> 备注:<input type ="text" name ="remark" /> <br /> <input type ="submit" value ="添加" /> </form > </body > </html >
该页面如下。
编写FruitDao相关类
从浏览器输入的水果库存信息要保存到数据库中,就要操作数据库,即需要编写 Fruit ORM 类、BaseDao、 FruitDao 接口、FruitDaoImpl 实现类。这部分需要 JDBC 的知识,读者可先阅读 此仓库 中的 jdbc学习实战_yukiyama 一文完成相关知识的学习,当然也可以跳过这部分内容直接使用已经提供好的相关实现。
编写AddServlet
创建一个继承 HttpServlet 的 AddServlet 类,用于响应通过 add.html 页面添加数据的请求。
1
2
3
4
5
6
7
8
9
10
11
12
13
14
15
16
17
18
19
20
21
22
23
24
25
26
27
28
package com.yukiyama.servlets;import com.yukiyama.fruit.dao.FruitDAO;import com.yukiyama.fruit.dao.impl.FruitDaoImpl;import com.yukiyama.fruit.pojo.Fruit;import javax.servlet.ServletException;import javax.servlet.http.HttpServlet;import javax.servlet.http.HttpServletRequest;import javax.servlet.http.HttpServletResponse;import java.io.IOException;public class AddServlet extends HttpServlet { @Override protected void doPost (HttpServletRequest req, HttpServletResponse resp) throws ServletException, IOException { req.setCharacterEncoding("UTF-8" ); String fname = req.getParameter("fname" ); String priceStr = req.getParameter("price" ); int price = Integer.parseInt(priceStr); String fcountStr = req.getParameter("fcount" ); int count = Integer.parseInt(fcountStr); String remark = req.getParameter("remark" ); FruitDAO fruitDAO = new FruitDAOImpl (); boolean flag = fruitDAO.addFruit(new Fruit (0 , fname, price, count, remark)); System.out.println(flag ? "添加成功" : "添加失败" ); } }
配置web.xml
将项目部署到 Tomcat 后,我们能够在浏览器中以 http 方式打开 add.html ,并能够填写相关信息。并且我们也编写好了 FruitDao 及相关的 JDBC 实现,能够将 Addservlet 通过 doPost 方法获取到的数据写入到数据库中。但目前 add.html 页面提交数据的请求,是无法找到 AddServlet 的,或者说 AddServlet 还不知道自己应该拦截什么请求。
我们还需要在 web.xml 中完成具体的 Servlet (AddServlet) 与具体的请求动作 (action="add") 的映射配置,Tomcat 通过该配置使得指定的 Servlet 拦截映射绑定的请求。
web.xml 如下。
1
2
3
4
5
6
7
8
9
10
11
12
13
14
15
16
17
18
<?xml version="1.0" encoding="UTF-8" ?> <web-app xmlns ="http://xmlns.jcp.org/xml/ns/javaee" xmlns:xsi ="http://www.w3.org/2001/XMLSchema-instance" xsi:schemaLocation ="http://xmlns.jcp.org/xml/ns/javaee http://xmlns.jcp.org/xml/ns/javaee/web-app_4_0.xsd" version ="4.0" > <servlet > <servlet-name > AddServlet</servlet-name > <servlet-class > com.yukiyama.servlets.AddServlet</servlet-class > </servlet > <servlet-mapping > <servlet-name > AddServlet</servlet-name > <url-pattern > /add</url-pattern > </servlet-mapping > </web-app >
配置Tomcat
参考「Tomcat」-「部署应用」-「自动」,一个 web 项目要部署到 Web 服务器中才能运行,因此我们要将 pro07-javaweb-begin 这个 artifact 部署到 Tomcat 中。
若指定打开的 URL 未写上 add.html ,则 Tomcat 会寻找 index.html ,找不到则报 404 错误。若在 webapp 目录下存在 index.html ,则 URL 中可以省略 index.html 。实际上,在 Tomcat 程序安装路径下的 conf 目录的 web.xml 配置文件中,有如下配置及注释说明。可以看到,若是前述情形,则 Tomcat 会在相应文件夹中依次寻找 index.html, index.htm, index.jsp 。
也可以在具体的 web 项目的 web.xml 下添加 <welcome-file-list> 标签,使得 URL 访问时不必写出资源文件名。
1 2 3 4 5 6 7 8 9 10 11 12 13 14 15 16 17 18 19 <welcome-file-list > <welcome-file > index.html</welcome-file > <welcome-file > index.htm</welcome-file > <welcome-file > index.jsp</welcome-file > </welcome-file-list >
运行
完成上述步骤后,pro07-javaweb-begin 子工程目录如下,相关的文件都可以在 javaweb_in_action 仓库中获取。
1
2
3
4
5
6
7
8
9
10
11
12
13
14
15
16
17
18
19
20
21
22
23
24
25
26
27
28
29
pro07-javaweb-begin ├── pom.xml └── src ├── main │ ├── java │ │ ├── com │ │ │ └── yukiyama │ │ │ └── servlets │ │ │ └── AddServlet.java │ │ └── com.yukiyama.fruit │ │ ├── dao │ │ │ ├── FruitDAO.java │ │ │ ├── base │ │ │ │ └── BaseDAO.java │ │ │ └── impl │ │ │ └── FruitDAOImpl.java │ │ └── pojo │ │ └── Fruit.java │ ├── resources │ └── webapp │ ├── WEB-INF │ │ ├── lib │ │ │ └── mysql-connector-java-8.0.11.jar │ │ └── web.xml │ ├── add.html │ └── hello01.html └── test ├── java └── resources
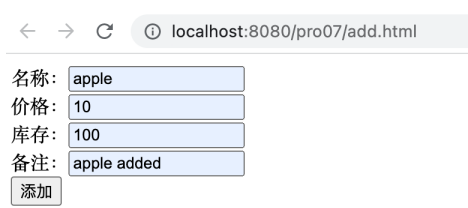
至此,我们完成了实现目标功能所需的所有工作。运行该工程,浏览器自动弹出 add.html 页面,填入相关信息后,如下。
正常情况下该请求 (名为 add 的 Post 请求) 会被 AddServlet 处理,根据请求类型为 Post ,调用其 doPost 方法,在方法中将通过 Tomcat 传入的 HttpServletRequest 实例的 getParameter 方法得到的数据,经由 FruitDao 实例方法 addFruit 写入到数据库中对应的表中。
此时查看数据库,可以看到数据已经被成功写入。
1 2 3 4 5 6 7 8 9 10 11 12 13 14 15 16 mysql> select * from t_fruit; + | fid | fname | price | fcount | remark | + | 1 | 红富士 | 5 | 16 | 红富士也是苹果! | | 2 | 大瓜 | 5 | 100 | 王校长的瓜真香 | | 3 | 南瓜 | 4 | 456 | 水果真好吃 | | 4 | 苦瓜 | 5 | 55 | 苦瓜很好吃 | | 5 | 莲雾 | 9 | 99 | 莲雾是一种神奇的水果 | | 6 | 羊角蜜 | 4 | 30 | 羊角蜜是一种神奇的瓜 | | 7 | 啃大瓜 | 13 | 123 | 孤瓜 | | 38 | apple | 10 | 100 | apple added | + 8 rows in set (0.07 sec)mysql>
继承关系
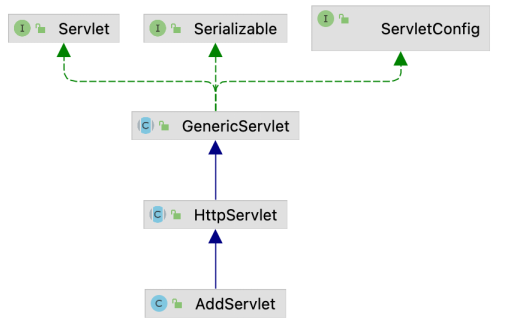
为了看清 servlet 是如何工作的,我们首先查看如下从具体实现类 AddServlet 上溯到 Servlet 接口的继承关系。可以看到继承路径为 Servlet 接口 > GenericServlet 抽象类 > HttpServlet 抽象类 > Servlet 具体实现类。
※ 继承关系图打开方法:在 idea 环境中选中类,右键菜单栏底部选择 Diagrams > Show Diagrams… 或 Show Diagrams Popup… 。此功能依赖「Diagrams」插件 (idea 已内置),需开启。
在 Servlet 接口中,声明了如下五个抽象方法。我们指出,其中的 init, service, destroy 正是 servlet 工作的核心方法。这五个方法有些在 GenericServlet 或 HttpServlet 中已实现,有的需要在具体的 Servlet 实现类中重写实现,后续详细说明。
方法
描述
init初始化方法。
getServletConfig获取包含 servlet 的初始化和启动参数的 ServletConfig 对象。
service服务方法。
getServletInfo获取有关 servlet 的信息,如作者、版本和版权等。
destroy销毁方法。
接口方法
如下详细描述 Servlet 接口中的五个抽象方法。
init
1 public void init (ServletConfig config) throws ServletException;
由 servlet 容器调用,调用即表明该 servlet 正在服务。
实例化 servlet 之后,init 方法 只会被调用一次 (因此 servlet 是单例的)。
servlet 处理请求前要求 init 方法必须已成功执行。
init 方法已在 GenericServlet 抽象类中实现,将 Servlet 容器 (Tomcat) 传入的 ServletConfig 实例赋值给类字段 config 。GenericServlet 中实现 Servlet 的 init 方法中还会调用一个无参 init 方法,可以具体的 Servlet 实现类中重写 init 方法 (无参) ,以扩展初始化动作。HttpServlet 抽象类未实现该方法。
1 2 3 4 5 6 7 8 public void init (ServletConfig config) throws ServletException { this .config = config; this .init(); } public void init () throws ServletException {}
getServletConifg
1 public ServletConfig getServletConfig () ;
返回包含 servlet 的初始化和启动参数的 ServletConfig 对象。
返回的 ServletConfig 对象就是传递给 init 方法的对象。
GenericServlet 类已经实现了这个方法。因此具体的 servlet 实现类不必重写该方法。HttpServlet 抽象类未实现该方法 (因为GenericServlet 类已经实现了)。
1 2 3 4 public ServletConfig getServletConfig () { return config; }
service
1 public void service (ServletRequest req, ServletResponse res) throws ServletException, IOException;
由 servlet 容器调用,以允许 servlet 响应请求。
此方法只在 init 方法成功完成后才会被调用。
对于抛出或发送错误的 servlet,应设置响应的状态代码。
servlet 通常在多线程的 servlet 容器内运行,以同时处理多个请求。因此必须注意任何共享资源,如文件、网络连接以及 servlet 实例等的同步访问。
该方法在 GenericServlet 中也是抽象方法,因此必须在后续子类 (例如 HttpServlet) 中重写。
实际上由于 HttpServlet 重写实现了该方法,具体的 Servlet 实现类不必重写该方法 (源码注释中有言:There’s no need to override this method.)。
如下是 HttpServlet 抽象类中的 service 方法的实现。
1 2 3 4 5 6 7 8 9 10 11 12 13 14 15 16 17 18 19 20 public void service (ServletRequest req, ServletResponse res) throws ServletException, IOException { HttpServletRequest request; HttpServletResponse response; if (!(req instanceof HttpServletRequest && res instanceof HttpServletResponse)) { throw new ServletException ("non-HTTP request or response" ); } request = (HttpServletRequest) req; response = (HttpServletResponse) res; service(request, response); }
可以看到,该实现先判断传入的 ServletRequest 、ServletResponse 实例能向下转型为 HttpServletRequest 、HttpServletResponse ,若不能,则抛出 ServletException 异常,并告知此请求或响应是「非 HTTP 的」(non-HTTP) 。若能向下转型,则转型后执行如下方法。
可以看到,下述 service 方法才是核心内容。该方法首先获取请求类型 (GET / HEAD / POST / PUT / DELET / OPTIONS / TRACE / 不属于列出的任何类型),然后通过 if-else 分支根据具体类型执行相应的 doXXX 方法或发送错误信息 (不属于列出的任何类型时)。
关于 lastModified
TODO
1 2 3 4 5 6 7 8 9 10 11 12 13 14 15 16 17 18 19 20 21 22 23 24 25 26 27 28 29 30 31 32 33 34 35 36 37 38 39 40 41 42 43 44 45 46 47 48 49 50 51 52 53 54 55 56 57 58 59 protected void service (HttpServletRequest req, HttpServletResponse resp) throws ServletException, IOException { String method = req.getMethod(); if (method.equals(METHOD_GET)) { long lastModified = getLastModified(req); if (lastModified == -1 ) { doGet(req, resp); } else { long ifModifiedSince = req.getDateHeader(HEADER_IFMODSINCE); if (ifModifiedSince < lastModified) { maybeSetLastModified(resp, lastModified); doGet(req, resp); } else { resp.setStatus(HttpServletResponse.SC_NOT_MODIFIED); } } } else if (method.equals(METHOD_HEAD)) { long lastModified = getLastModified(req); maybeSetLastModified(resp, lastModified); doHead(req, resp); } else if (method.equals(METHOD_POST)) { doPost(req, resp); } else if (method.equals(METHOD_PUT)) { doPut(req, resp); } else if (method.equals(METHOD_DELETE)) { doDelete(req, resp); } else if (method.equals(METHOD_OPTIONS)) { doOptions(req,resp); } else if (method.equals(METHOD_TRACE)) { doTrace(req,resp); } else { String errMsg = lStrings.getString("http.method_not_implemented" ); Object[] errArgs = new Object [1 ]; errArgs[0 ] = method; errMsg = MessageFormat.format(errMsg, errArgs); resp.sendError(HttpServletResponse.SC_NOT_IMPLEMENTED, errMsg); } }
getServletInfo
1 public String getServletInfo () ;
返回有关 servlet 的信息,如作者、版本和版权。
该方法返回的字符串应该是纯文本,而不是任何形式的标记 (如HTML、XML等)。
GenericServlet 抽象类中实现了该方法,但只返回了 "" 。HttpServlet 抽象类未实现该方法。具体的 Servlet 实现类可根据实际需要重写该方法。
1 2 3 4 public String getServletInfo () { return "" ; }
destroy
由 servlet 容器调用,表明该 servlet 正在退出服务。
只有在 servlet 的 service 方法中的所有线程都退出或超时后,才会调用这个方法。
在 servlet 容器调用此方法后,它将不再调用此 servlet 的 service 方法。
该方法给了 servlet 一个机会来清理任何被保留的资源 (例如内存、文件句柄、线程),并确保任何持久化状态与 servlet 在内存中的当前状态同步。
GenericServlet 抽象类中实现了该方法,但无任何动作。HttpServlet 抽象类未实现该方法。具体的 Servlet 实现类可根据实际需要重写该方法。
1 2 public void destroy () {}
HttpServlet
现在我们知道,响应请求的核心方法是 service ,该方法在 HttpServlet 已被实现。我们也已展示过 HttpServlet 中 service 方法的内部实现,其中对应不同请求的 doXxx 方法是响应请求的具体动作。虽然 JDK 建议具体 Servlet 实现类不必再重写 service 方法,但却必须重写从 HttpServlet 继承的 doXxx 方法,以根据实际情况处理具体的请求。例如我们在「入门示例」中展示过的那样,从 post 请求中获取表单信息写入数据库中。实际上,当具体的 Servlet 实现类处理请求时,若未重写对应该请求的 doXxx 方法,则会返回 405 错误。
doXxx
以 doPost 作为例子说明。如下是 HttpServlet 实现的 doPost 方法。传入由 Tomcat 根据请求创建和维护的 HttpServletRequest 和 HttpServletResponse 。首先获取请求协议字符串,例如 HTTP/1.1 ,接着获取 msg 字符串 (定义在 LocalStrings.properties 文件中) 。判断请求协议是否为 HTTP/1.1 ,若是则发送 405 错误 (HttpServletResponse.SC_METHOD_NOT_ALLOWED 即 int 405) ,否则发送 400 错误 (HttpServletResponse.SC_BAD_REQUEST 即 int 400) 。
1
2
3
4
5
6
7
8
9
10
11
protected void doPost (HttpServletRequest req, HttpServletResponse resp) throws ServletException, IOException { String protocol = req.getProtocol(); String msg = lStrings.getString("http.method_post_not_supported" ); if (protocol.endsWith("1.1" )) { resp.sendError(HttpServletResponse.SC_METHOD_NOT_ALLOWED, msg); } else { resp.sendError(HttpServletResponse.SC_BAD_REQUEST, msg); } }
※ LocalStrings.properties 文件中定义的字符串,如下只展示其中的两条。
1
2
http.method_get_not_supported =HTTP method GET is not supported by this URL http.method_post_not_supported =HTTP method POST is not supported by this URL
示例
新建一个 pro08-javaweb-servlet web 子工程,创建 Demo01Servlet 类继承 HttpServlet ,在 Demo01Servlet 中重写 doPost 方法 (只简单调用父类 doPost 方法),如下。
1
2
3
4
5
6
7
8
9
10
11
12
13
14
package com.yukiyama.servlets;import javax.servlet.ServletException;import javax.servlet.http.HttpServlet;import javax.servlet.http.HttpServletRequest;import javax.servlet.http.HttpServletResponse;import java.io.IOException;public class Demo01Servlet extends HttpServlet { @Override protected void doPost (HttpServletRequest req, HttpServletResponse resp) throws ServletException, IOException { super .doPost(req, resp); } }
接着按照我们已经熟悉的过程,在 web.xml 中配置该 servlet 与请求的映射关系。接着将该工程部署到 Tomcat 中,并使该项目运行后浏览器自动弹出指定页面 (将上下文设置为 /pro08) 。
web.xml 的相关配置。
1 2 3 4 5 6 7 8 <servlet > <servlet-name > Demo01Servlet</servlet-name > <servlet-class > com.yukiyama.servlets.Demo01Servlet</servlet-class > </servlet > <servlet-mapping > <servlet-name > Demo01Servlet</servlet-name > <url-pattern > /demo01</url-pattern > </servlet-mapping >
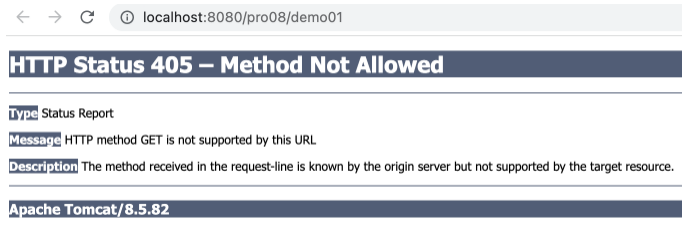
Tomcat 设置中勾选 Server 页签下的 Open Browser 设置项下的「After launch」,并将 URL 设置为 http://localhost:8080/pro08/demo01 。
运行后我们将发现页面显示 405 错误。
出现 405 的原因就在于默认请求为 Get 方式,而我们重写的是 doPost 方法 (我们并没有编写页面发送 method="post" 的请求) ,因此在执行 service 方法时,会调用 Demo01Servlet 的父类 doGet 方法。最终执行如下语句,其中的 HttpServletResponse.SC_METHOD_NOT_ALLOWED 常量即 405。
1
2
3
if (protocol.endsWith("1.1" )) { resp.sendError(HttpServletResponse.SC_METHOD_NOT_ALLOWED, msg); }
在 HttpServletResponse 中定义的 SC_METHOD_NOT_ALLOWED 常量。
1 public static final int SC_METHOD_NOT_ALLOWED = 405 ;
接着我们在 Demo01Servlet 中重写 doGet 方法,如下。重新运行后不会报之前的 405 错,且能够顺利打印出 doGet... 。
1
2
3
4
@Override protected void doGet (HttpServletRequest req, HttpServletResponse resp) throws ServletException, IOException { System.out.println("doGet..." ); }
通过该实例,我们看到 HttpServlet 中实现的 doXxx 方法会返回 405 错误,因此必须根据实际请求编写对应的 doXxx 方法 。
生命周期
servlet 的生命周期从实例创建开始,到 destroy 方法执行结束为止。主要有以下四个阶段。
创建 Servlet 实例。
当 Tomcat 服务接收到请求后,读取该请求 URL,根据预先配置在 web.xml 的「具体 servlet 实现类与 url-pattern 的映射关系」,通过反射创建对应的 Servlet 实现类的示例。
创建实例的过程会执行无参构造器。
对于相同的请求,相应的 Servlet 实例只会创建一个 (单例模式),此后均由此实例响应后续相同请求。
调用 init 。
接着 Tomcat 会调用该实例的 init 方法。由于 GenericServlet 抽象类中的 init 方法实现将 ServletConfig 实例赋值给实例字段 config ,因此 init 执行后, Servlet 实例就会持有该 config 字段。
如果 Servlet 实例重写了 init ,将继续执行重写的内容。
该方法在 Servlet 实例创建后只会执行一次。
调用 service 。
若 init 执行成功,Tomcat 继续调用 service 。由于 HttpServlet 实现了该方法,具体的 Servlet 实现类不必重写 (JDK 注释中即建议不必重写) 。
该方法最终会根据传入的请求执行对应的 doXXX 方法或发送错误信息 (请参考前文「接口方法」一节)。
该方法每次接收到新的请求后都会相应执行一次。
调用 destroy 。
service 方法中的所有线程都退出或超时后,调用 destroy 方法。此方法在 servlet 结束服务前提供一个清理任何被保留的资源 (例如内存、文件句柄、线程) 的机会,并确保任何持久化状态与 servlet 在内存中的当前状态同步。
此方法已在 GenericServlet 中实现,无方法体,即不执行任何动作。因此若无需清理,则具体 Servlet 实现类不必重写该方法。若需要执行某些动作,重写即可。
我们在 pro08-javaweb-servlet web 子项目下创建 Demo02Servlet 类演示 servlet 的生命周期。
1
2
3
4
5
6
7
8
9
10
11
12
13
14
15
16
17
18
19
20
21
22
23
24
25
26
package com.yukiyama.servlets;import javax.servlet.ServletException;import javax.servlet.ServletRequest;import javax.servlet.ServletResponse;import javax.servlet.http.HttpServlet;import java.io.IOException;public class Demo02Servlet extends HttpServlet { public Demo02Servlet () { System.out.println("Constructor Demo02Servlet() is running." ); } @Override public void init () throws ServletException { System.out.println("Method init() is running." ); } @Override public void service (ServletRequest req, ServletResponse res) throws ServletException, IOException { System.out.println("Method service() is running." ); } @Override public void destroy () { System.out.println("Method destroy() is running." ); } }
与之前一样,在 web.xml 中配置该 servlet 与请求的映射关系。接着将该项目部署到 Tomcat 并在 Tomcat 的设置界面 Server 页签下的 「Open browser」中,不勾选「After launch」,即运行后不让浏览器自动弹出对应该 URL 的页面,而是手动输入访问。由于没有指定资源,所有方法都未调用对应的父类方法 (例如 super.init()) ,因此不会出现 405 错误。idea 下方的 Tomcat 信息栏中的 Server 页签中显示如下内容。
1
2
3
com.yukiyama.servlets.Demo02Servlet@2f6691b4 Constructor Demo02Servlet() is running. com.yukiyama.servlets.Demo02Servlet@2f6691b4 Method init() is running. com.yukiyama.servlets.Demo02Servlet@2f6691b4 Method service() is running.
每刷新一次页面,就会打印一次如下信息。
1 com.yukiyama.servlets.Demo02Servlet@2f6691b4 Method service() is running.
停止 Tomcat 服务时,如下信息被打印。
1 com.yukiyama.servlets.Demo02Servlet@2f6691b4Method destroy() is running.
由此我们清晰地看到 servlet 生命周期的四个阶段,并且确认了生命周期内只有一个 Servlet 实例,init 方法只被调用一次,每次请求都会调用一次 service 方法,servlet 停止服务前调用 destroy 方法。
值得注意的是,因为 Servlet 实例是单例的,同一个实例响应多个对应此 servlet 的请求时,该实例是「线程不安全」的。因此应尽量避免在 Servlet 实例中声明字段。
实例创建时机
通过观察 servlet 的生命周期,我们看到 Servlet 实例是在请求到达 Tomcat 时才被创建。由于需要创建实例,第一次请求的响应会比之后的请求的响应要更耗时。我们想,如果 Servlet 实例不是在第一次请求时才被创建,而是在此前就已经创建好,那么第一次请求也会被快速响应。实际上这一点可以通过在 web.xml 中为指定的 servlet 添加 <load-on-starup> 标签来实现。如下为 Demo02Servlet 配置该标签。
1 2 3 4 5 <servlet > <servlet-name > Demo02Servlet</servlet-name > <servlet-class > com.yukiyama.servlets.Demo02Servlet</servlet-class > <load-on-startup > 0</load-on-startup > </servlet >
该标签的值必须是整数,即只能取 负整数、零或正整数 ,不同取值的作用如下。
0 或正整数:在 Tomcat 启动该 servlet 所在工程时,即实例化该 servlet。 数字越小,优先级越高 ,即当有多个 servlet 设置了此标签时,数字较小的先被其实例先被创建。若数字相同,servlet 容器 (即 Tomcat) 将自行决定创建实例的顺序。
负数:与无此标签相同,即 servlet 容器 (即 Tomcat) 在接收到相应请求时才创建 Servlet 实例。
在 idea 中,点击 <load-on-startup> (同时按住 command 键) ,会跳转到 xsd 文件该标签的定义处,可以查看到如下详细说明。
1 The load-on-startup element indicates that this servlet should be loaded (instantiated and have its init() called) on the startup of the web application. The optional contents of these element must be an integer indicating the order in which the servlet should be loaded. If the value is a negative integer, or the element is not present, the container is free to load the servlet whenever it chooses. If the value is a positive integer or 0, the container must load and initialize the servlet as the application is deployed. The container must guarantee that servlets marked with lower integers are loaded before servlets marked with higher integers. The container may choose the order of loading of servlets with the same load-on-start-up value.
session
session,即「会话」。会话出现是为了弥补 HTTP 协议无状态的缺陷,因为在很多「事务性」操作场景下,我们希望服务端识别一连串的请求是有关联的。最常被提到的例子是「购物操作」,即如果保持 HTTP 无状态的特点,每一次将商品加入购物车的请求都视作新的请求,那么一个购物车总是对应一件商品 (不考虑购物网站用户绑定购物车的关系),如果服务端能够标识请求,使得多次将商品加入购物车的请求都有相同标识,那么就可以将该多次请求的商品加入同一个购物车中。
上述例子容易让我们将「会话」与「客户端服务端之间的连续通信」联系在一起,这是一种很模糊的理解。我们指出,针对 Tomcat 的 servlet 来说,session 的本质是 Java 对象,即 javax.servlet.http.HttpSession 类的实例,也即当我们在说 session (会话) 时,本质上是在谈论 HttpSession 实例对象。
生命周期
session 的生命周期为创建、存活与结束。
session 创建,即 HttpSession 实例对象的创建。
对于 Servlet 而言,只有执行 req.getSession() 或 req.getSession(true) 才会创建 HttpSession 实例。但若请求携带了 sessionID,且此时服务器存在对应该 sessionID 的 HttpSession 实例时,不会创建。
session 存活,即 session 在创建与结束之间的过程。session 存活期间可通过 req.getSession() 获取,并可执行 getId(), isNew() 等一系列相关方法。
session 结束,即 HttpSession 实例对象的销毁。
HttpSession 实例对象超时。调用了实例方法 invalidate() 。
服务器 (Tomcat) 关闭或卸载了 HttpSession 实例所在的 web 应用。
超时时间
HttpSession 实例的 超时时间默认为 1800 秒 ,即 30 分钟,可通过其实例方法 getMaxInactiveInterval() 查询。可以通过 setMaxInactiveInterval(int interval) 来设置 当前 session 的超时时间,int interval 单位为秒,若设置为 0 或 负数,则为永不超时。
也可以通过在 web.xml 文件中加入如下配置来设置当前 web 应用全局 session 的超时时间 ,单位为分钟,若设置为 0 或 负数,则为永不超时。
1 2 3 4 <session-config > <session-timeout > 60</session-timeout > </session-config >
invalidate
HttpSession 接口的 invalidate() 抽象方法有如下注释,这表明会话实例调用该方法时,JVM 不会直接回收该对象 (在堆中) 的内存,而是清除所有对该实例的引用,这样在下一次 GC 时该对象会被回收。
参考1 , 参考2
1 Invalidates this session then unbinds any objects bound to it.
session与cookie
当服务端处理请求时创建了 HttpSession 实例后,对应该实例,会有一个唯一的 sessionID,可通过 HttpSession 实例方法 getId() 获取。此 sessionID 会附加到返回信息中,使得浏览器的该次请求的「Response Headers」中具有该 sessionID (set-cookie 字段),且浏览器会以 cookie 的形式记录在本地,并将其加入到下一次请求中。于是服务器在处理下一次请求时,即可根据此 sessionID 判断此次请求与第一次请求为「同一次会话」。具体过程看下例。
示例
在 pro08-javaweb-servlet web 子工程中创建如下 Demo03Servlet 类,在重写的 service 方法中获取 session 信息。
1
2
3
4
5
6
7
8
9
10
11
12
13
14
15
16
17
18
package com.yukiyama.servlets;import javax.servlet.ServletException;import javax.servlet.ServletRequest;import javax.servlet.ServletResponse;import javax.servlet.http.HttpServlet;import javax.servlet.http.HttpServletRequest;import javax.servlet.http.HttpServletResponse;import javax.servlet.http.HttpSession;import java.io.IOException;public class Demo03Servlet extends HttpServlet { @Override protected void service (HttpServletRequest req, HttpServletResponse resp) throws ServletException, IOException { HttpSession session = req.getSession(); System.out.println("session.getId() = " + session.getId()); } }
与之前一样,在 web.xml 中配置 Demo03Servlet 与请求 /demo03 的映射关系,确保 pro08-javaweb-servlet 已经部署在 Tomcat 中 (之前已部署) 。运行此应用,可以看到 Tomcat 打印了如下 sessionID 信息。
1 session.getId() = 9B41CA00381B384676117432AA6C2F4A
确保在浏览器页面中打开 http://localhost:8080/demo03 时,调试控制台 (按 F12) 已打开,即可以看到如下「Response Headers」中记录了上述 SessionID ,即 Set-Cookie 字段。这表示服务器针对 /demo03 这个 Get 请求,发回给浏览器的响应报文中携带了 SessionID (此时已保存到浏览器的 Cookie 中) 。
1
2
3
4
5
6
HTTP/1.1 200 Set-Cookie: JSESSIONID=9B41CA00381B384676117432AA6C2F4A; Path=/pro08; HttpOnly Content-Length: 0 Date: Wed, 12 Oct 2022 08:28:06 GMT Keep-Alive: timeout=20 Connection: keep-alive
此时我们注意到,在调试控制台下查看「Request Headers」,其中并未出现上述 SessionID 。这进一步说明首次请求时浏览器并未携带会话标记,是 服务端首次处理该请求时生成并返回给浏览器的 。
接着我们刷新页面,发送第二次 /demo03 Get 请求。此时「Request Headers」中可看到其携带了前述 SessionID ,即其中的 Cookie 字段。
1
2
3
4
5
6
7
8
9
10
11
12
13
14
15
16
GET /pro08/demo03 HTTP/1.1 Accept: text/html,application/xhtml+xml,application/xml;q=0.9,image/avif,image/webp,image/apng,*/*;q=0.8,application/signed-exchange;v=b3;q=0.9 Accept-Encoding: gzip, deflate, br Accept-Language: en,zh-CN;q=0.9,zh;q=0.8,ko-KR;q=0.7,ko;q=0.6,ja;q=0.5 Cache-Control: max-age=0 Connection: keep-alive Cookie: JSESSIONID=9B41CA00381B384676117432AA6C2F4A Host: localhost:8080 Sec-Fetch-Dest: document Sec-Fetch-Mode: navigate Sec-Fetch-Site: none Sec-Fetch-User: ?1 Upgrade-Insecure-Requests: 1 User-Agent: Mozilla/5.0 (Macintosh; Intel Mac OS X 10_15_7) AppleWebKit/537.36 (KHTML, like Gecko) Chrome/106.0.0.0 Safari/537.36 sec-ch-ua: "Chromium";v="106", "Google Chrome";v="106", "Not;A=Brand";v="99" sec-ch-ua-mobile: ?0
而「Response Headers」中无 SessionID 。
1
2
3
4
5
HTTP/1.1 200 Content-Length: 0 Date: Wed, 12 Oct 2022 08:43:18 GMT Keep-Alive: timeout=20 Connection: keep-alive
这是因为第一次请求后,服务器发回的响应报文中的 SesionID 已经记录在浏览器中,再次请求时,如我们看到的第二次请求的「Request Headers」那样,SessionID 携带于其中,服务端在处理第二次请求时,根据此 SessionID 得知这是同一次「会话」,也就不必再发回 SessionID 了。
从此示例中我们还可以得出如下结论。
HttpSession 实例对象只存在于服务器中。cookie 本质是 HttpSession 实例的 ID,在服务器端生成,由服务器响应第一次请求时发回给浏览器。浏览器保存为本地 cookie,在此后的请求中携带该 sessionID ,以告知服务器当前请求属于哪一次会话,sessionID 相同的请求均为同一会话。
相关方法
与 session 相关的方法总结如下。
session 相关常用方法
描述
req.getSession()获取当前请求对应的会话,若无则创建一个新的会话。
req.getSession(true)同 req.getSession()
req.getSession(false)获取当前请求对应的会话,若无则返回 null。
session.getId()获取 SessionID
session.isNew()判断是否为新创建的 session 。
session.getMaxInactiveInterval()最大非激活间隔时长 (默认 1800s,即 30m) 。
session.setMaxInactiveInterval()设置最大非激活间隔时长。
session.invalidate()使会话立即失效。
session.getCreationTime()获取会话创建时间。
session.getLastAccessedTime()获取最近一次访问时间。
session.setAttribute()保存指定数据到 session 作用域空间中
session.getAttribute()从 session 作用域空间中获取指定数据
session.removeAttribute()删除 session 作用域空间中的指定数据
转发与重定向
TODO: 示意图
转发
转发 (forward) 。浏览器将请求发送到服务器,服务器根据请求信息找到对应的 servlet A,但 A 并不处理该请求,而是将其转发给 servlet B,这就是服务器端的请求转发,服务器端内的转发可经历多次,由具体实现决定。
在 pro08-javaweb-servlet 中新建 Demo04Servlet 和 Demo05Servlet 类。
1
2
3
4
5
6
7
8
9
10
11
12
13
14
15
16
17
18
package com.yukiyama.servlets;import javax.servlet.ServletException;import javax.servlet.http.HttpServlet;import javax.servlet.http.HttpServletRequest;import javax.servlet.http.HttpServletResponse;import java.io.IOException;public class Demo04Servlet extends HttpServlet { @Override protected void service (HttpServletRequest req, HttpServletResponse resp) throws ServletException, IOException { System.out.println("demo04..." ); req.getRequestDispatcher("demo07" ).forward(req,resp); } }
1
2
3
4
5
6
7
8
9
10
11
12
13
14
15
package com.yukiyama.servlets;import javax.servlet.ServletException;import javax.servlet.http.HttpServlet;import javax.servlet.http.HttpServletRequest;import javax.servlet.http.HttpServletResponse;import java.io.IOException;public class Demo05Servlet extends HttpServlet { @Override protected void service (HttpServletRequest req, HttpServletResponse resp) throws ServletException, IOException { System.out.println("demo05..." ); } }
web.xml 及 Tomcat 设置不再赘述。运行后,访问 http://localhost:8080/pro08/demo04 ,Tomcat 首先打印 demo04... ,接着打印 demo05... ,表明请求首先 Demo04Servlet 处理,随后通过 servie 方法中的 getRequestDispatcher("demo05").forward(req, resp) 转发给 Demo05Servlet 。虽被转发,但服务端的转发过程对浏览器不可见,浏览器地址栏无变化。
重定向
重定向 (redirect) 。浏览器将请求发送到服务器,服务器根据请求信息找到对应的 servlet A,但 A 并不处理该请求,而是发回一个响应,该响应告知客户端浏览器应访问一指定页面 (告知浏览器发起一个指定的请求),这就是服务器端的请求重定向。
仍然利用 Demo04Servlet 和 Demo05Servlet 观察,将 Demo04Servlet 的 service 方法中的 req.getRequestDispatcher("demo05").forward(req,resp); 替换为 resp.sendRedirect("demo05"); 。运行应用后也将依次打印 demo04... 和 demo05... 。但与转发不同的是,在浏览器调试控制台中可以看到请求了两次 (demo04 和 demo05) ,且第一次请求 (demo04) 的响应报文头 Respond Headers 中,可看到响应状态码为 302 ,意为重定向,重定向到 Location: demo05 。 我们还能看到浏览器地址栏从 http://localhost:8080/pro08/demo04 变为了 http://localhost:8080/pro08/demo05 。
1
2
3
4
5
6
HTTP/1.1 302 Location: demo05 Content-Length: 0 Date: Wed, 12 Oct 2022 10:40:33 GMT Keep-Alive: timeout=20 Connection: keep-alive
作用域
Servlet 作用域 (Scope) 。web 应用各组件需要共享数据,这些共享的数据可共享的范围即此处讨论的「作用域」。这是一个不太容易理解的概念,详细说明如下。
「共享的数据」本质上是 web 应用中的基本数据类型数据或引用类型的对象实例。「共享范围」即所谓「作用域 (scope)」,从小到大可分为 page / request / session / web context (application) 这四种,它们的本质是四种类对象 ( scope object, 见后表) ,即 「域对象」 。「作用域」不是一个确定的内存空间域,也不是一个明确的「时间域」,而是与四个具体的类对象相绑定的概念。当我们说一个被共享的实例 (例如 String str ) 的作用域是 session,我们指的是该 str 实例与一个具体的 HttpSession 实例 httpSession 产生了关联,要使用 str ,需要通过这个 httpSession 来获取。回想「session」一节中的例子,当 httpSession 不可用时,str 也即不可用,其他作用域同理。总之四种作用域分别表示共享的对象实例可在同一 JSP页面 / 请求 / 会话 / 应用 (对象实例) 中共享。
更详细地,对于一个对象实例 Object value,当我们要共享它时,先确定要共享的范围,即作用域,例如要在 session 作用域下共享,那么就要明确是在哪个 HttpSession 实例下共享,例如在实例 httpSession 中共享,于是我们通过 httpSeesion.setAttribute(String name, Object value) 来将 value 与 httpSession 绑定。当我们要使用 value 时,通过 httpSession.getAttribute(String name) 来获取。 httpSeesion 是执行 setAttribute 方法时的 httpSession , name 是执行 setAttribute 方法时的参数 String name 。
如下是四种作用域及其对应的类,后续我们以一些场景展示对象实例如何在不同的作用域中共享。
Scope Object
Class
Accessible From
Web context (Application)
javax.servlet.ServletContextWeb components within a web context. See Accessing the Web Context .
Session
javax.servlet.http.HttpSessionWeb components handling a request that belongs to the session. See Maintaining Client State .
Request
Subtype of javax.servlet.ServletRequest
Web components handling the request.
Page
javax.servlet.jsp.JspContextThe JSP page that creates the object.
request作用域
在 pro08-java-servlet web子项目中创建 Demo06Servlet 和 Demo07Servlet 类演示 session 作用域。
在 Demo06Servlet 类的 service 方法内,向 request 作用域中设置属性名为 name 的数据,该数据 (属性值) 为字符串 yukiyama ,随后打印该字符串。并将请求转发给 demo07 。
1
2
3
4
5
6
7
8
9
10
11
12
13
14
15
16
17
18
19
20
21
package com.yukiyama.servlets;import javax.servlet.ServletException;import javax.servlet.http.HttpServlet;import javax.servlet.http.HttpServletRequest;import javax.servlet.http.HttpServletResponse;import java.io.IOException;public class Demo06Servlet extends HttpServlet { @Override protected void service (HttpServletRequest req, HttpServletResponse resp) throws ServletException, IOException { req.setAttribute("name" , "yukiyama" ); System.out.println("demo06:" + req.getAttribute("name" )); req.getRequestDispatcher("demo07" ).forward(req, resp); } }
在 Demo07Servlet 类的 service 方法中,按属性名 name ,从 request 作用域中获取相应的数据 (属性值) 并打印。
1
2
3
4
5
6
7
8
9
10
11
12
13
14
15
16
17
package com.yukiyama.servlets;import javax.servlet.ServletException;import javax.servlet.http.HttpServlet;import javax.servlet.http.HttpServletRequest;import javax.servlet.http.HttpServletResponse;import java.io.IOException;public class Demo07Servlet extends HttpServlet { @Override protected void service (HttpServletRequest req, HttpServletResponse resp) throws ServletException, IOException { Object name = req.getAttribute("name" ); System.out.println("demo07: " + name); } }
web.xml 完成相关配置,运行该 web 子工程,在浏览器中首先访问 http://localhost:8080/demo06 ,可以看到在 Tomcat 控制台分别打印了 demo06: yukiyama 以及 demo07: yukiyama 。如我们所知,转发请求仍是同一请求,两次获取 name 都是在同一 request 作用域下,符合预期。
接着在 Demo06Servlet 的 service 方法中将转发语句替换为重定向语句 resp.sendRedirect("demo07"); ,再次访问 http://localhost:8080/demo06 ,可以看到 Tomcat 控制台分别打印了 demo06: yukiyama 以及 demo07: null 。这是重定向后的请求与第一次请求是两次不同的请求,因此第一次请求时的 request 作用域下的 name 无法在第二次请求的作用域中取到。
【我的疑惑。。。】
但是打印 request 实例的时候,正好相反。「转发」时两个 servlet 打印的 request 实例是不同的,但是「重定向」时两个 servlet 打印的 request 实例是相同的。
session作用域
在 pro08-java-servlet web子项目中创建 Demo08Servlet 和 Demo09Servlet 类演示 session 作用域。
在 Demo08Servlet 类的 service 方法内,向 session 作用域中属性名为 userName 的数据,该数据 (属性值) 为字符串 yukiyama ,随后打印该字符串。
1
2
3
4
5
6
7
8
9
10
11
12
13
14
15
16
17
package com.yukiyama.servlets;import javax.servlet.ServletException;import javax.servlet.http.HttpServlet;import javax.servlet.http.HttpServletRequest;import javax.servlet.http.HttpServletResponse;import java.io.IOException;public class Demo08Servlet extends HttpServlet { @Override protected void service (HttpServletRequest req, HttpServletResponse resp) throws ServletException, IOException { req.getSession().setAttribute("userName" , "yukiyama" ); Object userName = req.getSession().getAttribute("userName" ); System.out.println(userName); } }
在 Demo09Servlet 类的 service 方法中获取 session 后,从该 session 作用域中,按属性名 userName 获取相应的数据 (属性值) 并打印。
1
2
3
4
5
6
7
8
9
10
11
12
13
14
15
16
package com.yukiyama.servlets;import javax.servlet.ServletException;import javax.servlet.http.HttpServlet;import javax.servlet.http.HttpServletRequest;import javax.servlet.http.HttpServletResponse;import java.io.IOException;public class Demo09Servlet extends HttpServlet { @Override protected void service (HttpServletRequest req, HttpServletResponse resp) throws ServletException, IOException { Object userName = req.getSession().getAttribute("userName" ); System.out.println(userName); } }
web.xml 完成相关配置,运行该 web 子工程,在浏览器中首先访问 http://localhost:8080/demo08 ,可以在 Tomcat 控制台看到打印了 yukiyama 。此时我们将 URL 改为 http://localhost:8080/demo09 ,可以看到 yukiyama 再次被打印。这是因为两次请求为同一次会话,而 userName 属性值保存在 session 作用域中。
但若此时我们打开另一个浏览器 (对于服务端 Tomcat 来说,这是另一个客户端) ,则会创建新的会话,由于 yukiyama 的是 session 作用域下的属性值,因此在另一个浏览器中访问 http://localhost:8080/demo09 ,打印的是 null 。
web context作用域
在 pro08-java-servlet web子项目中创建 Demo10Servlet 和 Demo11Servlet 类演示 web context (application) 作用域。
在 Demo10Servlet 类的 service 方法内,向 web context 作用域中属性名为 userName 的数据,该数据 (属性值) 为字符串 yukiyama ,随后打印该字符串。
1
2
3
4
5
6
7
8
9
10
11
12
13
14
15
16
17
18
19
package com.yukiyama.servlets;import javax.servlet.ServletContext;import javax.servlet.ServletException;import javax.servlet.http.HttpServlet;import javax.servlet.http.HttpServletRequest;import javax.servlet.http.HttpServletResponse;import java.io.IOException;public class Demo10Servlet extends HttpServlet { @Override protected void service (HttpServletRequest req, HttpServletResponse resp) throws ServletException, IOException { ServletContext app = req.getServletContext(); app.setAttribute("userName" , "yukiyama" ); Object userName = app.getAttribute("userName" ); System.out.println( "demo10" + userName); } }
在 Demo11Servlet 类的 service 方法中获取 web context 后,从该 web context 作用域中,按属性名 userName 获取相应的数据 (属性值) 并打印。
1
2
3
4
5
6
7
8
9
10
11
12
13
14
15
16
17
18
package com.yukiyama.servlets;import javax.servlet.ServletContext;import javax.servlet.ServletException;import javax.servlet.http.HttpServlet;import javax.servlet.http.HttpServletRequest;import javax.servlet.http.HttpServletResponse;import java.io.IOException;public class Demo11Servlet extends HttpServlet { @Override protected void service (HttpServletRequest req, HttpServletResponse resp) throws ServletException, IOException { ServletContext app = req.getServletContext(); Object userName = app.getAttribute("userName" ); System.out.println("demo11" + userName); } }
web.xml 完成相关配置,运行该 web 子工程,在浏览器中首先访问 http://localhost:8080/demo10 ,可以在 Tomcat 控制台看到打印了 yukiyama 。接着我们用另一个浏览器打开 http://localhost:8080/demo11 ,可以看到 yukiyama 再次被打印。
只要该应用仍在运行,则处于该作用域的共享数据就一直能够获取到。
路径问题
在 webapp 下的某个 html 文件中,若引用其他路径下的资源文件,有相对路径与绝对路径写法,建议写为绝对路径。在 html 页面中使用 base 标签定义绝对路径,则该页面中的其他路径自动拼接到 base 标签定义的路径之后,形成绝对路径。
小结
在 「HttpServlet」小结中我们通过一个示例观察了
标签含义如下。
Thymeleaf
Thymeleaf 是一种「视图模版」技术,支持在 Web 应用 (基于 servlet) 以及在非 Web 环境中工作。Thymeleaf 旨在完全取代 JSP,相比 JSP 的一大特点是实现了「自然模版 (natural tamplate)」,即利用 Thymeleaf 编写的 html 模版仍是一个 html 文件,且看起来以及工作起来均与 html 类似。当它工作在 Web 环境中时,能够动态渲染数据,在非 Web 环境中时就像静态 html 页面那样能够被浏览器解析。
入门示例
创建 pro09-fruit4-thymeleaf 子工程演示 Thymeleaf 的使用。
引入Thymeleaf依赖
首先在父工程中 javaweb_in_action 的 pom.xml 中引入 Thymeleaf 依赖。
1 2 3 4 5 <dependency > <groupId > org.thymeleaf</groupId > <artifactId > thymeleaf</artifactId > <version > 3.0.12.RELEASE</version > </dependency >
接着在子工程子工程 pro09-fruit4-thymeleaf 的 pom.xml 中引用。
1 2 3 4 <dependency > <groupId > org.thymeleaf</groupId > <artifactId > thymeleaf</artifactId > </dependency >
注意 mysql-connector 要像之前一样手动加入 (在 WEB-INF 目录中添加 lib 文件夹,导入 mysql-connector-java-8.0.11.jar)。
准备数据库
使用已在「Servlet」-「入门示例」-「准备数据库」中准备好的数据库 fruitdb 。
编写浏览器页面
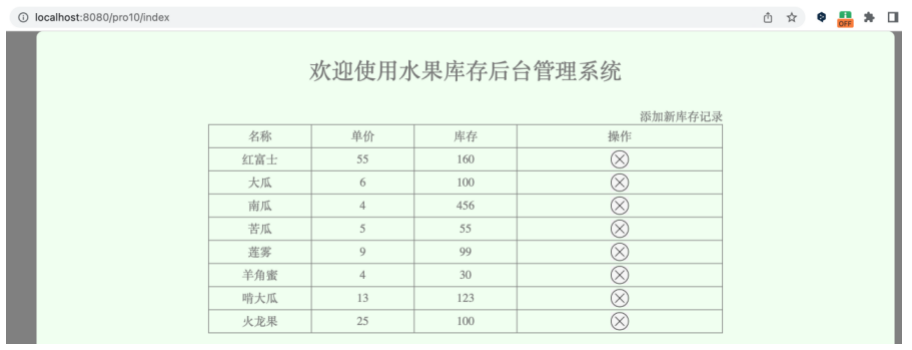
编写如下 index.html 页面,放在 webapp > WEB-INF 目录下。可以看到引入了 Thymeleaf 的命名空间,th 即为 Thymeleaf 标签。
此外还有相应的 css 与图片资源文件,均可在 javaweb_in_action 仓库中获取,此处不列出。
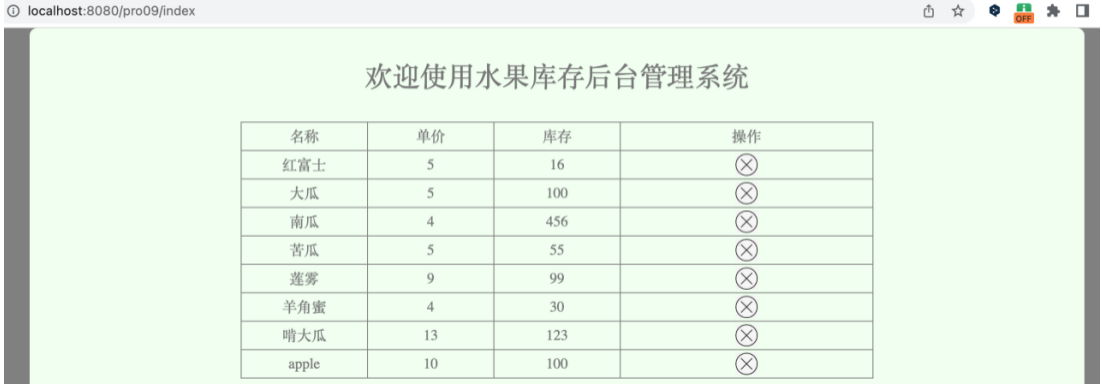
1 2 3 4 5 6 7 8 9 10 11 12 13 14 15 16 17 18 19 20 21 22 23 24 25 26 27 28 29 30 <html xmlns:th ="http://www.thymeleaf.org" > <head > <meta charset ="utf-8" > <link rel ="stylesheet" href ="css/index.css" > </head > <body > <div id ="div_container" > <div id ="div_fruit_list" > <p class ="center f30" > 欢迎使用水果库存后台管理系统</p > <table id ="tbl_fruit" > <tr > <th class ="w20" > 名称</th > <th class ="w20" > 单价</th > <th class ="w20" > 库存</th > <th > 操作</th > </tr > <tr th:if ="${#lists.isEmpty(session.fruitList)}" > <td colspan ="4" > 对不起,库存为空!</td > </tr > <tr th:unless ="${#lists.isEmpty(session.fruitList)}" th:each ="fruit : ${session.fruitList}" > <td th:text ="${fruit.fname}" > 苹果</td > <td th:text ="${fruit.price}" > 5</td > <td th:text ="${fruit.fcount}" > 20</td > <td > <img src ="imgs/del.jpg" class ="delImg" /> </td > </tr > </table > </div > </div > </body > </html >
编写FruitDao相关类
与已在「Servlet」-「入门示例」-「编写FruitDao相关类」写好的相关类类似,不在此处列出,相关文件可以在 javaweb_in_action 仓库中获取。
编写IndexServlet
如下是 Servlet 具体实现类 IndexServlet 。需要注意的是,这里继承的不是 HttpServlet 而是 ViewBaseServlet 。 ViewBaseServlet 来自 Thymeleaf 源码,该类继承了 HttpServlet 。
1
2
3
4
5
6
7
8
9
10
11
12
13
14
15
16
17
18
19
20
21
22
23
24
25
26
27
28
29
package com.yukiyama.fruit.servlets;import com.yukiyama.fruit.dao.FruitDao;import com.yukiyama.fruit.dao.impl.FruitDaoImpl;import com.yukiyama.fruit.pojo.Fruit;import com.yukiyama.myssm.myspringmvc.ViewBaseServlet;import javax.servlet.ServletException;import javax.servlet.annotation.WebServlet;import javax.servlet.http.HttpServletRequest;import javax.servlet.http.HttpServletResponse;import javax.servlet.http.HttpSession;import java.io.IOException;import java.util.List;@WebServlet("/index") public class IndexServlet extends ViewBaseServlet { @Override protected void doGet (HttpServletRequest req, HttpServletResponse resp) throws ServletException, IOException { FruitDao fruitDao = new FruitDaoImpl (); List<Fruit> fruitList = fruitDao.getFruitList(); HttpSession session = req.getSession(); session.setAttribute("fruitList" , fruitList); super .processTemplate("index" , req, resp); } }
ViewBaseServlet 类。
该类中的 processTemplate 方法完成资源转发与数据渲染。
1
2
3
4
5
6
7
8
9
10
11
12
13
14
15
16
17
18
19
20
21
22
23
24
25
26
27
28
29
30
31
32
33
34
35
36
37
38
39
40
41
42
43
44
45
46
47
48
49
50
51
52
53
package com.yukiyama.myssm.myspringmvc;import org.thymeleaf.TemplateEngine;import org.thymeleaf.context.WebContext;import org.thymeleaf.templatemode.TemplateMode;import org.thymeleaf.templateresolver.ServletContextTemplateResolver;import javax.servlet.ServletContext;import javax.servlet.ServletException;import javax.servlet.http.HttpServlet;import javax.servlet.http.HttpServletRequest;import javax.servlet.http.HttpServletResponse;import java.io.IOException;public class ViewBaseServlet extends HttpServlet { private TemplateEngine templateEngine; @Override public void init () throws ServletException { ServletContext servletContext = this .getServletContext(); ServletContextTemplateResolver templateResolver = new ServletContextTemplateResolver (servletContext); templateResolver.setTemplateMode(TemplateMode.HTML); String viewPrefix = servletContext.getInitParameter("view-prefix" ); templateResolver.setPrefix(viewPrefix); String viewSuffix = servletContext.getInitParameter("view-suffix" ); templateResolver.setSuffix(viewSuffix); templateResolver.setCacheTTLMs(60000L ); templateResolver.setCacheable(true ); templateResolver.setCharacterEncoding("utf-8" ); templateEngine = new TemplateEngine (); templateEngine.setTemplateResolver(templateResolver); } protected void processTemplate (String templateName, HttpServletRequest req, HttpServletResponse resp) throws IOException { resp.setContentType("text/html;charset=UTF-8" ); WebContext webContext = new WebContext (req, resp, getServletContext()); templateEngine.process(templateName, webContext, resp.getWriter()); } }
配置web.xml
要将浏览器请求映射到具体的 Servlet 实现类,此前都是通过在 web.xml 中配置 <servlet> 以及 <servlet-mapping> 标签来完成。Servlet 3.0 版本开始支持 注解方式映射 ,即在 Servlet 实现类上添加 @WebServlet 类注解完成与请求的映射,其 value 属性为请求路径字符串。在前面给出的 IndexServlet 中已写好。因此这部分配置无需借助 web.xml 完成。但需要在 web.xml 中配置「上下文参数」。
配置「上下文参数」,设置 视图前缀 (view-prefix) 与 视图后缀 (view-suffix) 。这两个参数在 ViewBaseServlet 类的 init 方法中被获取。
1
2
3
4
5
6
7
8
9
10
11
12
13
14
15
16
17
<?xml version="1.0" encoding="UTF-8" ?> <web-app xmlns ="http://xmlns.jcp.org/xml/ns/javaee" xmlns:xsi ="http://www.w3.org/2001/XMLSchema-instance" xsi:schemaLocation ="http://xmlns.jcp.org/xml/ns/javaee http://xmlns.jcp.org/xml/ns/javaee/web-app_4_0.xsd" version ="4.0" > <context-param > <param-name > view-prefix</param-name > <param-value > /</param-value > </context-param > <context-param > <param-name > view-suffix</param-name > <param-value > .html</param-value > </context-param > </web-app >
配置Tomcat
请参考「Tomcat」-「部署应用」-「自动」。
运行
完成上述步骤后,pro09-fruit4-thymeleaf 子工程目录如下,相关的文件都可以在 javaweb_in_action 仓库中获取。
1
2
3
4
5
6
7
8
9
10
11
12
13
14
15
16
17
18
19
20
21
22
23
24
25
26
27
28
29
30
31
32
33
34
pro09-fruit4-thymeleaf ├── pom.xml └── src └── main ├── java │ └── com │ └── yukiyama │ ├── fruit │ │ ├── dao │ │ │ ├── FruitDao.java │ │ │ └── impl │ │ │ └── FruitDaoImpl.java │ │ ├── pojo │ │ │ └── Fruit.java │ │ └── servlets │ │ └── IndexServlet.java │ └── myssm │ ├── basedao │ │ └── BaseDAO.java │ └── myspringmvc │ └── ViewBaseServlet.java ├── resources └── webapp ├── WEB-INF │ ├── lib │ │ └── mysql-connector-java-8.0.11.jar │ └── web.xml ├── css │ └── index.css ├── imgs │ └── del.jpg └── index.html 19 directories, 12 files
至此,我们完成了实现目标功能所需的所有工作。运行该工程,浏览器自动弹出 index.html 页面。注意此时 URL 为 http://localhost:8080/pro09/index (无 .html 文件名后缀),但能够打开 index.html 页面。
编辑和更新示例
创建 pro10-fruit5-thymeleaf 子工程,演示使用 Thymeleaf 编写 html 页面,实现在浏览器页面上编辑获取到的数据库信息,并将编辑后的结果更新到数据库中。
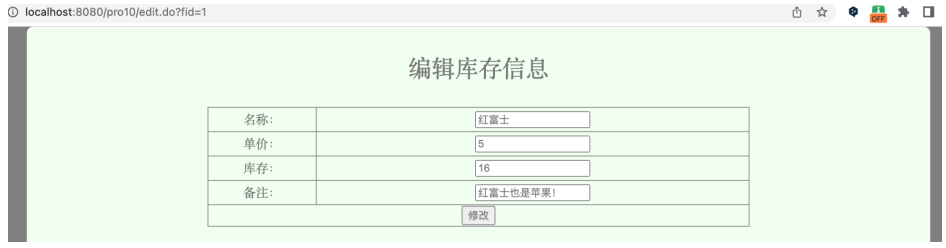
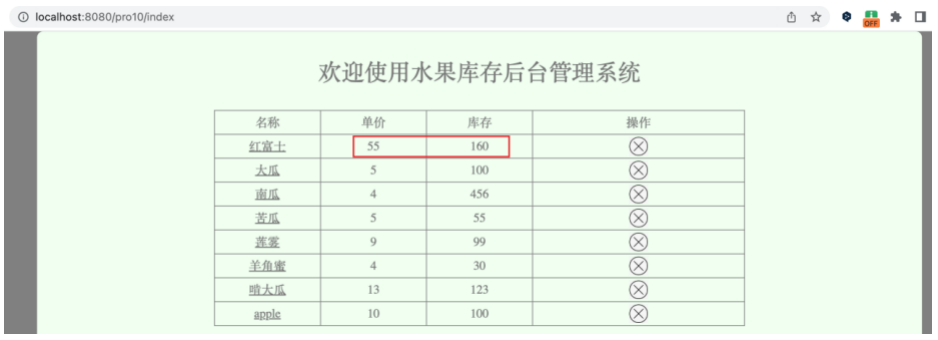
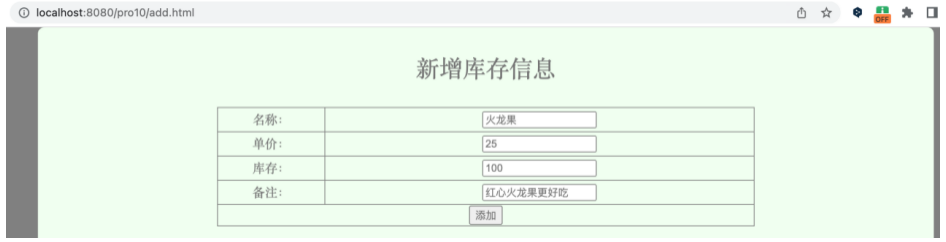
该子工程直接拷贝「入门示例」的 pro09-fruit4-thymeleaf ,并在此之上扩展。首先增加 edit.html 页面,使得点击 index 页面表格中的「名称」,例如「红富士」,可以跳转到「红富士」的编辑页面,编辑页面也为一表格,自动获取数据库中关于红富士的水果信息显示在文本框中,即「名称」、「价格」、「库存」、「备注」。编辑文本框修改字段后点击底部的「修改」按钮使修改反映到数据库中。预先展示编辑页面如下。
后续的「删除和添加示例」章节会继续在 pro10-fruit5-thymeleaf 子工程中演示增删条目、分页和按关键字查询的功能,预先列出完成这些演示后对应的后续的 pro12-fruit7-keyword 工程的文件结构,如下。所有文件均可在 javaweb_in_action 仓库中获取。
1
2
3
4
5
6
7
8
9
10
11
12
13
14
15
16
17
18
19
20
21
22
23
24
25
26
27
28
29
30
31
32
33
34
35
36
37
38
39
40
41
42
43
44
45
46
47
48
49
pro12-fruit7-keyword ├── pom.xml └── src └── main ├── java │ └── com │ └── yukiyama │ ├── fruit │ │ ├── dao │ │ │ ├── FruitDao.java │ │ │ └── impl │ │ │ └── FruitDaoImpl.java │ │ ├── pojo │ │ │ └── Fruit.java │ │ └── servlets │ │ ├── AddServlet.java │ │ ├── DelServlet.java │ │ ├── EditServlet.java │ │ ├── IndexServlet.java │ │ └── UpdateServlet.java │ └── myssm │ ├── basedao │ │ └── BaseDAO.java │ ├── myspringmvc │ │ └── ViewBaseServlet.java │ └── util │ └── StringUtils.java ├── resources └── webapp ├── WEB-INF │ ├── lib │ │ └── mysql-connector-java-8.0.11.jar │ └── web.xml ├── add.html ├── css │ ├── add.css │ ├── edit.css │ └── index.css ├── edit.html ├── imgs │ └── del.jpg ├── index.html ├── js │ └── index.js └── web └── WEB-INF └── web.xml 23 directories, 23 files
引入Thymeleaf依赖
同「入门示例」。父工程已引入,在子工程 pro10-fruit5-thymeleaf 的 pom.xml 中引入。mysql-connector 依赖的处理也同前。
准备数据库
「入门示例」中已完成。
编写浏览器页面
index.html
在「入门示例」的基础上主要多了如下一行。用于跳转到编辑页。
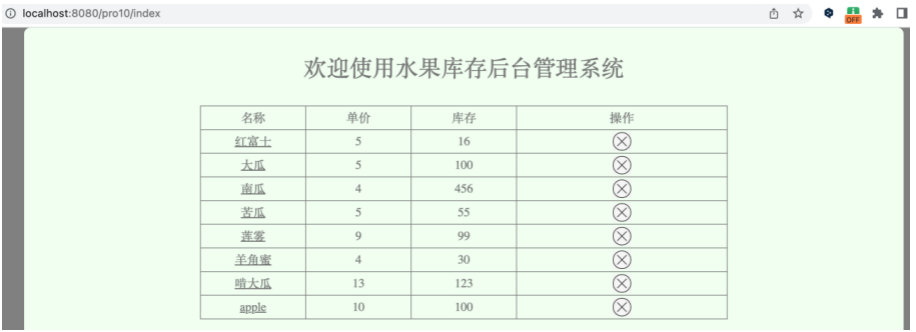
1 <td > <a th:text ="${fruit.fname}" th:href ="@{/edit.do(fid=${fruit.fid})}" > 苹果</a > </td >
index.html
1 2 3 4 5 6 7 8 9 10 11 12 13 14 15 16 17 18 19 20 21 22 23 24 25 26 27 28 29 30 31 <html xmlns:th ="http://www.thymeleaf.org" > <head > <meta charset ="utf-8" > <link rel ="stylesheet" href ="css/index.css" > </head > <body > <div id ="div_container" > <div id ="div_fruit_list" > <p class ="center f30" > 欢迎使用水果库存后台管理系统</p > <table id ="tbl_fruit" > <tr > <th class ="w20" > 名称</th > <th class ="w20" > 单价</th > <th class ="w20" > 库存</th > <th > 操作</th > </tr > <tr th:if ="${#lists.isEmpty(session.fruitList)}" > <td colspan ="4" > 对不起,库存为空!</td > </tr > <tr th:unless ="${#lists.isEmpty(session.fruitList)}" th:each ="fruit : ${session.fruitList}" > <td > <a th:text ="${fruit.fname}" th:href ="@{/edit.do(fid=${fruit.fid})}" > 苹果</a > </td > <td th:text ="${fruit.price}" > 5</td > <td th:text ="${fruit.fcount}" > 20</td > <td > <img src ="imgs/del.jpg" class ="delImg" /> </td > </tr > </table > </div > </div > </body > </html >
edit.html
编写如下 edit.html 页面,放在 webapp > WEB-INF 目录下。
1 2 3 4 5 6 7 8 9 10 11 12 13 14 15 16 17 18 19 20 21 22 23 24 25 26 27 28 29 30 31 32 33 34 35 36 37 38 39 40 41 <html xmlns:th ="http://www.thymeleaf.org" > <head > <meta charset ="utf-8" > <link rel ="stylesheet" href ="css/edit.css" > </head > <body > <div id ="div_container" > <div id ="div_fruit_list" > <p class ="center f30" > 编辑库存信息</p > <form th:action ="@{/update.do}" method ="post" th:object ="${fruit}" > <input type ="hidden" name ="fid" th:value ="*{fid}" /> <table id ="tbl_fruit" > <tr > <th class ="w20" > 名称:</th > <td > <input type ="text" name ="fname" th:value ="*{fname}" /> </td > </tr > <tr > <th class ="w20" > 单价:</th > <td > <input type ="text" name ="price" th:value ="*{price}" /> </td > </tr > <tr > <th class ="w20" > 库存:</th > <td > <input type ="text" name ="fcount" th:value ="*{fcount}" /> </td > </tr > <tr > <th class ="w20" > 备注:</th > <td > <input type ="text" name ="remark" th:value ="*{remark}" /> </td > </tr > <tr > <th colspan ="2" > <input type ="submit" value ="修改" /> </th > </tr > </table > </form > </div > </div > </body > </html >
编写FruitDao相关类
「入门示例」中已完成。有部分调整,请参考仓库。
编写Servlet具体实现类
IndexServlet
「入门示例」中已完成。
EditServlet
与 /edit.do 绑定。
TODO:说明
1
2
3
4
5
6
7
8
9
10
11
12
13
14
15
16
17
18
19
20
21
22
23
24
25
26
27
28
29
30
package com.yukiyama.fruit.servlets;import com.yukiyama.fruit.dao.FruitDao;import com.yukiyama.fruit.dao.impl.FruitDaoImpl;import com.yukiyama.fruit.pojo.Fruit;import com.yukiyama.myssm.myspringmvc.ViewBaseServlet;import com.yukiyama.myssm.util.StringUtils;import javax.servlet.ServletException;import javax.servlet.annotation.WebServlet;import javax.servlet.http.HttpServletRequest;import javax.servlet.http.HttpServletResponse;import javax.servlet.http.HttpSession;import java.io.IOException;import java.util.List;@WebServlet("/edit.do") public class EditServlet extends ViewBaseServlet { private FruitDao fruitDao = new FruitDaoImpl (); @Override protected void doGet (HttpServletRequest req, HttpServletResponse resp) throws ServletException, IOException { String fidStr = req.getParameter("fid" ); if (StringUtils.isNotEmpty(fidStr)){ int fid = Integer.parseInt(fidStr); Fruit fruit = fruitDao.getFruitByFid(fid); req.setAttribute("fruit" , fruit); super .processTemplate("edit" , req, resp); } } }
UpdateServlet
与 /update.do 绑定。
TODO:说明
1
2
3
4
5
6
7
8
9
10
11
12
13
14
15
16
17
18
19
20
21
22
23
24
25
26
27
28
29
30
31
32
33
34
35
36
37
38
39
40
41
42
43
44
package com.yukiyama.fruit.servlets;import com.yukiyama.fruit.dao.FruitDao;import com.yukiyama.fruit.dao.impl.FruitDaoImpl;import com.yukiyama.fruit.pojo.Fruit;import com.yukiyama.myssm.myspringmvc.ViewBaseServlet;import javax.servlet.ServletException;import javax.servlet.annotation.WebServlet;import javax.servlet.http.HttpServletRequest;import javax.servlet.http.HttpServletResponse;import java.io.IOException;@WebServlet("/update.do") public class UpdateServlet extends ViewBaseServlet { private FruitDao fruitDao = new FruitDaoImpl (); @Override protected void doPost (HttpServletRequest request, HttpServletResponse response) throws ServletException, IOException { request.setCharacterEncoding("utf-8" ); String fidStr = request.getParameter("fid" ); Integer fid = Integer.parseInt(fidStr); String fname = request.getParameter("fname" ); String priceStr = request.getParameter("price" ); int price = Integer.parseInt(priceStr); String fcountStr = request.getParameter("fcount" ); Integer fcount = Integer.parseInt(fcountStr); String remark = request.getParameter("remark" ); fruitDao.updateFruit(new Fruit (fid,fname, price ,fcount ,remark )); response.sendRedirect("index" ); } }
配置web.xml
同「入门示例」。
配置Tomcat
方法同前,略。
运行
完成上述步骤后,运行 pro10-fruit5-thymeleaf 应用。浏览器自动弹出 index.html 页面。
可以看到所有「名称」都变为了链接,点击后跳转到编辑页。
编辑并提交后,回到 index 页面,这是通过 UpdateServlet 类 doPost 方法中的 response.sendRedirect("index"); 做到的 。页面显示正确 (单价改成了 55,库存改成了 160) 。
接着查看到数据库,相关项确实更新了。
1 2 3 4 5 6 7 8 9 10 11 12 13 14 15 16 mysql> select * from t_fruit; + | fid | fname | price | fcount | remark | + | 1 | 红富士 | 55 | 160 | 红富士也是苹果! | | 2 | 大瓜 | 5 | 100 | 王校长的瓜真香 | | 3 | 南瓜 | 4 | 456 | 水果真好吃 | | 4 | 苦瓜 | 5 | 55 | 苦瓜很好吃 | | 5 | 莲雾 | 9 | 99 | 莲雾是一种神奇的水果 | | 6 | 羊角蜜 | 4 | 30 | 羊角蜜是一种神奇的瓜 | | 7 | 啃大瓜 | 13 | 123 | 孤瓜 | | 38 | apple | 10 | 100 | apple added | + 8 rows in set (0.04 sec)mysql>
删除和添加示例
继续在 pro10-fruit5-thymeleaf 子工程中为库存系统增加「删除」和「新增」数据的功能。
增加删除功能
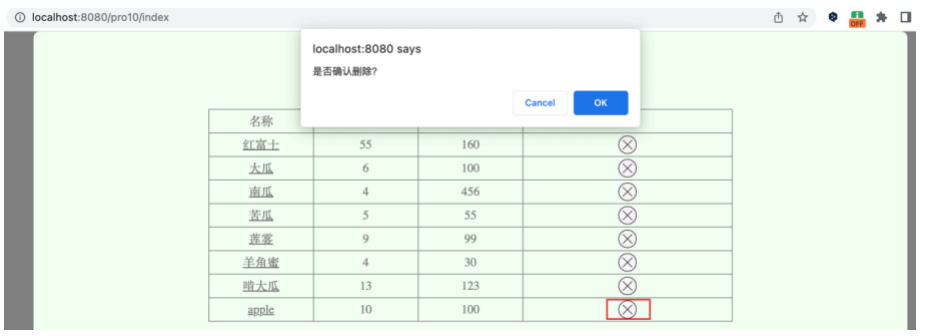
更新 index.html, 为删除 icon 添加点击事件。
1 2 3 4 5 6 7 8 9 10 11 12 13 14 15 16 17 18 19 20 21 22 23 24 25 26 27 28 29 30 31 32 33 <html xmlns:th ="http://www.thymeleaf.org" > <head > <meta charset ="utf-8" > <link rel ="stylesheet" href ="css/index.css" > <script language ="JavaScript" src ="js/index.js" > </script > </head > <body > <div id ="div_container" > <div id ="div_fruit_list" > <p class ="center f30" > 欢迎使用水果库存后台管理系统</p > <table id ="tbl_fruit" > <tr > <th class ="w20" > 名称</th > <th class ="w20" > 单价</th > <th class ="w20" > 库存</th > <th > 操作</th > </tr > <tr th:if ="${#lists.isEmpty(session.fruitList)}" > <td colspan ="4" > 对不起,库存为空!</td > </tr > <tr th:unless ="${#lists.isEmpty(session.fruitList)}" th:each ="fruit : ${session.fruitList}" > <td > <a th:text ="${fruit.fname}" th:href ="@{/edit.do(fid=${fruit.fid})}" > 苹果</a > </td > <td th:text ="${fruit.price}" > 5</td > <td th:text ="${fruit.fcount}" > 20</td > <td > <img src ="imgs/del.jpg" class ="delImg" th:onclick ="|delFruit(${fruit.fid})|" /> </td > </tr > </table > </div > </div > </body > </html >
其中, index.js 如下。
1
2
3
4
5
function delFruit (fid ){ if (confirm ('是否确认删除?' )){ window .location .href ='del.do?fid=' +fid; } }
新增DelServlet实现类
如下,新增 DelServlet 实现类。FruitDao 和 FruitDaoImpl 增加 delFruit 方法。
TODO:说明
1
2
3
4
5
6
7
8
9
10
11
12
13
14
15
16
17
18
19
20
21
22
23
24
25
26
27
package com.yukiyama.fruit.servlets;import com.yukiyama.fruit.dao.FruitDao;import com.yukiyama.fruit.dao.impl.FruitDaoImpl;import com.yukiyama.myssm.myspringmvc.ViewBaseServlet;import com.yukiyama.myssm.util.StringUtils;import javax.servlet.ServletException;import javax.servlet.annotation.WebServlet;import javax.servlet.http.HttpServletRequest;import javax.servlet.http.HttpServletResponse;import java.io.IOException;@WebServlet("/del.do") public class DelServlet extends ViewBaseServlet { private FruitDao fruitDao = new FruitDaoImpl (); @Override protected void doGet (HttpServletRequest request, HttpServletResponse response) throws ServletException, IOException { String fidStr = request.getParameter("fid" ); if (StringUtils.isNotEmpty(fidStr)){ int fid = Integer.parseInt(fidStr); fruitDao.delFruit(fid); response.sendRedirect("index" ); } } }
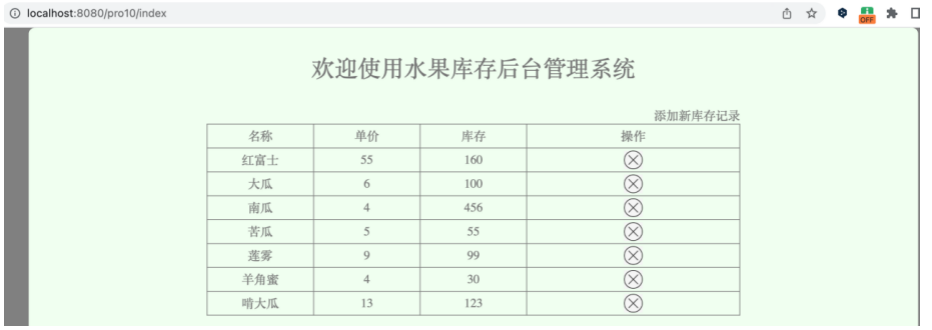
运行该子工程,点击最后一行的删除 icon,弹出提示信息,点击「OK」删除。
与编辑功能类似,删除后跳转回 index 页面,可以看到删除完成。
增加新增功能
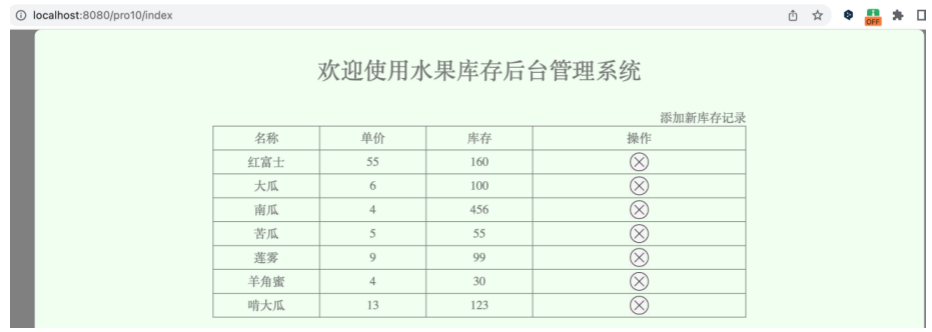
继续在 index.html 中增加新增库存条目的功能,如下。
1 2 3 4 5 6 7 8 9 10 11 12 13 14 15 16 17 18 19 20 21 22 23 24 25 26 27 28 29 30 31 32 33 34 35 36 <html xmlns:th ="http://www.thymeleaf.org" > <head > <meta charset ="utf-8" > <link rel ="stylesheet" href ="css/index.css" > <script language ="JavaScript" src ="js/index.js" > </script > </head > <body > <div id ="div_container" > <div id ="div_fruit_list" > <p class ="center f30" > 欢迎使用水果库存后台管理系统</p > <div style ="border:0px solid red;width:60%;margin-left:20%;text-align:right;" > <a th:href ="@{/add.html}" style ="border:0px solid blue;margin-bottom:4px;" > 添加新库存记录</a > </div > <table id ="tbl_fruit" > <tr > <th class ="w20" > 名称</th > <th class ="w20" > 单价</th > <th class ="w20" > 库存</th > <th > 操作</th > </tr > <tr th:if ="${#lists.isEmpty(session.fruitList)}" > <td colspan ="4" > 对不起,库存为空!</td > </tr > <tr th:unless ="${#lists.isEmpty(session.fruitList)}" th:each ="fruit : ${session.fruitList}" > <td > <a th:text ="${fruit.fname}" th:href ="@{/edit.do(fid=${fruit.fid})}" > 苹果</a > </td > <td th:text ="${fruit.price}" > 5</td > <td th:text ="${fruit.fcount}" > 20</td > <td > <img src ="imgs/del.jpg" class ="delImg" th:onclick ="|delFruit(${fruit.fid})|" /> </td > </tr > </table > </div > </div > </body > </html >
新增AddServlet实现类
如下,新增 AddServlet 实现类。FruitDao 和 FruitDaoImpl 增加 addFruit 方法。
TODO:说明
1
2
3
4
5
6
7
8
9
10
11
12
13
14
15
16
17
18
19
20
21
22
23
24
25
26
27
28
29
30
31
32
33
34
35
36
37
38
39
40
41
42
package com.yukiyama.fruit.servlets;import com.yukiyama.fruit.dao.FruitDao;import com.yukiyama.fruit.dao.impl.FruitDaoImpl;import com.yukiyama.fruit.pojo.Fruit;import com.yukiyama.myssm.myspringmvc.ViewBaseServlet;import javax.servlet.ServletException;import javax.servlet.annotation.WebServlet;import javax.servlet.http.HttpServletRequest;import javax.servlet.http.HttpServletResponse;import java.io.IOException;@WebServlet("/add.do") public class AddServlet extends ViewBaseServlet { private FruitDao fruitDao = new FruitDaoImpl (); @Override protected void doPost (HttpServletRequest req, HttpServletResponse resp) throws ServletException, IOException { req.setCharacterEncoding("utf-8" ); String fname = req.getParameter("fname" ); String priceStr = req.getParameter("price" ); Integer price = Integer.parseInt(priceStr); String fcountStr = req.getParameter("fcount" ); Integer fcount = Integer.parseInt(fcountStr); String remark = req.getParameter("remark" ); Fruit fruit = new Fruit (0 , fname, price, fcount, remark); fruitDao.addFruit(fruit); resp.sendRedirect("index" ); } }
运行该子工程,可以看到 index 页表格右上角出现了「添加新库存记录」的可点击链接。
点击后跳转到新增库存信息编辑页面。
编辑后点击「添加」。
跳转到 index 页面,可以看到新增的库存信息已经更新到该页面表格中。
分页示例
复制一份 pro10-fruit5-thymeleaf ,重命名为 pro11-fruit6-pagination ,使用此子工程中为库存系统增加表格分页展示的功能。
增加分页功能
更新 index.html, 在 <table> 标签下新增分页用的按钮,并设置点击事件。
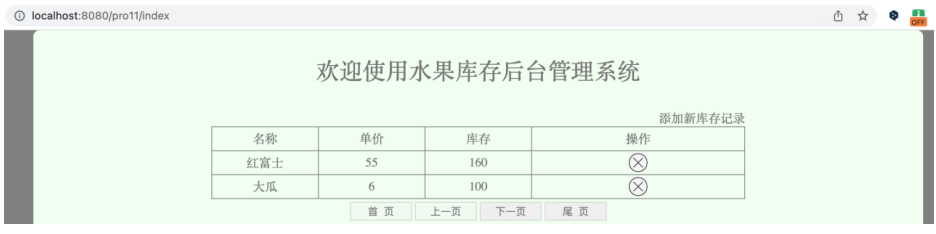
1 2 3 4 5 6 7 8 9 10 11 12 13 14 15 16 17 18 19 20 21 22 23 24 25 26 27 28 29 30 31 32 33 34 35 36 37 38 39 40 41 42 <html xmlns:th ="http://www.thymeleaf.org" > <head > <meta charset ="utf-8" > <link rel ="stylesheet" href ="css/index.css" > <script language ="JavaScript" src ="js/index.js" > </script > </head > <body > <div id ="div_container" > <div id ="div_fruit_list" > <p class ="center f30" > 欢迎使用水果库存后台管理系统</p > <div style ="border:0px solid red;width:60%;margin-left:20%;text-align:right;" > <a th:href ="@{/add.html}" style ="border:0px solid blue;margin-bottom:4px;" > 添加新库存记录</a > </div > <table id ="tbl_fruit" > <tr > <th class ="w20" > 名称1</th > <th class ="w20" > 单价</th > <th class ="w20" > 库存</th > <th > 操作</th > </tr > <tr th:if ="${#lists.isEmpty(session.fruitList)}" > <td colspan ="4" > 对不起,库存为空!</td > </tr > <tr th:unless ="${#lists.isEmpty(session.fruitList)}" th:each ="fruit : ${session.fruitList}" > <td > <a th:text ="${fruit.fname}" th:href ="@{/edit.do(fid=${fruit.fid})}" > 苹果</a > </td > <td th:text ="${fruit.price}" > 5</td > <td th:text ="${fruit.fcount}" > 20</td > <td > <img src ="imgs/del.jpg" class ="delImg" th:onclick ="|delFruit(${fruit.fid})|" /> </td > </tr > </table > <div style ="width:60%;margin-left:20%;border:0px solid red;padding-top:4px;" class ="center" > <input type ="button" value ="首 页" class ="btn" th:onclick ="|page(1)|" th:disabled ="${session.pageNo==1}" /> <input type ="button" value ="上一页" class ="btn" th:onclick ="|page(${session.pageNo-1})|" th:disabled ="${session.pageNo==1}" /> <input type ="button" value ="下一页" class ="btn" th:onclick ="|page(${session.pageNo+1})|" th:disabled ="${session.pageNo==session.pageCount}" /> <input type ="button" value ="尾 页" class ="btn" th:onclick ="|page(${session.pageCount})|" th:disabled ="${session.pageNo==session.pageCount}" /> </div > </div > </div > </body > </html >
为实现分页,IndexServlet 的 doGet 方法以及 FruitDao, FruitDaoImpl 都需要相应新增一些内容,详细请看代码文件。
完成修改后运行工程,可以看到如下分页效果。四个按钮的状态和点击后的效果也如预期。
查询示例
复制一份 pro11-fruit6-pagination ,重命名为 pro12-fruit7-keyword ,使用此子工程中为库存系统增加按关键字查询功能。
增加查询功能
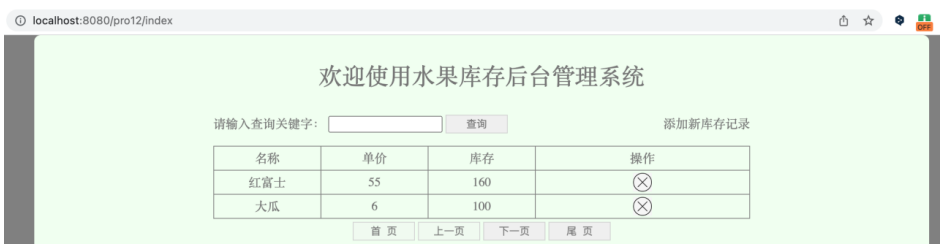
更新 index.html, 新增查询用的关键字文本框和按钮。
1 2 3 4 5 6 7 8 9 10 11 12 13 14 15 16 17 18 19 20 21 22 23 24 25 26 27 28 29 30 31 32 33 34 35 36 37 38 39 40 41 42 43 44 45 46 47 <html xmlns:th ="http://www.thymeleaf.org" > <head > <meta charset ="utf-8" > <link rel ="stylesheet" href ="css/index.css" > <script language ="JavaScript" src ="js/index.js" > </script > </head > <body > <div id ="div_container" > <div id ="div_fruit_list" > <p class ="center f30" > 欢迎使用水果库存后台管理系统</p > <div style ="border:0px solid red;width:60%;margin-left:20%;text-align:right;" > <form th:action ="@{/index}" method ="post" style ="float:left;width:60%;margin-left:20%;" > <input type ="hidden" name ="oper" value ="search" /> 请输入关键字:<input type ="text" name ="keyword" th:value ="${session.keyword}" /> <input type ="submit" value ="查询" class ="btn" /> </form > <a th:href ="@{/add.html}" style ="border:0px solid blue;margin-bottom:4px;" > 添加新库存记录</a > </div > <table id ="tbl_fruit" > <tr > <th class ="w20" > 名称</th > <th class ="w20" > 单价</th > <th class ="w20" > 库存</th > <th > 操作</th > </tr > <tr th:if ="${#lists.isEmpty(session.fruitList)}" > <td colspan ="4" > 对不起,库存为空!</td > </tr > <tr th:unless ="${#lists.isEmpty(session.fruitList)}" th:each ="fruit : ${session.fruitList}" > <td > <a th:text ="${fruit.fname}" th:href ="@{/edit.do(fid=${fruit.fid})}" > 苹果</a > </td > <td th:text ="${fruit.price}" > 5</td > <td th:text ="${fruit.fcount}" > 20</td > <td > <img src ="imgs/del.jpg" class ="delImg" th:onclick ="|delFruit(${fruit.fid})|" /> </td > </tr > </table > <div style ="width:60%;margin-left:20%;border:0px solid red;padding-top:4px;" class ="center" > <input type ="button" value ="首 页" class ="btn" th:onclick ="|page(1)|" th:disabled ="${session.pageNo==1}" /> <input type ="button" value ="上一页" class ="btn" th:onclick ="|page(${session.pageNo-1})|" th:disabled ="${session.pageNo==1}" /> <input type ="button" value ="下一页" class ="btn" th:onclick ="|page(${session.pageNo+1})|" th:disabled ="${session.pageNo==session.pageCount}" /> <input type ="button" value ="尾 页" class ="btn" th:onclick ="|page(${session.pageCount})|" th:disabled ="${session.pageNo==session.pageCount}" /> </div > </div > </div > </body > </html >
为实现关键字查询,IndexServlet 的需要新增 doPost 方法 (内部调用 doGet 方法), doGet 方法以及 FruitDao, FruitDaoImpl 都需要相应修改一些内容,详细请看代码文件。
完成修改后运行工程,可以看到如下关键字查询框如下,查询效果也符合预期。
MVC
MVC : Model(模型)、View(视图)、Controller(控制器)
pojo / vo : 值对象
DAO : 数据访问对象
BO : 业务对象
区分业务对象和数据访问对象:
在库存系统中添加业务层组件
优化一:引入 Controller
复制 pro12-fruit7-keyword 子工程,更名为 pro13-fruit8-mvc ,在此基础上优化原有代码,将多个 Servlet 具体实现类的功能集中于一个 FruitServlet 实现类中。FruitServlet 实际上对应的是 MVC 结构中的 Controller 。
FruitServlet
将 IndexServlet, AddServlet, EditServlet, DelServlet, UpdateServlet 的主要方法 (doGet, doPost) 都写入一个新建的 FruitServlet 类中,分别对应 index, add, edit, del, update 方法。在该类中的 service 方法中使用 switch-case 来将具体请求匹配执行具体方法。
这样即可由 FruitServlet 这一个 servlet 来取代之前的多个 servlet ,此一设计正是 controller (控制器) 的概念,即一个控制器对应一个模块的功能。仍以水果库存系统为例,该系统可以存在多个功能模块,例如「用户注册登陆」模块,「用户权限管理」模块等,每个模块对应一个 Controller,由 Controller 调用具体的方法处理对应模块的具体请求。
TODO: 图
本例是「水果库存信息」模块,负责水果库存信息的增删改查等功能,具体的增删改查操作由此控制器通过调用对应的方法执行。
在后续的优化中我们会看到在浏览器和 Controller 之间还会设置一个「中央控制器」用于统一调度所有请求,根据请求信息将其分配到不同的 Controller 。
1
2
3
4
5
6
7
8
9
10
11
12
13
14
15
16
17
18
19
20
21
22
23
24
25
26
27
28
29
30
31
32
33
34
35
36
37
38
39
40
41
42
43
44
45
46
47
48
49
50
51
52
53
54
55
56
57
58
59
60
61
62
63
64
65
66
67
68
69
70
71
72
73
74
75
76
77
78
79
80
81
82
83
84
85
86
87
88
89
90
91
92
93
94
95
96
97
98
99
100
101
102
103
104
105
106
107
108
109
110
111
112
113
114
115
116
117
118
119
120
121
122
123
124
125
126
127
128
129
130
131
132
133
134
135
136
137
138
139
140
141
142
143
144
145
146
147
148
149
150
151
152
153
154
155
156
157
158
159
160
161
162
163
164
165
166
167
168
169
170
171
172
173
174
175
176
177
178
179
180
181
182
183
package com.yukiyama.fruit.servlets;import com.yukiyama.fruit.dao.FruitDao;import com.yukiyama.fruit.dao.impl.FruitDaoImpl;import com.yukiyama.fruit.pojo.Fruit;import com.yukiyama.myssm.myspringmvc.ViewBaseServlet;import com.yukiyama.myssm.util.StringUtils;import javax.servlet.ServletException;import javax.servlet.annotation.WebServlet;import javax.servlet.http.HttpServletRequest;import javax.servlet.http.HttpServletResponse;import javax.servlet.http.HttpSession;import java.io.IOException;import java.util.List;@WebServlet("/fruit.do") public class FruitServlet extends ViewBaseServlet { private FruitDao fruitDao = new FruitDaoImpl (); @Override protected void service (HttpServletRequest req, HttpServletResponse resp) throws ServletException, IOException { req.setCharacterEncoding("UTF-8" ); String operate = req.getParameter("operate" ); if (StringUtils.isEmpty(operate)){ operate = "index" ; } switch (operate){ case "index" : index(req, resp); break ; case "add" : add(req, resp); break ; case "del" : del(req, resp); break ; case "edit" : edit(req, resp); break ; case "update" : update(req, resp); break ; default : throw new RuntimeException ("operate值非法" ); } } private void update (HttpServletRequest request, HttpServletResponse response) throws ServletException, IOException { request.setCharacterEncoding("utf-8" ); String fidStr = request.getParameter("fid" ); Integer fid = Integer.parseInt(fidStr); String fname = request.getParameter("fname" ); String priceStr = request.getParameter("price" ); int price = Integer.parseInt(priceStr); String fcountStr = request.getParameter("fcount" ); Integer fcount = Integer.parseInt(fcountStr); String remark = request.getParameter("remark" ); fruitDao.updateFruit(new Fruit (fid,fname, price ,fcount ,remark )); response.sendRedirect("fruit.do" ); } private void edit (HttpServletRequest req, HttpServletResponse resp) throws ServletException, IOException { String fidStr = req.getParameter("fid" ); if (StringUtils.isNotEmpty(fidStr)){ int fid = Integer.parseInt(fidStr); Fruit fruit = fruitDao.getFruitByFid(fid); req.setAttribute("fruit" , fruit); super .processTemplate("edit" , req, resp); } } private void del (HttpServletRequest request, HttpServletResponse response) throws ServletException, IOException { String fidStr = request.getParameter("fid" ); if (StringUtils.isNotEmpty(fidStr)){ int fid = Integer.parseInt(fidStr); fruitDao.delFruit(fid); response.sendRedirect("fruit.do" ); } } private void add (HttpServletRequest req, HttpServletResponse resp) throws ServletException, IOException { String operate = req.getParameter("operate" ); req.setCharacterEncoding("utf-8" ); String fname = req.getParameter("fname" ); String priceStr = req.getParameter("price" ); Integer price = Integer.parseInt(priceStr); String fcountStr = req.getParameter("fcount" ); Integer fcount = Integer.parseInt(fcountStr); String remark = req.getParameter("remark" ); Fruit fruit = new Fruit (0 , fname, price, fcount, remark); fruitDao.addFruit(fruit); resp.sendRedirect("fruit.do" ); } private void index (HttpServletRequest req , HttpServletResponse resp) throws IOException, ServletException { HttpSession session = req.getSession() ; Integer pageNo = 1 ; String oper = req.getParameter("oper" ); String keyword = null ; if (StringUtils.isNotEmpty(oper) && "search" .equals(oper)){ pageNo = 1 ; keyword = req.getParameter("keyword" ); if (StringUtils.isEmpty(keyword)){ keyword = "" ; } session.setAttribute("keyword" ,keyword); }else { String pageNoStr = req.getParameter("pageNo" ); if (StringUtils.isNotEmpty(pageNoStr)){ pageNo = Integer.parseInt(pageNoStr); } Object keywordObj = session.getAttribute("keyword" ); if (keywordObj!=null ){ keyword = (String)keywordObj ; }else { keyword = "" ; } } session.setAttribute("pageNo" ,pageNo); FruitDao fruitDAO = new FruitDaoImpl (); List<Fruit> fruitList = fruitDAO.getFruitList(keyword , pageNo); session.setAttribute("fruitList" ,fruitList); int fruitCount = fruitDAO.getFruitCount(keyword); int pageCount = (fruitCount+ 2 -1 ) / 2 ; session.setAttribute("pageCount" ,pageCount); super .processTemplate("index" ,req,resp); } }
其他修改
由于引入了 FruitServlet ,对应的请求为 fruit.do ,与此相关的各处 js, html 文件均要相应修改,具体请看源文件。
完成修改后运行,效果与修改前一致,不再展示。
优化二:利用反射
在 FruitServlet 的 service 中使用了 switch-case 来匹配请求与处理该请求的方法,不同的请求越多,switch-case 就会越长,更重要的是,让需要新增一个请求时,必须新增一个 case,不符合开闭原则。我们可以使用反射技术来实现 switch-case 的功能。
拷贝 pro13-fruit8-mvc 子项目,更名为 pro14-fruit9-mvc-reflection ,在此子项目中实现本节优化。
反射
在 FruitServlet 中将 service 方法修改为如下。通过反射获取具体的方法名,根据 operate 的名称与方法名称的匹配关系通过 method.invoke() 执行对应的方法。
1
2
3
4
5
6
7
8
9
10
11
12
13
14
15
16
17
18
19
20
21
22
23
24
@Override protected void service (HttpServletRequest req, HttpServletResponse resp) throws ServletException, IOException { req.setCharacterEncoding("UTF-8" ); String operate = req.getParameter("operate" ); if (StringUtils.isEmpty(operate)){ operate = "index" ; } Method[] methods = this .getClass().getDeclaredMethods(); for (Method method : methods){ String methodName = method.getName(); if (operate.equals(methodName)){ try { method.invoke(this , req,resp); return ; } catch (IllegalAccessException e) { throw new RuntimeException (e); } catch (InvocationTargetException e) { throw new RuntimeException (e); } } } throw new RuntimeException ("operate值非法" ); }
优化三:DispatcherServlet
在「优化一」中我们提到过系统中的多个功能模块对应多个 Controller ,可以在浏览器请求发起端和 Controller 之间再设计一个「中央控制器」,用于统一调度所有请求。此「中央控制器」是一个 servlet,即 DispatcherServlet 。见名知义,该 servlet 是一个针对请求的 dispatcher (分派器) 。在「优化二」中,我们利用反射技术代替了 FruitServlet 中不符合开闭原则的 switch-case 写法,但对于每一个 servlet (即 controller) ,都需要同样的反射代码,因此 DispatcherServlet 的另一个作用是可以在其中实现反射代码,而不必在每一个 controller 中重复实现。
拷贝 pro14-fruit9-mvc-reflection 子项目,更名为 pro15-fruit10-mvc-dispatcherServlet ,在此子项目中实现本节优化。
DispatcherServlet
如下 DispacherServlet 的实现,可知其工作流程如下。
类注解 @WebServlet("*.do") 表示处理所有请求。
当 Web 服务器 (Tomcat) 接受到请求后,调用 DispatcherServlet 的 init 方法,解析 applicationCOntext.xml 文件,获取 xml 文件所有 <bean> 标签中的 id 和 class,通过反射创建所有 class 对应的类对象实例 (即 Controller 对象实例),将 id 作为 key,对象实例作为 value ,放入对象容器中 (map) 。
执行 service ,通过 req.getServletPath() 方法获取到的 URL 中的请求目的地名,如 /hello.do ,解析出 hello 。通过 req.getParameter() 获取到请求动作名 (如 edit) 。由 hello 从 bean 容器 map 中获取相应的 Controller 对象 controllerBeanObj ,再由 controllerBeanObj.getClass().getDeclaredMethod 反射方法和已经得到的 edit 来最终执行对应浏览器请求的方法。
1
2
3
4
5
6
7
8
9
10
11
12
13
14
15
16
17
18
19
20
21
22
23
24
25
26
27
28
29
30
31
32
33
34
35
36
37
38
39
40
41
42
43
44
45
46
47
48
49
50
51
52
53
54
55
56
57
58
59
60
61
62
63
64
65
66
67
68
69
70
71
72
73
74
75
76
77
78
79
80
81
82
83
84
85
86
87
88
89
90
91
92
93
94
95
96
97
98
99
100
101
102
103
104
105
106
107
108
109
110
111
112
package com.yukiyama.myssm.myspringmvc;import com.yukiyama.myssm.util.StringUtils;import org.w3c.dom.Document;import org.w3c.dom.Element;import org.w3c.dom.Node;import org.w3c.dom.NodeList;import org.xml.sax.SAXException;import javax.servlet.ServletContext;import javax.servlet.ServletException;import javax.servlet.annotation.WebServlet;import javax.servlet.http.HttpServlet;import javax.servlet.http.HttpServletRequest;import javax.servlet.http.HttpServletResponse;import javax.xml.parsers.DocumentBuilder;import javax.xml.parsers.DocumentBuilderFactory;import javax.xml.parsers.ParserConfigurationException;import java.io.IOException;import java.io.InputStream;import java.lang.reflect.InvocationTargetException;import java.lang.reflect.Method;import java.util.HashMap;import java.util.Map;@WebServlet("*.do") public class DispatcherServlet extends HttpServlet { private Map<String,Object> beanMap = new HashMap <>(); public DispatcherServlet () { } public void init () { try { InputStream inputStream = getClass().getClassLoader().getResourceAsStream("applicationContext.xml" ); DocumentBuilderFactory documentBuilderFactory = DocumentBuilderFactory.newInstance(); DocumentBuilder documentBuilder = documentBuilderFactory.newDocumentBuilder() ; Document document = documentBuilder.parse(inputStream); NodeList beanNodeList = document.getElementsByTagName("bean" ); for (int i = 0 ; i<beanNodeList.getLength() ; i++){ Node beanNode = beanNodeList.item(i); if (beanNode.getNodeType() == Node.ELEMENT_NODE){ Element beanElement = (Element)beanNode ; String beanId = beanElement.getAttribute("id" ); String className = beanElement.getAttribute("class" ); Class controllerBeanClass = Class.forName(className); Object beanObj = controllerBeanClass.newInstance() ; Method setServletContextMethod = controllerBeanClass.getDeclaredMethod("setServletContext" , ServletContext.class); setServletContextMethod.invoke(beanObj , this .getServletContext()); beanMap.put(beanId , beanObj) ; } } } catch (ParserConfigurationException e) { e.printStackTrace(); } catch (SAXException e) { e.printStackTrace(); } catch (IOException e) { e.printStackTrace(); } catch (IllegalAccessException e) { e.printStackTrace(); } catch (InstantiationException e) { e.printStackTrace(); } catch (ClassNotFoundException e) { e.printStackTrace(); } catch (NoSuchMethodException e) { e.printStackTrace(); } catch (InvocationTargetException e) { e.printStackTrace(); } } @Override protected void service (HttpServletRequest req, HttpServletResponse resp) throws ServletException, IOException { req.setCharacterEncoding("UTF-8" ); String servletPath = req.getServletPath(); servletPath = servletPath.substring(1 ); int lastDotIndex = servletPath.lastIndexOf(".do" ); servletPath = servletPath.substring(0 , lastDotIndex); Object controllerBeanObj = beanMap.get(servletPath); String operate = req.getParameter("operate" ); if (StringUtils.isEmpty(operate)){ operate = "index" ; } try { Method method = controllerBeanObj.getClass().getDeclaredMethod(operate, HttpServletRequest.class, HttpServletResponse.class); method.setAccessible(true ); if (method != null ){ method.invoke(controllerBeanObj, req, resp); } else { throw new RuntimeException ("operate值非法" ); } } catch (NoSuchMethodException e) { throw new RuntimeException (e); } catch (InvocationTargetException e) { throw new RuntimeException (e); } catch (IllegalAccessException e) { throw new RuntimeException (e); } } }
applicationContext.xml
在 resources 文件夹中新建 applicationContext.xml 文件,用于配置 bean (即 Java 类) 。
1
2
3
4
5
<?xml version="1.0" encoding="UTF-8" ?> <beans > <bean id ="fruit" class ="com.yukiyama.fruit.controllers.FruitController" /> </beans >
FruitController
将原先的 FruitServlet 改名为 FruitController ,其所在包名也从 servlets 改成 controllers 。由于所有请求均由 DispatcherServlet 统一处理,因此 FruitController 不再是一个 servlet,应删除其类注解 @WebServlet 。
优化四:提取视图资源通用代码
对于一个 controller ,例如 FruitController ,其中每一个具体的方法最后会涉及到重定向到某个页面 (resp.sendRedirect() 方法) 或者执行视图模版方法 (processTemplate()) 。可以提取这部分代码到 DispatcherServlet 中实现。
拷贝 pro15-fruit10-mvc-dispatcherServlet 子项目,更名为 pro16-fruit11-mvc-controller ,在此子项目中实现本节优化。
FruitController
在 FruitController 中修改针对请求执行的方法,用返回字符串的方式取代最后的重定向或执行视图模版方法。
例如 update 中的重定向可改为返回 "redirect:fruit.do" 字符串。
1
2
3
4
5
6
7
8
9
10
11
12
13
14
15
16
17
18
private String update (HttpServletRequest request) { String fidStr = request.getParameter("fid" ); Integer fid = Integer.parseInt(fidStr); String fname = request.getParameter("fname" ); String priceStr = request.getParameter("price" ); int price = Integer.parseInt(priceStr); String fcountStr = request.getParameter("fcount" ); Integer fcount = Integer.parseInt(fcountStr); String remark = request.getParameter("remark" ); fruitDao.updateFruit(new Fruit (fid,fname, price ,fcount ,remark )); return "redirect:fruit.do" ; }
edit 方法中的执行视图模版方法改为返回 "edit" 字符串。
1
2
3
4
5
6
7
8
9
10
11
private String edit (HttpServletRequest req) { String fidStr = req.getParameter("fid" ); if (StringUtils.isNotEmpty(fidStr)){ int fid = Integer.parseInt(fidStr); Fruit fruit = fruitDao.getFruitByFid(fid); req.setAttribute("fruit" , fruit); return "edit" ; } return "error" ; }
这些字符串将返回到 DispatcherServlet 的中统一处理。
DispatcherServlet
针对 FruitController 类中方法的字符串返回值,在 service 方法中,根据返回的字符串是否以 "redirect:" 为前缀,分别处理。若有此前缀,则执行重定向方法,若无,则执行视图模版方法。
1
2
3
4
5
6
7
8
9
10
11
12
13
14
15
16
17
18
19
20
21
22
23
24
25
26
27
28
29
30
31
32
33
34
35
36
37
38
39
40
41
42
@Override protected void service (HttpServletRequest req, HttpServletResponse resp) throws ServletException, IOException { req.setCharacterEncoding("UTF-8" ); String servletPath = req.getServletPath(); servletPath = servletPath.substring(1 ); int lastDotIndex = servletPath.lastIndexOf(".do" ); servletPath = servletPath.substring(0 , lastDotIndex); Object controllerBeanObj = beanMap.get(servletPath); String operate = req.getParameter("operate" ); if (StringUtils.isEmpty(operate)){ operate = "index" ; } try { Method method = controllerBeanObj.getClass().getDeclaredMethod(operate, HttpServletRequest.class); if (method != null ){ method.setAccessible(true ); Object returnObj = method.invoke(controllerBeanObj, req); String methodReturnStr = (String) returnObj; if (methodReturnStr.startsWith("redirect:" )){ String redirectStr = methodReturnStr.substring("redirect:" .length()); resp.sendRedirect(redirectStr); } else { super .processTemplate(methodReturnStr, req, resp); } } else { throw new RuntimeException ("operate值非法" ); } } catch (NoSuchMethodException e) { throw new RuntimeException (e); } catch (InvocationTargetException e) { throw new RuntimeException (e); } catch (IllegalAccessException e) { throw new RuntimeException (e); } }
优化五:提取参数获取通用代码
对于一个 controller ,例如 FruitController ,其中每一个具体的方法都会获取请求中的参数,可以参数获取的代码统一到 DispatcherServlet 中实现。
拷贝 pro16-fruit11-mvc-controller 子项目,更名为 pro16-fruit11-mvc-controller-param ,在此子项目中实现本节优化。
FruitController
FruitController 中的方法均改为直接传入参数,这些参数在 DispatcherServlet 中获取并在反射调用 FruitController 相关方法时传入。
例如 update 改为如下。
1
2
3
4
private String update (Integer fid, String fname, Integer price, Integer fcount, String remark) { fruitDao.updateFruit(new Fruit (fid,fname, price ,fcount ,remark )); return "redirect:fruit.do" ; }
edit 方法改为如下。
1
2
3
4
5
6
7
8
9
private String edit (Integer fid, HttpServletRequest request) { if (fid!=null ){ Fruit fruit = fruitDao.getFruitByFid(fid); request.setAttribute("fruit" ,fruit); return "edit" ; } return "error" ; }
DispatcherServlet
在 DispatcherServlet 的 service 方法中通过反射获取对应请求方法所需的参数值,在反射调用 controller 相关方法时传入。
1
2
3
4
5
6
7
8
9
10
11
12
13
14
15
16
17
18
19
20
21
22
23
24
25
26
27
28
29
30
31
32
33
34
35
36
37
38
39
40
41
42
43
44
45
46
47
48
49
50
51
52
53
54
55
56
57
58
59
60
61
62
63
64
65
66
67
68
69
70
71
72
73
74
75
76
@Override protected void service (HttpServletRequest request, HttpServletResponse response) throws ServletException, IOException { request.setCharacterEncoding("UTF-8" ); String servletPath = request.getServletPath(); servletPath = servletPath.substring(1 ); int lastDotIndex = servletPath.lastIndexOf(".do" ) ; servletPath = servletPath.substring(0 ,lastDotIndex); Object controllerBeanObj = beanMap.get(servletPath); String operate = request.getParameter("operate" ); if (StringUtils.isEmpty(operate)){ operate = "index" ; } try { Method[] methods = controllerBeanObj.getClass().getDeclaredMethods(); for (Method method : methods){ if (operate.equals(method.getName())){ Parameter[] parameters = method.getParameters(); Object[] parameterValues = new Object [parameters.length]; for (int i = 0 ; i < parameters.length; i++) { Parameter parameter = parameters[i]; String parameterName = parameter.getName() ; if ("request" .equals(parameterName)){ parameterValues[i] = request ; }else if ("response" .equals(parameterName)){ parameterValues[i] = response ; }else if ("session" .equals(parameterName)){ parameterValues[i] = request.getSession() ; }else { String parameterValue = request.getParameter(parameterName); String typeName = parameter.getType().getName(); Object parameterObj = parameterValue ; if (parameterObj!=null ) { if ("java.lang.Integer" .equals(typeName)) { parameterObj = Integer.parseInt(parameterValue); } } parameterValues[i] = parameterObj ; } } method.setAccessible(true ); Object returnObj = method.invoke(controllerBeanObj, parameterValues); String methodReturnStr = (String)returnObj ; if (methodReturnStr.startsWith("redirect:" )){ String redirectStr = methodReturnStr.substring("redirect:" .length()); response.sendRedirect(redirectStr); }else { super .processTemplate(methodReturnStr,request,response); } } } } catch (IllegalAccessException e) { e.printStackTrace(); } catch (InvocationTargetException e) { e.printStackTrace(); } }
优化六:引入 Service
在之前的实现中,controller 中直接操作 dao 来获取数据,但在实际的业务中,与数据库交互的逻辑相比当前实现会更为复杂,有必要在 controller 层与 dao 层之间再引入 service 层,controller 执行具体方法时,通过其持有的 service 实例完成与数据库的交互,controller 不必关系 service 的具体实现。
拷贝 pro16-fruit11-mvc-controller-param 子项目,更名为 pro17-fruit12-mvc-ioc-service ,在此子项目中实现本节优化。
FruitService
新增 service 包,在该包下新建 FruitService 接口,声明服务方法。
1
2
3
4
5
6
7
8
9
10
11
12
13
14
15
16
17
18
19
20
package com.yukiyama.fruit.service;import com.yukiyama.fruit.pojo.Fruit;import java.util.List;public interface FruitService { List<Fruit> getFruitList (String keyword , Integer pageNo) ; void addFruit (Fruit fruit) ; Fruit getFruitByFid (Integer fid) ; void delFruit (Integer fid) ; Integer getPageCount (String keyword) ; void updateFruit (Fruit fruit) ; }
新建 FruitServiceImpl 实现类实现 FruitService 接口,在其内持用 dao 实例,并完成与 dao 的交互来获取数据。
1
2
3
4
5
6
7
8
9
10
11
12
13
14
15
16
17
18
19
20
21
22
23
24
25
26
27
28
29
30
31
32
33
34
35
36
37
38
package com.yukiyama.fruit.service.impl;import com.yukiyama.fruit.service.FruitService;import com.yukiyama.fruit.dao.FruitDao;import com.yukiyama.fruit.dao.impl.FruitDaoImpl;import com.yukiyama.fruit.pojo.Fruit;import java.util.List;public class FruitServiceImpl implements FruitService { private FruitDao fruitDao = new FruitDaoImpl (); @Override public List<Fruit> getFruitList (String keyword, Integer pageNo) { return fruitDao.getFruitList(keyword,pageNo); } @Override public void addFruit (Fruit fruit) { fruitDao.addFruit(fruit); } @Override public Fruit getFruitByFid (Integer fid) { return fruitDao.getFruitByFid(fid); } @Override public void delFruit (Integer fid) { fruitDao.delFruit(fid); } @Override public Integer getPageCount (String keyword) { int count = fruitDao.getFruitCount(keyword); int pageCount = (count + 2 - 1 ) / 2 ; return pageCount; } @Override public void updateFruit (Fruit fruit) { fruitDao.updateFruit(fruit); } }
FruitController
FruitController 不再直接操作 dao,而是持有一个 FruitService 实例,由 FruitService 来提供服务。
1
2
3
4
5
6
7
8
9
10
11
12
13
14
15
16
17
18
19
20
21
22
23
24
25
26
27
28
29
30
31
32
33
34
35
36
37
38
39
40
41
42
43
44
45
46
47
48
49
50
51
52
53
54
55
56
57
58
59
60
61
62
63
64
65
66
67
68
69
70
71
72
73
74
75
76
77
78
package com.yukiyama.fruit.controllers;import com.yukiyama.fruit.service.FruitService;import com.yukiyama.fruit.service.impl.FruitServiceImpl;import com.yukiyama.fruit.pojo.Fruit;import com.yukiyama.myssm.util.StringUtils;import javax.servlet.http.HttpServletRequest;import javax.servlet.http.HttpSession;import java.util.List;public class FruitController { private FruitService fruitService = new FruitServiceImpl (); private String update (Integer fid, String fname, Integer price, Integer fcount, String remark) { fruitService.updateFruit(new Fruit (fid,fname, price ,fcount ,remark )); return "redirect:fruit.do" ; } private String edit (Integer fid, HttpServletRequest request) { if (fid!=null ){ Fruit fruit = fruitService.getFruitByFid(fid); request.setAttribute("fruit" ,fruit); return "edit" ; } return "error" ; } private String del (Integer fid ) { if (fid!=null ){ fruitService.delFruit(fid); return "redirect:fruit.do" ; } return "error" ; } private String add (String fname , Integer price , Integer fcount , String remark ) { Fruit fruit = new Fruit (0 ,fname , price , fcount , remark ) ; fruitService.addFruit(fruit); return "redirect:fruit.do" ; } private String index (String oper , String keyword , Integer pageNo , HttpServletRequest request ) { HttpSession session = request.getSession() ; if (pageNo==null ){ pageNo = 1 ; } if (StringUtils.isNotEmpty(oper) && "search" .equals(oper)){ pageNo = 1 ; if (StringUtils.isEmpty(keyword)){ keyword = "" ; } session.setAttribute("keyword" ,keyword); }else { Object keywordObj = session.getAttribute("keyword" ); if (keywordObj!=null ){ keyword = (String)keywordObj ; }else { keyword = "" ; } } session.setAttribute("pageNo" ,pageNo); List<Fruit> fruitList = fruitService.getFruitList(keyword , pageNo); session.setAttribute("fruitList" ,fruitList); int pageCount = fruitService.getPageCount(keyword); session.setAttribute("pageCount" ,pageCount); return "index" ; } }
优化七:IoC
当前的实现中,controller 持有 service 实例,service 实例持有 dao 实例。A 类持有 B 类的实例使得在 A 类中必须引入 B 类,于是这两个类产生了耦合。我们希望去掉这样的耦合,即当 A 类需要用到 B 类时,再实时地为 A 类提供 B 类的实例。实现这种解耦合的技术称为 IoC (Inversion of Control) ,即「依赖反转」。所谓依赖即前述耦合,反转指的是原先由 A 类管理 B 类的实例,但解耦之后 A 类不再管理其所依赖的对象,而是交给外界管理,在 IoC 的实现中,由一个专门的对象容器来产生以及管理对象实例。
IoC 有时根据其实现方式也被称作 DI (Dependency Injection) ,即「依赖注入」,也就是前面说到的,当 A 类需要 B 类时,由对象容器将 B 类实例 (作为 A 类字段) 「注入」到 A 类 (实例) 中。
拷贝 pro17-fruit12-mvc-ioc-service 子项目,更名为 pro17-fruit12-mvc-ioc-beanFactory ,在此子项目中实现本节优化。
类的解耦
对于原先持有 FruitDaoImpl 实例的 FruitServiceImpl 类,持有 FruitServiceImpl 实例的 FruitController 类,我们将其中的字段值声明为 null 以去除耦合。
1 2 3 4 5 private FruitDao fruitDao = null ;private FruitService fruitService = null ;
applicationContext.xml
在「优化三」中我们引入过「applicationContext.xml」,在该文件中以 <bean> 标签声明了 FruitController 类。在 DispatcherServlet 类中,通过解析 applicationContext.xml ,利用反射技术将 FruitController 实例放入 map 容器中,并在需要时 (在 service 方法中) 使用将 map 容器中的 FruitController 实例。
类似地,我们在前面已经接触了类的耦合,因此有必要通过相同的方式将后续需要用到的对象放入到容器中,因此在 applicationContext.xml 文件中新增两个 bean 标签,记录 FruitServiceImpl 类及 FruitController 类的信息,通常称作「配置 bean」。所谓「bean」,即指由 IoC 容器管理的类或类对象。
1
2
3
4
5
6
7
8
9
10
11
<?xml version="1.0" encoding="UTF-8" ?> <beans > <bean id ="fruitDao" class ="com.yukiyama.fruit.dao.impl.FruitDaoImpl" /> <bean id ="fruitService" class ="com.yukiyama.fruit.service.impl.FruitServiceImpl" > <property name ="fruitDao" ref ="fruitDao" > </property > </bean > <bean id ="fruit" class ="com.yukiyama.fruit.controllers.FruitController" > <property name ="fruitService" ref ="fruitService" > </property > </bean > </beans >
BeanFactory
BeanFactory 接口中声明 Object getBean(String id); 方法,参数中的 id 对应了 applicationContext.xml 中 <bean> 标签的 id 属性。BeanFactory 具体实现类将实现 getBean 方法,解析 xml 配置文件,根据 id 从 IoC 容器 (map) 中获取相应的类对象。
1
2
3
4
5
package com.yukiyama.myssm.io;public interface BeanFactory { Object getBean (String id) ; }
ClassPathXmlApplicationContext
ClassPathXmlApplicationContext 是 BeanFactory 的实现类。该实现类解析 applicationContext.xml 文件,通过反射得到每个 <bean> 标签对应的类对象,并放入其持用的对象容器 map 中。
1
2
3
4
5
6
7
8
9
10
11
12
13
14
15
16
17
18
19
20
21
22
23
24
25
26
27
28
29
30
31
32
33
34
35
36
37
38
39
40
41
42
43
44
45
46
47
48
49
50
51
52
53
54
55
56
57
58
59
60
61
62
63
64
65
66
67
68
69
70
71
72
73
74
75
76
77
78
79
80
81
82
83
84
85
86
87
88
89
90
package com.yukiyama.myssm.io;import org.w3c.dom.Document;import org.w3c.dom.Element;import org.w3c.dom.Node;import org.w3c.dom.NodeList;import org.xml.sax.SAXException;import javax.xml.parsers.DocumentBuilder;import javax.xml.parsers.DocumentBuilderFactory;import javax.xml.parsers.ParserConfigurationException;import java.io.IOException;import java.io.InputStream;import java.lang.reflect.Field;import java.util.HashMap;import java.util.Map;public class ClassPathXmlApplicationContext implements BeanFactory { private Map<String, Object> beanMap = new HashMap <>(); public ClassPathXmlApplicationContext () { try { InputStream inputStream = getClass().getClassLoader().getResourceAsStream("applicationContext.xml" ); DocumentBuilderFactory documentBuilderFactory = DocumentBuilderFactory.newInstance(); DocumentBuilder documentBuilder = documentBuilderFactory.newDocumentBuilder() ; Document document = documentBuilder.parse(inputStream); NodeList beanNodeList = document.getElementsByTagName("bean" ); for (int i = 0 ; i<beanNodeList.getLength() ; i++){ Node beanNode = beanNodeList.item(i); if (beanNode.getNodeType() == Node.ELEMENT_NODE){ Element beanElement = (Element)beanNode ; String beanId = beanElement.getAttribute("id" ); String className = beanElement.getAttribute("class" ); Class beanClass = Class.forName(className); Object beanObj = beanClass.newInstance() ; beanMap.put(beanId , beanObj) ; } } for (int i = 0 ; i<beanNodeList.getLength() ; i++){ Node beanNode = beanNodeList.item(i); if (beanNode.getNodeType() == Node.ELEMENT_NODE) { Element beanElement = (Element) beanNode; String beanId = beanElement.getAttribute("id" ); NodeList beanChildNodeList = beanElement.getChildNodes(); for (int j = 0 ; j < beanChildNodeList.getLength() ; j++) { Node beanChildNode = beanChildNodeList.item(j); if (beanChildNode.getNodeType()==Node.ELEMENT_NODE && "property" .equals(beanChildNode.getNodeName())){ Element propertyElement = (Element) beanChildNode; String propertyName = propertyElement.getAttribute("name" ); String propertyRef = propertyElement.getAttribute("ref" ); Object refObj = beanMap.get(propertyRef); Object beanObj = beanMap.get(beanId); Class beanClazz = beanObj.getClass(); Field propertyField = beanClazz.getDeclaredField(propertyName); propertyField.setAccessible(true ); propertyField.set(beanObj,refObj); } } } } } catch (ParserConfigurationException e) { e.printStackTrace(); } catch (SAXException e) { e.printStackTrace(); } catch (IOException e) { e.printStackTrace(); } catch (IllegalAccessException e) { e.printStackTrace(); } catch (InstantiationException e) { e.printStackTrace(); } catch (ClassNotFoundException e) { e.printStackTrace(); } catch (NoSuchFieldException e) { throw new RuntimeException (e); } } @Override public Object getBean (String id) { return beanMap.get(id); } }
DispatcherServlet
引入 bean 工厂后,DispatcherServlet 不必再直接持有 bean 容器,而是持有一个 beanFactory ,并在 init() 方法中以 ClassPathXmlApplicationContext 实例化该 beanFactory,这样当 DispatcherServlet 相应请求执行 init() 方法时就会创建 xml 配置文件中配置的 bean ,并放入 beanFactory 持有的 map 中 (IoC 容器)。
1
2
3
4
5
6
7
8
9
10
11
12
13
14
15
16
17
18
19
20
21
22
23
24
25
26
27
28
29
30
31
32
33
34
35
36
37
38
39
40
41
42
43
44
45
46
47
48
49
50
51
52
53
54
55
56
57
58
59
60
61
62
63
64
65
66
67
68
69
70
71
72
73
74
75
76
77
78
79
80
81
82
83
84
85
86
87
88
89
90
91
92
93
94
95
96
97
98
99
100
101
102
103
104
105
106
107
package com.yukiyama.myssm.myspringmvc;import com.yukiyama.myssm.io.BeanFactory;import com.yukiyama.myssm.io.ClassPathXmlApplicationContext;import com.yukiyama.myssm.util.StringUtils;import javax.servlet.*;import javax.servlet.annotation.WebServlet;import javax.servlet.http.HttpServletRequest;import javax.servlet.http.HttpServletResponse;import java.io.IOException;import java.lang.reflect.InvocationTargetException;import java.lang.reflect.Method;import java.lang.reflect.Parameter;@WebServlet("*.do") public class DispatcherServlet extends ViewBaseServlet { private BeanFactory beanFactory; public DispatcherServlet () { } public void init () throws ServletException { super .init(); beanFactory = new ClassPathXmlApplicationContext (); } @Override protected void service (HttpServletRequest request, HttpServletResponse response) throws ServletException, IOException { request.setCharacterEncoding("UTF-8" ); String servletPath = request.getServletPath(); servletPath = servletPath.substring(1 ); int lastDotIndex = servletPath.lastIndexOf(".do" ) ; servletPath = servletPath.substring(0 ,lastDotIndex); Object controllerBeanObj = beanFactory.getBean(servletPath); String operate = request.getParameter("operate" ); if (StringUtils.isEmpty(operate)){ operate = "index" ; } try { Method[] methods = controllerBeanObj.getClass().getDeclaredMethods(); for (Method method : methods){ if (operate.equals(method.getName())){ Parameter[] parameters = method.getParameters(); Object[] parameterValues = new Object [parameters.length]; for (int i = 0 ; i < parameters.length; i++) { Parameter parameter = parameters[i]; String parameterName = parameter.getName() ; if ("request" .equals(parameterName)){ parameterValues[i] = request ; }else if ("response" .equals(parameterName)){ parameterValues[i] = response ; }else if ("session" .equals(parameterName)){ parameterValues[i] = request.getSession() ; }else { String parameterValue = request.getParameter(parameterName); String typeName = parameter.getType().getName(); Object parameterObj = parameterValue ; if (parameterObj!=null ) { if ("java.lang.Integer" .equals(typeName)) { parameterObj = Integer.parseInt(parameterValue); } } parameterValues[i] = parameterObj ; } } method.setAccessible(true ); Object returnObj = method.invoke(controllerBeanObj,parameterValues); String methodReturnStr = (String)returnObj ; if (methodReturnStr.startsWith("redirect:" )){ String redirectStr = methodReturnStr.substring("redirect:" .length()); response.sendRedirect(redirectStr); }else { super .processTemplate(methodReturnStr,request,response); } } } } catch (IllegalAccessException e) { e.printStackTrace(); } catch (InvocationTargetException e) { e.printStackTrace(); } } }
初始化参数
可以预先设置 servlet 的初始化参数。 ServletConfig 实例持有该参数,并可通过实例方法 getInitParameters 来获取该参数。可通过在 web.xml 中配置 <init-param> 标签来实现,也可以采用注解方式来实现。
新建 pro18-servlet-api webapp 子项目,新增如下 Demo01Servlet 类。通过该子工程演示如何设置和获取初始化参数。
1
2
3
4
5
6
7
8
9
10
11
12
13
14
15
16
17
18
package com.yukiyama.servlets;import javax.servlet.ServletConfig;import javax.servlet.ServletException;import javax.servlet.annotation.WebInitParam;import javax.servlet.annotation.WebServlet;import javax.servlet.http.HttpServlet;public class Demo01Servlet extends HttpServlet { @Override public void init () throws ServletException { ServletConfig config = getServletConfig(); String hello = config.getInitParameter("hello" ); String name = config.getInitParameter("name" ); System.out.println("hello = " + hello); System.out.println("name = " + name); } }
web.xml配置方式
在 web.xml 文件中增加 <init-param> 标签并按如下设置参数名及其值,可设置多个。启动 Tomcat 运行 pro18-servlet-api 应用,即可在控制台看到 hello 及 name 的值被打印输出。
1
2
3
4
5
6
7
8
9
10
11
12
13
14
15
16
17
18
19
20
21
22
23
24
<?xml version="1.0" encoding="UTF-8" ?> <web-app xmlns ="http://xmlns.jcp.org/xml/ns/javaee" xmlns:xsi ="http://www.w3.org/2001/XMLSchema-instance" xsi:schemaLocation ="http://xmlns.jcp.org/xml/ns/javaee http://xmlns.jcp.org/xml/ns/javaee/web-app_4_0.xsd" version ="4.0" > <servlet > <servlet-name > hello</servlet-name > <servlet-class > com.yukiyama.servlets.Demo01Servlet</servlet-class > <init-param > <param-name > hello</param-name > <param-value > world</param-value > </init-param > <init-param > <param-name > name</param-name > <param-value > yukiyama</param-value > </init-param > </servlet > <servlet-mapping > <servlet-name > hello</servlet-name > <url-pattern > /demo01</url-pattern > </servlet-mapping > </web-app >
注解方式
为 Demo01Servlet 添加如下类注解,即可在无 web.xml 文件的情况下设置和获取初始化参数。
1
2
3
4
5
6
@WebServlet(urlPatterns = {"/demo01"}, initParams = { @WebInitParam(name = "hello", value = "world"), @WebInitParam(name = "name", value = "yukiyama"), } )