Spring5框架学习实战
本文总结自尚硅谷视频 , 参考1 , Spring 下载地址 , Spring框架官方文档 (5.3.22)
框架概述
Spring框架是什么?
Spring 是一个 开源的 Java EE 开发框架 。
Spring 框架的核心功能可以应用在任何 Java 应用程序中,尤其对 Java EE 平台上的 Web 应用程序有更好的扩展性。
Spring 框架的目标是使得 Java EE 应用程序的开发更加简便快捷,通过使用 POJO (Plain Old Java Object) 为基础的编程模型促进良好的编程风格。
Spring有哪些优点?
方便解耦,简化开发 。
IoC 容器实现松耦合。对象之间的依赖关系交由 Spring 控制,避免了在一个对象代码中操作另一个对象所造成的耦合。
AOP 编程的支持。通过 Spring 提供的 AOP 功能,方便进行 面向切面 的编程,把应用的业务逻辑与系统的服务分离开来。
声明事务的支持 。在 Spring 中,我们可以从单调烦闷的事务管理代码中解脱出来,通过声明式方式灵活地进行事务的管理,提高开发效率和质量。
方便程序的测试 。可以用非容器依赖的编程方式进行几乎所有的测试工作。Spring支持 Junit,可以通过注解方便的测试 Spring 程序。
方便集成各种优秀框架 。Spring 提供了对各种优秀框架(如Struts, Hibernate)等的直接支持。
Java 源码是经典学习范例 。Spring 的源码设计精妙、结构清晰、应用了许多 Java 设计模式,是对 Java 技术的极佳实践范例。
异常处理 。Spring 提供一个方便的 API 将特定技术的异常 (由 JDBC, Hibernate 等抛出) 转化为一致的 Unchecked 异常。
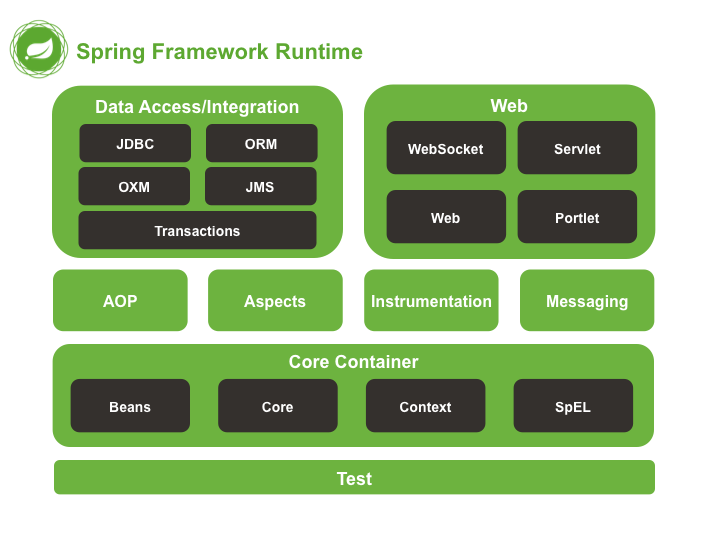
Spring 由哪些模块组成?(架构图)
模块
细分
描述
Data Access/Integration
JDBC
对JDBC的封装。
ORM
支持数据集成框架的封装(如 Mybatis,Hibernate)。
OXM
Object XML Mapper,支持在 Java 对象和 XML 文档间转换。
JMS
生产者和消费者的消息功能实现。
Transactions
事务管理。
Web
WebSocket
提供 Socket 通信,web 端的的推送功能。
Servlet
Spring MVC 框架实现。
Web
包含 web 应用开发用到 Spring 框架时所需的核心类,包括自动载入 WebApplicationContext 特性的类,Struts 集成类、文件上传的支持类、Filter 类和大量辅助工具类。
Portlet
实现 web 模块功能的聚合(如网站首页(Port)下面可能会有不同的子窗口(Portlet))。
AOP
面向切面功能模块。
Aspects
面向切面的一个重要的组成部分,提供对 AspectJ 框架的整合。
Instrumentation
检测器,检测JVM 及 Tomcat 。
Messaging
Spring 提供的消息处理功能。
Core Container
Beans
负责Bean工厂中Bean的装配,所谓Bean工厂即是创建对象的工厂,Bean的装配也就是对象的创建工作。
Core
负责 IoC 基本实现。
Context
Spring 的 IoC 容器大量调用 Spring Core 中的函数。Bean 创建好对象后,由 Context 负责建立 Bean 与 Bean 之间的关系并维护,可以把 Context 看成是 Bean 关系的集合。
SpEl
Spring Expression Language(Spring 表达式语言)。
Test
在做单元测试时,Spring会帮我们初始化一些测试过程当中需要用到的资源对象
该表内容 来源 。
本文测试例
对于每一个知识点,本文均给出对应的测试例。
测试例
涉及的类
测试方法
xml
基于XML文件的Bean管理 com.yukiyama.spring.xml
TestXML
注入bean (创建对象)
User
testInjectBean
injectBean.xml
bean的作用域
Book, Order
testScope
scope.xml
bean的生命周期
LifeCycle
testLifeCycle
lifeCycle.xml
通过setter注入字段
Book
testInjectFieldBySetter
injectFieldBySetter.xml
通过构造器注入字段
User
testInjectFieldByConstructor
injectFieldByConstructor.xml
p名称空间的使用
Book
testInjectFieldBySetterWithPNamespace
pNamespace.xml
注入空值和特殊符号
Book
testNullAndSpecialStringDI
nullAndSpecialString.xml
注入外部bean
UserService, UserDao, UserDaoImpl
testInjectOuterBean
injectOuterBean.xml
注入内部bean
UserService, UserDao, UserDaoImpl
testInjectInnerBean
injectInnerBean.xml
外部级联赋值
Order, Book
testCascadeOuter
cascadeOuter.xml
内部级联赋值
Order, Book
testCascadeInner
cascadeInner.xml
注入集合字段
Bucket
testInjectCollectionType
injectCollectionType.xml
提取集合元素
Bucket
testInjectCollectionTypeUsingUtilTag
injectCollectionTypeUsingUtilTag.xml
FactoryBean
自动装配
Book, Order
testAutowire
autowire.xml
外部配置文件
基于注解的bean管理 com.yukiyama.spring.anno
TestAnno
注入bean
UserService
testAnnoInjectBean
anno.xml
注入引用类型字段
UserService, UserDao, UserDaoImpl
testAnnoInjectRefFiled
anno.xml
注入基本类型字段
UserService, UserDao, UserDaoImpl
testAnnoInjectValueFiled
anno.xml
完全注解开发
UserService, UserDao, UserDaoImpl
testCompleteAnno
无
IoC
IoC基本概念
什么是 IoC?
IoC (Inversion of Control), 控制反转 / 反转控制 ,一种程序设计思想,目的是为了降低程序的耦合度。
控制 指的是对象的创建、字段注入、对象间的引用等。
反转 指原本在对象内部直接控制 (例如通过 new 来创建对象) 其他对象,转变为将所有对象都交给 IoC 容器来控制。对于一个对象,IoC 容器负责查找和注入它所依赖的对象。
在框架中,org.springframework.beans 和 org.springframework.context 两个包是 IoC 的基础。
什么是 IoC 容器?
IoC 容器即 对象工厂 。负责创建对象、通过 DI 管理对象、装配对象、配置对象、管理对象的生命周期。
IoC 容器有两种实现方式 (两个接口):
BeanFactory 接口 。IoC 容器的基本实现,加载配置文件时不会创建对象,在获取对象时才会创建对象。ApplicationContex 接口 。BeanFactory 接口的子接口,是 BeanFactory 的超集 ,提供更多更强大的面向企业开发的功能。与 BeanFactory 不同的是,加载配置文件时即创建对象 。
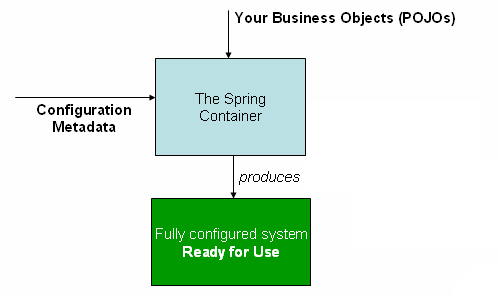
下图是 IoC 容器示意图。
ApplicationContext 及其具体实现类?
org.springframework.context.ApplicationContext 接口 代表 Spring IoC 容器 ,负责实例化、配置和组装bean。容器通过读取 配置元数据 来获得关于要实例化、配置和组装哪些对象的指示。配置元数据以 XML、Java 注解或 Java 代码表示。它可以让你表达构成你的应用程序的对象以及这些对象之间丰富的相互依赖关系。
FileSystemXmlApplicationContext :此容器从一个 XML 文件中加载 beans 的配置,其有参构造器的参数为 XML 配置文件的全路径名 (带盘符文件路径)。
ClassPathXmlApplicationContext:此容器从一个 XML 文件中加载 beans 的配置,该实现 在 classpath 里搜索XML 配置文件 (src文件夹中)。
IoC 的实现原理?
XML 解析。
工厂模式。不是通过 new 来创建对象,而是通过工厂 (IoC 容器) 来获取对象。
反射。创建对象实例是通过反射实现的。
什么是 DI?
DI (Dependency Injection), 依赖注入 。与 IoC 可看作对同一概念的两个不同角度的描述,IoC 是对「将对象交给 Spring 管理」这一概念的概括描述,DI 则指出管理的具体实现,即 IoC 容器根据配置信息来为一个对象注入它所依赖的内容。
5.3.x官方文档 : “IoC is also known as dependency injection (DI).”
SpringBean
Bean 的定义 : Spring 中的 Bean 是一个被 Spring IoC 容器 实例化、组装和管理 的对象。
5.3.x官方文档定义
In Spring, the objects that form the backbone of your application and that are managed by the Spring IoC container are called beans . A bean is an object that is instantiated, assembled, and managed by a Spring IoC container . Otherwise, a bean is simply one of many objects in your application. Beans, and the dependencies among them, are reflected in the configuration metadata used by a container.
另外注意与 JavaBean 的区别。JavaBean 是可序列化,具有空参构造器和 getter 和 setter 方法的 Java 对象。
Bean 管理的定义 : 可理解为 IoC 中的 「控制」,即负责 对象的创建 和 字段的注入 。
Bean 管理的方式
两种 Bean
普通 bean 。bean 标签中 class 属性指定的类。 ApplicationContext 的 getBean 方法获取的类型即为 bean 标签中指定的类型。
工厂 bean (FactoryBean) 。 ApplicationContext 的 getBean 方法获取的类型可以与 bean 标签中指定的类型不同。
Bean 的配置元数据
基于XML文件的Bean管理
XML 配置文件的内容
命名空间 。
bean 标签:描述 Java 对象。通过无参构造器创建对象。
id 属性: 对象的标识。
class: 类全路径 (包类路径) 。
name 属性: 也是对象的标识,可以有特殊符号,不常用。
property 标签:描述对象的字段,为 Bean 标签的子标签。
name 属性:字段名
value 属性:字段值
ref 属性: bean 标签的 id 值。
constructor-arg 标签:描述构造器,为 Bean 标签的子标签。
name 属性:参数名
value 属性:参数值
index 属性: 参数的序号,可替代 name 的作用,但不清晰,故不常用。
XML 文件的名称空间
参考
如下最基本的 Spring XML 配置文件中,xmlns / xmlns:xsi / xsi:schemaLocation 三项便是 命名空间 自动为 XML 标签补全前缀,避免标签命名冲突 。类似 Java 中的包,不同的包下面可以存放相同的类名,只要在引入类时前面加上类的包就可以避免同名类的冲突。
1
2
3
4
5
<?xml version="1.0" encoding="UTF-8" ?> <beans xmlns ="http://www.springframework.org/schema/beans" xmlns:xsi ="http://www.w3.org/2001/XMLSchema-instance" xsi:schemaLocation ="http://www.springframework.org/schema/beans http://www.springframework.org/schema/beans/spring-beans.xsd" > </beans >
注入bean
在 idea 中创建 maven 工程 (quitckstart)
pom.xml 中添加必要依赖
工程中创建测试用的普通类
创建相关测试类
创建 xml 配置文件
在 src/main/ 下创建 resources 文件夹,将 xml 配置文件放入该文件夹下
pom.xml 文件
1 2 3 4 5 6 7 8 9 10 11 12 13 14 15 16 17 18 19 20 21 22 23 24 25 26 27 28 29 30 31 32 33 34 35 36 37 38 39 40 41 <project xmlns ="http://maven.apache.org/POM/4.0.0" xmlns:xsi ="http://www.w3.org/2001/XMLSchema-instance" xsi:schemaLocation ="http://maven.apache.org/POM/4.0.0 http://maven.apache.org/xsd/maven-4.0.0.xsd" > <modelVersion > 4.0.0</modelVersion > <groupId > com.yukiyama.spring</groupId > <artifactId > spring_demo</artifactId > <version > 1.0-SNAPSHOT</version > <packaging > jar</packaging > <name > spring_demo</name > <url > http://maven.apache.org</url > <properties > <project.build.sourceEncoding > UTF-8</project.build.sourceEncoding > </properties > <dependencies > <dependency > <groupId > junit</groupId > <artifactId > junit</artifactId > <version > 4.12</version > <scope > test</scope > </dependency > <dependency > <groupId > commons-logging</groupId > <artifactId > commons-logging</artifactId > <version > 1.1.1</version > </dependency > <dependency > <groupId > org.springframework</groupId > <artifactId > spring-context</artifactId > <version > 5.2.6.RELEASE</version > </dependency > </dependencies > </project >
依赖关系
通过命令行工具,在该项目的 pom.xml 文件目录下执行 mvn dependency:tree 可看到如下依赖关系。
1
2
3
4
5
6
7
8
9
10
11
[INFO] --- maven-dependency-plugin:2.8:tree (default-cli) @ spring_demo --- [INFO] com.yukiyama.spring:spring_demo:jar:1.0-SNAPSHOT [INFO] +- junit:junit:jar:4.12:test [INFO] | \- org.hamcrest:hamcrest-core:jar:1.3:test [INFO] +- commons-logging:commons-logging:jar:1.1.1:compile [INFO] \- org.springframework:spring-context:jar:5.2.6.RELEASE:compile [INFO] +- org.springframework:spring-aop:jar:5.2.6.RELEASE:compile [INFO] +- org.springframework:spring-beans:jar:5.2.6.RELEASE:compile [INFO] +- org.springframework:spring-core:jar:5.2.6.RELEASE:compile [INFO] | \- org.springframework:spring-jcl:jar:5.2.6.RELEASE:compile [INFO] \- org.springframework:spring-expression:jar:5.2.6.RELEASE:compile
通过 idea 还可以看到重复的依赖已被自动忽略。
普通类
1
2
3
4
5
package com.yukiyama.spring.xml.bean;public class User { private String userName; }
测试方法
1 2 3 4 5 6 7 8 @Test public void testInjectBean () { System.out.println("【测试】装配 bean (通过 xml 配置方式获取对象)" ); ApplicationContext context = new ClassPathXmlApplicationContext ("getBean.xml" ); User user = context.getBean("user" , User.class); System.out.println(user); }
配置文件 injectBean.xml
1
2
3
4
5
6
7
8
<?xml version="1.0" encoding="UTF-8" ?> <beans xmlns ="http://www.springframework.org/schema/beans" xmlns:xsi ="http://www.w3.org/2001/XMLSchema-instance" xsi:schemaLocation ="http://www.springframework.org/schema/beans http://www.springframework.org/schema/beans/spring-beans.xsd" > <bean id ="user" class ="com.yukiyama.spring.xml.bean.User" > </bean > </beans >
Bean的作用域
所谓作用域 (scope) 即值 Bean 是 单实例 的还是 多实例 的。
单实例 Bean 在 bean 标签中由 scope="singleton" 属性确定 (默认值,可不写),在 IoC 容器对象创建的时候 (BeanFactory / ApplicationContext) 就会创建 bean 实例。整个 IoC 容器中该 bean 只存在这一个实例。
多实例 Bean 在 bean 标签中由 scope="prototype" 属性确定,在 IoC 容器对象创建的时候 (BeanFactory / ApplicationContext) 不会创建 bean 实例,而是在 IoC 容器获取该 bean 时 (如 getBean() 方法) 才创建实例。
1
2
3
4
5
6
7
8
9
<?xml version="1.0" encoding="UTF-8" ?> <beans xmlns ="http://www.springframework.org/schema/beans" xmlns:xsi ="http://www.w3.org/2001/XMLSchema-instance" xsi:schemaLocation ="http://www.springframework.org/schema/beans http://www.springframework.org/schema/beans/spring-beans.xsd" > <bean id ="book" class ="com.yukiyama.spring.xml.bean.Book" scope ="singleton" > </bean > <bean id ="order" class ="com.yukiyama.spring.xml.bean.Order" scope ="prototype" > </bean > </beans >
除了 singleton 和 prototype 外,还有三种应用于 WebApplicationContext 的作用域。
作用域
描述
singleton
默认作用域 。在 Spring IoC 容器仅存在一个 Bean 实例,单例方式存在。
prototype
每次从容器中调用 Bean 时,都返回一个新的实例,即每次调用 getBean() 时,相当于执行 newXxxBean() 。
request
每次 HTTP 请求都会创建一个新的 Bean,该作用域仅适用于 WebApplicationContext 环境。
session
同一个 HTTP Session 共享一个 Bean,不同 Session 使用不同的 Bean ,仅适用于 WebApplicationContext 环境。
global-session
一般用于 Portlet 应用环境,该作用域仅适用于 WebApplicationContex t环境。
Bean的生命周期
从对象创建到销毁的过程。可在「调用初始化方法」前后加上「后置处理器」过程。
创建 bean 实例。
为 bean 的字段设置值及引入其他 bean 。
执行 bean 后置处理器的 postProcessBeforeInitialization 方法。
执行 bean 的初始化方法 (需要在 xml 中配置初始化方法) 。
执行 bean 后置处理器的 postProcessAfterInitialization 方法。
使用 bean 。
关闭容器时,调用 bean 的销毁方法 (需要在 xml 中配置销毁方法) 。
后置处理器的使用步骤。
创建后置处理器类,实现 BeanPostProcessor 接口,重写 postProcessBeforeInitialization 和 postProcessAfterInitialization 方法。。
在 XML 文件中以 bean 标签添加后置处理器。XML 文件中的所有 bean 都会应用该后置处理器。
如下代码演示 bean 的生命周期。
普通类
1
2
3
4
5
6
7
8
9
10
11
12
13
14
15
16
17
18
19
20
21
22
23
package com.yukiyama.spring.xml.bean;public class LifeCycle { private String name; public LifeCycle () { System.out.println("step: non-args' constructor." ); } public void setName (String name) { this .name = name; } public void init () { System.out.println("step: initial method." ); } @Override public String toString () { return "LifeCycle{" + "name='" + name + '\'' + '}' ; } public void destroy () { System.out.println("step: destroy method" ); } }
后置处理器类
1
2
3
4
5
6
7
8
9
10
11
12
13
14
15
16
package com.yukiyama.spring.xml.bean;import org.springframework.beans.BeansException;import org.springframework.beans.factory.config.BeanPostProcessor;public class PostProcessor implements BeanPostProcessor { public Object postProcessBeforeInitialization (Object bean, String beanName) throws BeansException { System.out.println("step: postProcessBeforeInitialization" ); return bean; } public Object postProcessAfterInitialization (Object bean, String beanName) throws BeansException { System.out.println("step: postProcessAfterInitialization" ); return bean; } }
xml 文件 lifeCycle.xml
1
2
3
4
5
6
7
8
9
10
11
12
<?xml version="1.0" encoding="UTF-8" ?> <beans xmlns ="http://www.springframework.org/schema/beans" xmlns:xsi ="http://www.w3.org/2001/XMLSchema-instance" xsi:schemaLocation ="http://www.springframework.org/schema/beans http://www.springframework.org/schema/beans/spring-beans.xsd" > <bean id ="lifeCycle" class ="com.yukiyama.spring.xml.bean.LifeCycle" init-method ="init" destroy-method ="destroy" > <property name ="name" value ="lifeCycleBean" > </property > </bean > <bean id ="postProcessor" class ="com.yukiyama.spring.xml.bean.PostProcessor" > </bean > </beans >
测试方法
1 2 3 4 5 6 7 8 9 @Test public void testLifeCycle () { System.out.println("【测试】bean 的生命周期" ); ApplicationContext context = new ClassPathXmlApplicationContext ("lifeCycle.xml" ); LifeCycle lifeCycle = context.getBean("lifeCycle" , LifeCycle.class); System.out.println("step: use bean" ); System.out.println(lifeCycle.toString()); }
执行结果
1
2
3
4
5
6
7
【测试】bean 的生命周期 step: non-args' constructor. step: postProcessBeforeInitialization step: initial method. step: postProcessAfterInitialization step: use bean LifeCycle{name='lifeCycleBean'}
注入字段
XML 文件的字段注入方式?
基于 setter 方法。
创建类,定义属性和对应的 setter 。
XML 文件中配置对象 (Bean 标签) 和要注入的字段 (Property 标签)。
基于有参构造器。
创建类,定义属性和对应的有参构造器。
XML 文件中配置对象 (Bean 标签) 和相应的有参构造器参数 (constructor-arg 标签) ,即需要注入的字段。
使用基于有参构造器的方式时通常基于构造器的方式用于 强制依赖 ,setter 方式用于 可选依赖 。
基于setter
如下演示基于 setter 的 DI。
普通类
1
2
3
4
5
6
7
8
9
10
11
12
13
14
15
16
17
18
19
package com.yukiyama.spring.bean;public class Book { private String name; private String author; public void setName (String name) { this .name = name; } public void setAuthor (String author) { this .author = author; } @Override public String toString () { return "Book{" + "name='" + name + '\'' + ", author='" + author + '\'' + '}' ; } }
测试方法
1
2
3
4
5
6
7
@Test public void testInjectFieldBySetter () { System.out.println("【测试】通过 setter 注入字段" ); ApplicationContext context = new ClassPathXmlApplicationContext ("injectFieldBySetter.xml" ); Book book = context.getBean("book" , Book.class); System.out.println(book.toString()); }
xml 配置文件 injectFieldBySetter.xml。
1
2
3
4
5
6
7
8
9
10
11
<?xml version="1.0" encoding="UTF-8" ?> <beans xmlns ="http://www.springframework.org/schema/beans" xmlns:xsi ="http://www.w3.org/2001/XMLSchema-instance" xsi:schemaLocation ="http://www.springframework.org/schema/beans http://www.springframework.org/schema/beans/spring-beans.xsd" > <bean id ="book" class ="com.yukiyama.spring.xml.bean.Book" > <property name ="name" value ="Hamlet" > </property > <property name ="author" value ="Shakespeare" > </property > </bean > </beans >
基于构造器
如下演示基于有参构造器的 DI。当一个类具有有参构造器时,参数对应的字段都需要在 xml 的 bean 标签下写出,即有多少个字段,就对应写出多少个 <constructor-arg> 标签内容,否则报错。因此说基于构造器的方式用于 强制依赖 。
普通类
在前述 User 类中加入有参构造器和 toString() 方法。
1
2
3
4
5
6
7
8
9
10
11
12
13
14
package com.yukiyama.spring.xml.bean;public class User { private String userName; public User (String userName) { this .userName = userName; } @Override public String toString () { return "User{" + "userName='" + userName + '\'' + '}' ; } }
测试方法
1 2 3 4 5 6 7 8 @Test public void testInjectFieldByConstructor () { System.out.println("【测试】通过构造器注入字段" ); ApplicationContext context = new ClassPathXmlApplicationContext ("injectFieldByConstructor.xml" ); User user = context.getBean("user" , User.class); System.out.println(user.toString()); }
xml 配置文件 injectFieldByConstructor.xml。
1
2
3
4
5
6
7
8
9
10
<?xml version="1.0" encoding="UTF-8" ?> <beans xmlns ="http://www.springframework.org/schema/beans" xmlns:xsi ="http://www.w3.org/2001/XMLSchema-instance" xsi:schemaLocation ="http://www.springframework.org/schema/beans http://www.springframework.org/schema/beans/spring-beans.xsd" > <bean id ="user" class ="com.yukiyama.spring.xml.bean.User" > <constructor-arg name ="userName" value ="USER#1" > </constructor-arg > </bean > </beans >
p名称空间
使用p名称空间可简化 setter 方式的字段注入的写法。
在 XML 文件中添加 p 名称空间配置。
1 xmlns:p="http://www.springframework.org/schema/p"
注入字段时,在 bean 标签中无需再以 property 子标签注入字段,可直接作为 bean 标签的属性注入字段。
测试方法
1 2 3 4 5 6 7 8 @Test public void testInjectFieldBySetterWithPNamespace () { System.out.println("【测试】通过 p 命名空间简化 setter 注入字段" ); ApplicationContext context = new ClassPathXmlApplicationContext ("pNamespace.xml" ); Book book = context.getBean("book" , Book.class); System.out.println(book.toString()); }
xml 配置文件 pNamespace.xml
1
2
3
4
5
6
7
8
9
<?xml version="1.0" encoding="UTF-8" ?> <beans xmlns ="http://www.springframework.org/schema/beans" xmlns:p ="http://www.springframework.org/schema/p" xmlns:xsi ="http://www.w3.org/2001/XMLSchema-instance" xsi:schemaLocation ="http://www.springframework.org/schema/beans http://www.springframework.org/schema/beans/spring-beans.xsd" > <bean id ="book" class ="com.yukiyama.spring.xml.bean.Book" p:name ="Harry Potter" p:author ="J. K. Rowling" > </bean > </beans >
注入空值和特殊符号
注入空值: <null/> 标签
注入特殊符号: ![CDATA[]]
测试方法
1 2 3 4 5 6 7 8 @Test public void testNullAndSpecialStringDI () { System.out.println("【测试】注入空值和特殊符号字段" ); ApplicationContext context = new ClassPathXmlApplicationContext ("nullAndSpecialString.xml" ); Book book = context.getBean("book" , Book.class); System.out.println(book.toString()); }
xml 配置文件: nullAndSpecialString.xml
1
2
3
4
5
6
7
8
9
10
11
12
13
14
15
<?xml version="1.0" encoding="UTF-8" ?> <beans xmlns ="http://www.springframework.org/schema/beans" xmlns:xsi ="http://www.w3.org/2001/XMLSchema-instance" xsi:schemaLocation ="http://www.springframework.org/schema/beans http://www.springframework.org/schema/beans/spring-beans.xsd" > <bean id ="book" class ="com.yukiyama.spring.xml.bean.Book" > <property name ="name" > <null /> </property > <property name ="author" > <value > <![CDATA[<<special string>>]]></value > </property > </bean > </beans >
注入外部bean
指在 XML 配置文件中,对于一个 bean 对象,其字段是另一个 bean 对象的情况下,若两者并列写出,且前者 bean 标签内通过 <property name="" ref=""> 的方式注入,则为「注入外部bean」。
例子:
创建类 UserService 、接口 UserDao 及其实现类 UserDaoImpl。
在 UserService 中调用 UserDao 实现类中的方法。
1
2
3
4
5
6
7
8
9
10
11
12
13
package com.yukiyama.spring.xml.Service;import com.yukiyama.spring.xml.dao.UserDao;public class UserService { private UserDao userDao; public void setUserDao (UserDao userDao) { this .userDao = userDao; } public UserDao getUserDao () { return userDao; } }
1
2
3
4
5
package com.yukiyama.spring.xml.dao;public interface UserDao { void update () ; }
1
2
3
4
5
6
7
package com.yukiyama.spring.xml.dao;public class UserDaoImpl implements UserDao { public void update () { System.out.println("This method: UserDaoImpl.update()" ); } }
在 XML 配置文件中配置 injectOuterBean.xml 。
1
2
3
4
5
6
7
8
9
10
<?xml version="1.0" encoding="UTF-8" ?> <beans xmlns ="http://www.springframework.org/schema/beans" xmlns:xsi ="http://www.w3.org/2001/XMLSchema-instance" xsi:schemaLocation ="http://www.springframework.org/schema/beans http://www.springframework.org/schema/beans/spring-beans.xsd" > <bean id ="userService" class ="com.yukiyama.spring.xml.Service.UserService" > <property name ="userDao" ref ="userDao" > </property > </bean > <bean id ="userDao" class ="com.yukiyama.spring.xml.dao.UserDaoImpl" > </bean > </beans >
测试方法
1 2 3 4 5 6 7 8 @Test public void testInjectOuterBean () { System.out.println("【测试】注入外部bean" ); ApplicationContext context = new ClassPathXmlApplicationContext ("injectOuterBean.xml" ); UserService userService = context.getBean("userService" , UserService.class); userService.getUserDao().update(); }
注入内部bean
与「注入外部bean」相对,在 property 中将 bean 标签作为子标签注入的方式为「注入内部bean」。
如下为 injectInnerBean.xml 。
1
2
3
4
5
6
7
8
9
10
11
12
<?xml version="1.0" encoding="UTF-8" ?> <beans xmlns ="http://www.springframework.org/schema/beans" xmlns:xsi ="http://www.w3.org/2001/XMLSchema-instance" xsi:schemaLocation ="http://www.springframework.org/schema/beans http://www.springframework.org/schema/beans/spring-beans.xsd" > <bean id ="userService" class ="com.yukiyama.spring.xml.Service.UserService" > <property name ="userDao" > <bean id ="userDao" class ="com.yukiyama.spring.xml.dao.UserDaoImpl" > </bean > </property > </bean > </beans >
测试方法。
1 2 3 4 5 6 7 8 @Test public void testInjectInnerBean () { System.out.println("【测试】注入内部bean" ); ApplicationContext context = new ClassPathXmlApplicationContext ("injectInnerBean.xml" ); UserService userService = context.getBean("userService" , UserService.class); userService.getUserDao().update(); }
级联赋值
在一个 bean 对象 A 中注入另一个 bean 对象 B 的属性并对该属性赋值。
参考
外部级联赋值
在外部 bean Book 中注入字段 name 和 author 后,Order 再引用。
普通类
1
2
3
4
5
6
7
8
9
10
11
package com.yukiyama.spring.xml.bean;public class Order { private Book book; public void setBook (Book book) { this .book = book; } public Book getBook () { return book; } }
测试方法
1 2 3 4 5 6 7 8 @Test public void testCascade () { System.out.println("【测试】级联赋值" ); ApplicationContext context = new ClassPathXmlApplicationContext ("cascadeOuter.xml" ); Order order = context.getBean("order" , Order.class); System.out.println(order.getBook().toString()); }
xml 配置文件 cascadeOuter.xml
1
2
3
4
5
6
7
8
9
10
11
12
13
<?xml version="1.0" encoding="UTF-8" ?> <beans xmlns ="http://www.springframework.org/schema/beans" xmlns:xsi ="http://www.w3.org/2001/XMLSchema-instance" xsi:schemaLocation ="http://www.springframework.org/schema/beans http://www.springframework.org/schema/beans/spring-beans.xsd" > <bean id ="order" class ="com.yukiyama.spring.xml.bean.Order" > <property name ="book" ref ="book" > </property > </bean > <bean id ="book" class ="com.yukiyama.spring.xml.bean.Book" > <property name ="name" value ="Story of the stone" > </property > <property name ="author" value ="Cao Xueqin" > </property > </bean > </beans >
内部级联赋值
bean Order 直接赋值 bean Book 的属性 name 和 author。
xml 配置文件 cascadeInner.xml
1
2
3
4
5
6
7
8
9
10
11
12
<?xml version="1.0" encoding="UTF-8" ?> <beans xmlns ="http://www.springframework.org/schema/beans" xmlns:xsi ="http://www.w3.org/2001/XMLSchema-instance" xsi:schemaLocation ="http://www.springframework.org/schema/beans http://www.springframework.org/schema/beans/spring-beans.xsd" > <bean id ="order" class ="com.yukiyama.spring.xml.bean.Order" > <property name ="book" ref ="book" > </property > <property name ="book.name" value ="Story of the stone" > </property > <property name ="book.author" value ="Cao Xueqin" > </property > </bean > <bean id ="book" class ="com.yukiyama.spring.xml.bean.Book" > </bean > </beans >
注入集合字段
创建类,定义数组、list、map、set 类型字段,生成对应的 setter 方法。
在 XML 配置文件中配置。
普通类
1
2
3
4
5
6
7
8
9
10
11
12
13
14
15
16
17
18
19
20
21
22
23
24
25
26
27
28
29
30
31
32
33
34
35
36
37
38
39
40
package com.yukiyama.spring.xml.bean;import java.util.Arrays;import java.util.List;import java.util.Map;import java.util.Set;public class Bucket { private String[] arr; private List<String> list; private List<Book> bookList; private Map<String, Integer> bookMap; private Set<String> set; public void setArr (String[] arr) { this .arr = arr; } public void setList (List<String> list) { this .list = list; } public void setBookList (List<Book> bookList) { this .bookList = bookList; } public void setBookMap (Map<String, Integer> bookMap) { this .bookMap = bookMap; } public void setSet (Set<String> set) { this .set = set; } @Override public String toString () { return "Bucket{" + "arr=" + Arrays.toString(arr) + ", list=" + list + ", bookList=" + bookList + ", bookMap=" + bookMap + ", set=" + set + '}' ; } }
测试方法
1 2 3 4 5 6 7 8 @Test public void testInjectCollectionType () { System.out.println("【测试】注入各种集合类型字段" ); ApplicationContext context = new ClassPathXmlApplicationContext ("injectCollectionType.xml" ); Bucket bucket = context.getBean("bucket" , Bucket.class); System.out.println(bucket.toString()); }
xml 配置文件 injectCollectionType.xml
1
2
3
4
5
6
7
8
9
10
11
12
13
14
15
16
17
18
19
20
21
22
23
24
25
26
27
28
29
30
31
32
33
34
35
36
37
38
39
40
41
42
43
44
45
46
47
48
49
50
51
52
<?xml version="1.0" encoding="UTF-8" ?> <beans xmlns ="http://www.springframework.org/schema/beans" xmlns:xsi ="http://www.w3.org/2001/XMLSchema-instance" xsi:schemaLocation ="http://www.springframework.org/schema/beans http://www.springframework.org/schema/beans/spring-beans.xsd" > <bean id ="bucket" class ="com.yukiyama.spring.xml.bean.Bucket" > <property name ="arr" > <array > <value > arr1</value > <value > arr2</value > </array > </property > <property name ="list" > <list > <value > listEle1</value > <value > listEle2</value > </list > </property > <property name ="bookList" > <list > <ref bean ="book1" > </ref > <ref bean ="book2" > </ref > </list > </property > <property name ="bookMap" > <map > <entry key ="bookName#1" value ="123" > </entry > <entry key ="bookName#2" value ="456" > </entry > </map > </property > <property name ="set" > <set > <value > setEle1</value > <value > setEle2</value > </set > </property > </bean > <bean id ="book1" class ="com.yukiyama.spring.xml.bean.Book" > <property name ="name" value ="Story of the stone" > </property > <property name ="author" value ="Cao Xueqin" > </property > </bean > <bean id ="book2" class ="com.yukiyama.spring.xml.bean.Book" > <property name ="name" value ="Harry Potter" > </property > <property name ="author" value ="J. K. Rowling" > </property > </bean > </beans >
提取集合元素
在 XML 配置文件中引入 util 名称空间。
在 XML 配置文件中配置。
1
2
3
4
5
6
7
8
9
10
11
12
13
14
15
16
17
18
19
20
21
<?xml version="1.0" encoding="UTF-8" ?> <beans xmlns ="http://www.springframework.org/schema/beans" xmlns:util ="http://www.springframework.org/schema/util" xmlns:xsi ="http://www.w3.org/2001/XMLSchema-instance" xsi:schemaLocation ="http://www.springframework.org/schema/beans http://www.springframework.org/schema/beans/spring-beans.xsd http://www.springframework.org/schema/util http://www.springframework.org/schema/util/spring-util.xsd" > <util:list id ="stringList" > <value > listEle1</value > <value > listEle2</value > </util:list > <bean id ="bucket" class ="com.yukiyama.spring.xml.bean.Bucket" > <property name ="list" ref ="stringList" > </property > </bean > </beans >
FactoryBean
FactoryBean 即工厂 bean, 实现 FactoryBean 接口的类,通过 ApplicationContext 的 getBean 方法获取的类型可以与 bean 标签中指定的类型不同。
创建类,令其实现 FactoryBean 接口,那么它就是一个工厂 bean。
实现接口的方法,在该方法中定义返回的具体的 bean 类型。
XML 配置文件完成配置。
1
2
3
4
5
6
7
8
9
10
11
12
13
14
15
16
17
18
19
20
21
22
23
package com.yukiyama.factorybean;import com.yukiyama.collectiontype.Course;import org.springframework.beans.factory.FactoryBean;public class MyBean implements FactoryBean <Course> { @Override public boolean isSingleton () { return FactoryBean.super .isSingleton(); } @Override public Course getObject () throws Exception { Course course = new Course (); course.setName("Spring5" ); return course; } @Override public Class<?> getObjectType() { return null ; } }
1 2 <bean id ="myBean" class ="com.yukiyama.factorybean.MyBean" > </bean >
1
2
3
4
5
6
@org .junit.Testpublic void testFactoryBean () { ApplicationContext context = new ClassPathXmlApplicationContext ("bean1.xml" ); Course course = context.getBean("myBean" , Course.class); System.out.println(course); }
自动装配
参考
自动装配指对于 bean 类型的字段的注入不再通过配置文件中的 <property> 标签实现 (参考前面「注入外部Bean」、「注入内部Bean」内容),而是在 <bean> 标签中通过 autowire 属性为当前 bean 装配字段 (也是 bean) 。Spring 根据指定的装配规则 (字段名称 autowire = byName 或字段类型 autowire = byType) 自动注入匹配的字段值。autowire 默认值为 no ,表示不使用自动装配。
byName : 根据当前 bean 中的字段名,在 xml 文件中寻找 id 与之对应的 bean,然后作为字段注入当前 bean 中。byType : 根据当前 bean 中的字段类型,在 xml 文件中寻找 class 与之对应的 bean,然后作为字段注入当前 bean 中。
需要自动装配多个同类型字段时,应使用 byName ,若使用 byType ,则存在多个同类型 bean 将导致错误。
普通类
在 Order 类中设置两个 Book 类型字段。
1
2
3
4
5
6
7
8
9
10
11
12
13
14
15
16
17
18
19
20
21
22
23
package com.yukiyama.spring.xml.bean;public class Order { private Book book; private Book book1; public void setBook (Book book) { this .book = book; } public void setBook1 (Book book) { this .book1 = book; } public Book getBook () { return book; } @Override public String toString () { return "Order{" + "book=" + book + ", book1=" + book1 + '}' ; } }
测试方法。
1 2 3 4 5 6 7 8 @Test public void testAutowire () { System.out.println("【测试】自动装配" ); ApplicationContext context = new ClassPathXmlApplicationContext ("autowire.xml" ); Order order = context.getBean("order" , Order.class); System.out.println(order); }
xml 配置文件 autowire.xml 。
1
2
3
4
5
6
7
8
9
10
<?xml version="1.0" encoding="UTF-8" ?> <beans xmlns ="http://www.springframework.org/schema/beans" xmlns:xsi ="http://www.w3.org/2001/XMLSchema-instance" xsi:schemaLocation ="http://www.springframework.org/schema/beans http://www.springframework.org/schema/beans/spring-beans.xsd" > <bean id ="order" class ="com.yukiyama.spring.xml.bean.Order" autowire ="byName" > </bean > <bean id ="book" class ="com.yukiyama.spring.xml.bean.Book" > </bean > <bean id ="book1" class ="com.yukiyama.spring.xml.bean.Book" > </bean > </beans >
若 autowire="byType" 则报错。
外部配置文件
对于 JDBC 连接等场景,需要注入的字段 (例如 username, password 等) 适合用配置文件维护,可以将这些字段的在 <property> 中的 name 和 value 作为键值对写到外部配置文件中。在 XML 中通过 context 名称空间引入配置文件来注入相应的字段。
例如,使用 Druid 连接池,直接在 XML 中配置字段注入的写法如下。
1 2 3 4 5 6 <bean id ="dataSource" class ="com.alibaba.druid.pool.DruidDataSource" > <property name ="driverClassName" value ="com.mysql.jdbc.Driver" > </property > <property name ="url" value ="jdbc:mysql://localhost:3306/crash" > </property > <property name ="username" value ="root" > </property > <property name ="password" value ="xxxxxx" > </property > </bean >
通过外部配置文件注入的方法步骤如下。
在项目 pom.xml 文件中增加 druid 依赖。
创建外部字段配置 .properties 文件,写入字段键值对 (字段名=字段值)。
在 XML 中添加 context 命名空间声明,并通过 <context:property-placeholder> 引入 .properties 文件。
在 XML 中通过引入的 .properties 文件注入字段。
jdbc.properties 文件。
1
2
3
4
prop.driver =com.mysql.jdbc.Driver prop.url =jdbc:mysql://localhost:3306/crash prop.username =root prop.password =xxxxxx
xml 配置文件 properties.xml
1
2
3
4
5
6
7
8
9
10
11
12
13
14
15
16
17
18
19
<?xml version="1.0" encoding="UTF-8" ?> <beans xmlns ="http://www.springframework.org/schema/beans" xmlns:context ="http://www.springframework.org/schema/context" xmlns:xsi ="http://www.w3.org/2001/XMLSchema-instance" xsi:schemaLocation ="http://www.springframework.org/schema/beans http://www.springframework.org/schema/beans/spring-beans.xsd http://www.springframework.org/schema/context http://www.springframework.org/schema/context/spring-context.xsd" > <context:property-placeholder location ="classpath:jdbc.properties" /> <bean id ="dataSource" class ="com.alibaba.druid.pool.DruidDataSource" > <property name ="driverClassName" value ="${prop.driver}" > </property > <property name ="url" value ="${prop.url}" > </property > <property name ="username" value ="${prop.username}" > </property > <property name ="password" value ="${prop.password}" > </property > </bean > </beans >
测试方法
基于注解的Bean管理
使用注解能够简化 XML 配置。
注入bean
Spring 针对 Bean 管理中的「对象创建」提供如下注解。Spring 实际上 并不区分不同注解名称 ,也就是说在代码中用如下任意一个注解标注一个 Bean 都是可以的。但 Spring 提倡在不同层次中使用对应名称的注解,使逻辑更清晰。
1
2
3
4
@Component: 一般 bean 注解 @Service: 通常用于 Service 层 @Controller: 通常用于 Web 层 @Repository: 通常用于 DAO 层
使用注解创建对象的过程。
在 pom.xml 中引入 AOP 依赖 spring-aop-5.2.6.RELEASE.jar (已经通过 org.springframework:spring-context:5.2.6.RELEASE 完成了依赖传递)。
在 XML 文件中添加 context 命名空间,并开启组件扫描 (context:component-scan 标签)。
创建类 (bean) ,添加类注解 (前述四种之一)。
anno.xml
1
2
3
4
5
6
7
8
9
10
<?xml version="1.0" encoding="UTF-8" ?> <beans xmlns ="http://www.springframework.org/schema/beans" xmlns:context ="http://www.springframework.org/schema/context" xmlns:xsi ="http://www.w3.org/2001/XMLSchema-instance" xsi:schemaLocation ="http://www.springframework.org/schema/beans http://www.springframework.org/schema/beans/spring-beans.xsd http://www.springframework.org/schema/context http://www.springframework.org/schema/context/spring-context.xsd" > <context:component-scan base-package ="com.yukiyama.spring.anno" /> </beans >
普通类
在其上添加类注解 @Service(value = "userService") 。括号及其内的参数为该 bean 名称,若不写出则默认为该类名 (首字母小写) 。UserDao 接口与 UserDaoImpl 的代码与「注入外部bean」一节中给出的相同。
1
2
3
4
5
6
7
8
9
10
11
12
package com.yukiyama.spring.anno.Service;import com.yukiyama.spring.anno.dao.UserDao;import org.springframework.stereotype.Service;@Service(value = "userService") public class UserService { private UserDao userDao; public void useDao () { userDao.update(); } }
测试方法
1 2 3 4 5 6 7 8 @Test public void testAnnoInjectBean () { System.out.println("【测试】注解方式注入 bean" ); ApplicationContext context = new ClassPathXmlApplicationContext ("annoInjectBean.xml" ); UserService userService = context.getBean("userService" , UserService.class); System.out.println(userService); }
组件扫描过滤器
参考
在 XML 中的组件扫描标签中 (<context:component-scan>) ,通过过滤标签可设置只扫描某些注解,或不扫描哪些注解。
1 2 3 4 <context:component-scan base-package ="com.yukiyama.spring.anno" > <context:include-filter type ="annotation" expression ="org.springframework.stereotype.Service" /> <context:exclude-filter type ="annotation" expression ="org.springframework.stereotype.Controller" /> </context:component-scan >
注入字段
注入字段主要使用如下注解。
注入引用类型字段
@Autowired: 根据字段类型注入 (自动装配)
@Qualifier: 根据字段名称注入
@Resource: 支持根据类型或名称注入
注入基本类型字段
创建类,添加类注解 (以 UserService 和 UserDaoImpl 为例,为前者添加类注解 @Service ,为后者添加 @Repository)。
在 UserService 中添加 UserDao 类型字段,并使用上述 字段注解 。
例一:使用 @Autowired 注解根据字段类型 UserDao (接口) ,寻找其实现类 UserDaoImpl 后注入。
1
2
3
4
5
6
7
8
9
10
11
12
13
14
package com.yukiyama.spring.anno.Service;import com.yukiyama.spring.anno.dao.UserDao;import org.springframework.beans.factory.annotation.Autowired;import org.springframework.stereotype.Service;@Service public class UserService { @Autowired private UserDao userDao; public void useDao () { userDao.update(); } }
例二:同时使用 @Autowired 和 @Qulifier ,并为后者添加 value 属性,实现根据名称注入。
1
2
3
4
5
6
7
8
9
10
11
12
13
14
15
16
package com.yukiyama.spring.anno.Service;import com.yukiyama.spring.anno.dao.UserDao;import org.springframework.beans.factory.annotation.Autowired;import org.springframework.beans.factory.annotation.Qualifier;import org.springframework.stereotype.Service;@Service public class UserService { @Autowired @Qualifier(value = "yukiyamaDao") private UserDao userDao; public void useDao () { userDao.update(); } }
此时的 UserDaoImpl 类注解 @Repository 后需要添加 value 属性 (只使用 @Autowired 注解时不需要该属性)。
1
2
3
4
5
6
7
8
9
10
package com.yukiyama.spring.anno.dao;import org.springframework.stereotype.Repository;@Repository(value = "yukiyamaDao") public class UserDaoImpl implements UserDao { public void update () { System.out.println("This method: UserDaoImpl.update()" ); } }
例三:演示 @Resource 的使用。需要注意的是 @Resource 在 javax.annotation.Resource; 中,并不在 Spring 框架中,因此不被推荐使用。
1 2 3 4 5 6 7 @Resource private UserDao userDao;@Resource(name = "yukiyamaDao") private UserDao userDao;
以上三例使用如下测试方法。
1 2 3 4 5 6 7 8 @Test public void testAnnoInjectRefFiled () { System.out.println("【测试】注解方式注入引用类型字段" ); ApplicationContext context = new ClassPathXmlApplicationContext ("annoInjectBean.xml" ); UserService userService = context.getBean("userService" , UserService.class); userService.useDao(); }
演示 @Value 的使用。在 UserService 中加入 String 类型的 name 字段及 getName 方法。
1
2
3
4
5
@Value(value = "yukiyamaUserService") private String name;public String getName () { return name; }
测试方法
1 2 3 4 5 6 7 8 @Test public void testAnnoInjectValueFiled () { System.out.println("【测试】注解方式注入引用类型字段" ); ApplicationContext context = new ClassPathXmlApplicationContext ("annoInjectBean.xml" ); UserService userService = context.getBean("userService" , UserService.class); System.out.println(userService.getName()); }
完全注解方式
前述基于注解的 Bean 管理中,XML 中只需要开启组件扫描即可,已经十分简化,但若将此功能用类文件而不是 XML 来实现,则可完全抛弃 XML 配置,此形式称为「完全注解开发」。
创建替代 XML 文件的配置类,并添加 @Configuration 和 @ComponentScan 注解。
测试类需要相应修改 (使用 AnnotationConfigApplicationContext)。
配置类
1
2
3
4
5
6
7
8
9
10
package com.yukiyama.spring.anno.config;import org.springframework.context.annotation.ComponentScan;import org.springframework.context.annotation.Configuration;@Configuration @ComponentScan(basePackages = {"com.yukiyama.spring.anno"}) public class SpringConfig {}
1 2 3 4 5 6 7 8 @Test public void testCompleteAnno () { System.out.println("【测试】注解方式注入引用类型字段" ); ApplicationContext context = new AnnotationConfigApplicationContext (SpringConfig.class); UserService userService = context.getBean("userService" , UserService.class); System.out.println(userService.getName()); }
AOP
AOP基本概念
AOP (Aspect Oriented Programming),面向切面编程 / 面向方面编程。利用 AOP 可以 解耦业务逻辑,提高程序重用性和开发效率 。
更通俗地说,可以在不修改原有代码的基础上为主干功能添加新功能。例如对于一个页面登录功能,若希望加入用户鉴权功能,无需在原有代码中加入判断逻辑,而是通过 AOP 的方式在不修改源代码的情况下添加该新功能。
AOP 的实现原理
动态代理。
有接口,使用 JDK 动态代理。
无接口,使用 CGLIB 动态代理。
JDK 动态代理
参考1 , 参考2 , 参考3
动态代理与静态代理的区别主要为: 静态代理类要实现接口,编译完成后有一 .class 文件。动态代理类不实现接口,在运行时动态生成,编译后无 .class 文件,而是在 运行时动态生成类字节码并加载到 JVM 中 。
动态代理是 反射与代理模式 的应用,涉及到 java.lang.reflect 中若干类和方法, 其中最关键的方法为 Proxy.newProxyInstance 静态方法。
1 static Object newProxyInstance (ClassLoader loader, Class<?>[] interfaces, InvocationHandler h)
方法参数和返回值
描述
ClassLoader loader指定当前目标对象使用的类加载器
Class<?>[] interfaces目标对象实现的接口的类型 (数组)
InvocationHandler h事件处理器
Object返回一个指定接口的代理类实例
动态代理的实现步骤如下。
创建主题类和代理类都要实现的 接口 ,定义接口方法。
创建 接口实现类作为主题类 ,重写方法。
创建实现 InvocationHandler 接口的实现类作为 代理类 (也可以用匿名类形式写出)。
内部通过有参构造器持有主题类对象。
重写 invoke 方法,在方法中完成 「前置增强」 与 「后置增强」 (按需要) 。
可自定义一个 getProxyInstance 方法,内部调用 Proxy.newProxyInstance 静态方法,返回代理对象实例。
完成代理。
如下代码演示动态代理实现。
1 2 3 4 5 interface UserDao { int add (int a, int b) ; String update (String id) ; }
1 2 3 4 5 6 7 8 9 10 11 12 13 public class UserDaoImpl implements UserDao { @Override public int add (int a, int b) { System.out.println("执行主题类add方法," + a + "+" + b + " = " + (a + b)); return a + b; } @Override public String update (String id) { System.out.println("执行主题类update方法,更新为" + id); return id; } }
1
2
3
4
5
6
7
8
9
10
11
12
13
14
15
16
17
18
19
20
21
22
23
24
25
26
27
28
29
import java.lang.reflect.InvocationHandler;import java.lang.reflect.Method;import java.lang.reflect.Proxy;import java.util.Arrays;public class UserDaoProxy implements InvocationHandler { private Object obj; public UserDaoProxy (Object obj) { this .obj = obj; } @Override public Object invoke (Object proxy, Method method, Object[] args) throws Throwable { System.out.println("前置增强 " + method.getName() + " ,传递的参数: " + Arrays.toString(args)); Object res = method.invoke(obj, args); System.out.println("后置增强" ); return res; } public Object getProxyInstance () { return Proxy.newProxyInstance(obj.getClass().getClassLoader(), obj.getClass().getInterfaces(), this ); } }
如下代码执行动态代理。
1 2 3 4 5 6 7 8 9 10 11 12 13 public class DynamicProxyDemo { public static void main (String[] args) { UserDao userDao = new UserDaoImpl (); UserDaoProxy proxy = new UserDaoProxy (userDao); UserDao proxyDao = (UserDao) proxy.getProxyInstance(); proxyDao.add(7 , 8 ); proxyDao.update("yukiyama" ); } }
执行结果。
1
2
3
4
5
6
前置增强 add ,传递的参数: [7, 8] 执行主题类add方法,7+8 = 15 后置增强 前置增强 update ,传递的参数: [yukiyama] 执行主题类update方法,更新为yukiyama 后置增强
AOP术语
AOP 中有许多重要的概念,对应了一些并不是很直观的术语。这些术语是通用的而非 Spring 所特有的。这些术语的官方释义如下 (来自 Spring官方文档 ) ,每一条概念的英文原文下是中文翻译和必要的注释。
Aspect 切面, Join Point 连接点, Advice 通知/增强, Pointcut 切点, Introduction 引入, Target object 目标类, AOP Proxy AOP代理, Weaving 织入
在不了解 AOP 实现细节的情况下,即便阅读如下较为详细的定义,也很难形成具象的理解,尽管如此,我们仍先列出这些概念的释义,在后续 AOP 实现中再反复体会理解。
AOP Concepts
Aspect : A modularization of a concern that cuts across multiple classes. Transaction management is a good example of a crosscutting concern in enterprise Java applications. In Spring AOP, aspects are implemented by using regular classes (the schema-based approach ) or regular classes annotated with the @Aspect annotation (the @AspectJ style ).
切面 : 横跨不同类的关注点的模块化。「事务管理」即是企业级 Java 应用中横跨 (类) 的关注点中的一个好例子。在 Spring AOP 中,切面由基于模式的方法或由 @Aspect 注解的普通类来实现。
Join point : A point during the execution of a program, such as the execution of a method or the handling of an exception. In Spring AOP, a join point always represents a method execution.
连接点 : 程序执行过程中的点 (一个动作),例如一个方法的执行或一个异常的处理。在 Spring AOP 中,一个连接点总是代表一个方法的执行。@AfterThrowing 通知时),通知 (增强方法) 作用于该方法或执行该方法时产生的异常 (当使用 @AfterThrowing 通知时)。
Advice : Action taken by an aspect at a particular join point. Different types of advice include “around”, “before” and “after” advice. (Advice types are discussed later.) Many AOP frameworks, including Spring, model an advice as an interceptor and maintain a chain of interceptors around the join point.
通知/增强/建议 : 切面在特定连接点上的动作。不同类型的通知包括「环绕通知」、「前置通知」、「后置通知」等 (后续讨论)。包括 Spring 在内的许多 AOP 框架,都将通知作为一个拦截器,并在连接点周围维护一个拦截器链。
Pointcut : A predicate that matches join points. Advice is associated with a pointcut expression and runs at any join point matched by the pointcut (for example, the execution of a method with a certain name). The concept of join points as matched by pointcut expressions is central to AOP, and Spring uses the AspectJ pointcut expression language by default.
切点/切入点 : 连接点的声明。通知会作用于切点表达式匹配的所有连接点 (例如,执行一个具有特定名称的方法)。由切点表达式匹配连接点这一概念是 AOP 的核心,Spring 默认使用 AspectJ 的切点表达式语言。<aop:pointcut id="" expression=""> 或注解方式中的 @Before(value = "execution()") ,均通过 expression (切点表达式) 来指定具体的连接点 (被增强的方法) 。
Introduction : Declaring additional methods or fields on behalf of a type. Spring AOP lets you introduce new interfaces (and a corresponding implementation) to any advised object. For example, you could use an introduction to make a bean implement an IsModified interface, to simplify caching. (An introduction is known as an inter-type declaration in the AspectJ community.)
引入 : 为一个类型声明额外的方法或字段。Spring AOP 允许你为任何通知的对象引入新的接口 (以及相应的实现) 。例如,你可以使用引入来使一个 bean 实现 IsModified 接口,以实现一个简化的缓存功能 (引入在 AspectJ 社区中被称为类型间声明)。这里 。
Target object : An object being advised by one or more aspects. Also referred to as the “advised object”. Since Spring AOP is implemented by using runtime proxies, this object is always a proxied object.
目标对象/目标类 : 被一个或多个切面所增强的对象。也被称为 「被增强对象」。由于 Spring AOP 是通过使用运行时代理来实现的,这个对象总是一个被代理的对象。
AOP proxy : An object created by the AOP framework in order to implement the aspect contracts (advise method executions and so on). In the Spring Framework, an AOP proxy is a JDK dynamic proxy or a CGLIB proxy.
AOP 代理 : 一个由 AOP 框架创建的对象,以实现切面功能 (增强方法的执行等) 。在 Spring 框架中,AOP 代理是一个 JDK 动态代理或CGLIB 代理。
Weaving : linking aspects with other application types or objects to create an advised object. This can be done at compile time (using the AspectJ compiler, for example), load time, or at runtime. Spring AOP, like other pure Java AOP frameworks, performs weaving at runtime.
织入 : 将切面与其他应用类型或对象联系起来,以创建一个增强对象。这可以在编译期 (如使用 AspectJ 编译器) 、加载期或运行时完成。Spring AOP 和其他纯 Java AOP 框架一样,在运行时织入。
通知类型
描述
前置通知 @Before
在连接点之前执行的增强方法。
环绕通知 @Around
在连接点之前以及之后都可以执行的增强方法,可选择是否传入 ProceedingJoinPoint 对象来决定是否执行连接点 (被增强方法) 。
返回型后置通知 @AfterReturning
在连接点正常返回后执行的增强方法。
异常型后置通知 @AfterThrowing
在连接点发生异常后执行的增强方法。
后置通知 (最终通知) @After
无论连接点是否正常完成运行,在其运行结束后都会执行的增强方法。
基于AspectJ的AOP
AspectJ 是 Eclipse 基金会的独立的开源 AOP 框架,Spring 框架整合了 AspectJ,并支持 利用 XML 配置文件 或 注解方式 ,通过 AspectJ 来实现 AOP。使用前应向项目中引入相关依赖,此外还要了解 「切入点表达式」 的写法。
1 2 3 4 5 6 <dependency > <groupId > org.springframework</groupId > <artifactId > spring-aspects</artifactId > <version > 5.2.6.RELEASE</version > </dependency >
1
2
3
4
5
6
7
8
语法结构: execution([权限修饰符] [返回类型] [类全路径] [方法名称]([参数列表])) 举例1:增强 com.yukiyama.dao.BookDao 类的 add 方法 execution(* com.yukiyama.dao.BookDao.add(..)) 举例2:增强 com.yukiyama.dao.BookDao 类的所有方法 execution(* com.yukiyama.dao.BookDao.*(..)) 举例3:增强 com.yukiyama.dao 下所有类的所有方法 execution(* com.yukiyama.dao.*.*(..))
基于XML
按如下步骤演示使用 XML配置文件方式 实现 AOP 增强的过程。
第1步: 创建主题类 (要被增强的目标类) ,定义方法。
1
2
3
4
5
package com.yukiyama.spring.aop.xml.dao;public interface UserDao { void update () ; }
1
2
3
4
5
6
7
package com.yukiyama.spring.aop.xml.dao;public class UserDaoImpl implements UserDao { public void update () { System.out.println("This method: UserDaoImpl.update()" ); } }
第2步: 创建代理类 (即增强主题类功能的增强类) 。
1
2
3
4
5
6
7
8
9
10
11
12
13
14
15
16
17
18
19
20
21
22
23
24
25
26
27
28
29
30
31
32
33
package com.yukiyama.spring.aop.xml.dao;import org.aspectj.lang.ProceedingJoinPoint;public class UserDaoProxy { public void before () { System.out.println("==== before advice ====" ); System.out.println("This method: UserDaoProxy.before()" ); } public void around (ProceedingJoinPoint pjp) throws Throwable { System.out.println("This method: UserDaoProxy.around()" ); System.out.println("==== around advice: before ====" ); pjp.proceed(); System.out.println("==== around advice: after ====" ); } public void afterReturning () { System.out.println("==== afterReturning advice ====" ); System.out.println("This method: UserDaoProxy.afterReturning()" ); } public void afterThrowing () { System.out.println("==== afterThrowing advice ====" ); System.out.println("This method: UserDaoProxy.afterThrowing()" ); } public void after () { System.out.println("==== after advice ====" ); System.out.println("This method: UserDaoProxy.after()" ); } }
第3步: 完成通知的配置。在 XML 配置文件中添加 aop 命名空间,声明要创建的 bean 对象,完成 aop 配置。
xml 配置文件 aop.xml
1
2
3
4
5
6
7
8
9
10
11
12
13
14
15
16
17
18
19
20
21
22
23
24
25
26
27
<?xml version="1.0" encoding="UTF-8" ?> <beans xmlns ="http://www.springframework.org/schema/beans" xmlns:xsi ="http://www.w3.org/2001/XMLSchema-instance" xmlns:aop ="http://www.springframework.org/schema/aop" xsi:schemaLocation ="http://www.springframework.org/schema/beans http://www.springframework.org/schema/beans/spring-beans.xsd http://www.springframework.org/schema/aop http://www.springframework.org/schema/aop/spring-aop.xsd" > <bean id ="userDaoImpl" class ="com.yukiyama.spring.aop.xml.dao.UserDaoImpl" > </bean > <bean id ="userDaoProxy" class ="com.yukiyama.spring.aop.xml.dao.UserDaoProxy" > </bean > <aop:config > <aop:pointcut id ="update" expression ="execution(* com.yukiyama.spring.aop.xml.dao.UserDao.update(..))" /> <aop:aspect ref ="userDaoProxy" > <aop:before method ="before" pointcut-ref ="update" /> <aop:around method ="around" pointcut-ref ="update" /> <aop:after-returning method ="afterReturning" pointcut-ref ="update" /> <aop:after-throwing method ="afterThrowing" pointcut-ref ="update" /> <aop:after method ="after" pointcut-ref ="update" /> </aop:aspect > </aop:config > </beans >
完成上述步骤后以如下测试代码测试效果。TestAOPXML 中的如下方法。
1 2 3 4 5 6 7 @Test public void testAopXml () { ApplicationContext context = new ClassPathXmlApplicationContext ("aop.xml" ); UserDao userDao = context.getBean("userDaoImpl" , UserDao.class); userDao.update(); }
无异常时控制台输出如下。
1
2
3
4
5
6
7
8
9
10
==== before advice ==== This method: UserDaoProxy.before() This method: UserDaoProxy.around() ==== around advice: before ==== This method: UserDaoImpl.update() ==== around advice: after ==== ==== afterReturning advice ==== This method: UserDaoProxy.afterReturning() ==== after advice ==== This method: UserDaoProxy.after()
有异常时控制台输出如下。
1
2
3
4
5
6
7
8
9
==== before advice ==== This method: UserDaoProxy.before() This method: UserDaoProxy.around() ==== around advice: before ==== This method: UserDaoImpl.update() ==== afterThrowing advice ==== This method: UserDaoProxy.afterThrowing() ==== after advice ==== This method: UserDaoProxy.after()
基于注解
按如下步骤演示使用 注解方式 实现 AOP 增强的过程,展示五种通知类型的效果。
第1步: 创建主题类 (要被增强的目标类) ,定义方法。
1
2
3
4
5
6
7
8
9
10
11
package com.yukiyama.spring.aop.anno.dao;import org.springframework.stereotype.Component;@Component("userDaoImpl") public class UserDaoImpl implements UserDao { public void update () { System.out.println("This method: UserDaoImpl.update()" ); } }
第2步: 创建代理类 (即增强主题类功能的增强类) 。
如下添加了五种通知,并展示了增强注解参数的几种不同的写法。
1 2 3 4 5 6 7 8 @Before("pointcut()") @AfterReturning(value = "execution(* com.yukiyama.spring.aop.anno.dao.UserDao.update(..))") @AfterThrowing("execution(* com.yukiyama.spring.aop.anno.dao.UserDao.update(..))") @After("execution(void com.yukiyama.spring.aop.anno.*.*.*(..))")
1
2
3
4
5
6
7
8
9
10
11
12
13
14
15
16
17
18
19
20
21
22
23
24
25
26
27
28
29
30
31
32
33
34
35
36
37
38
39
40
41
42
43
44
45
46
package com.yukiyama.spring.aop.anno.dao;import org.aspectj.lang.ProceedingJoinPoint;import org.aspectj.lang.annotation.*;import org.springframework.stereotype.Component;@Component @Aspect public class UserDaoProxy { @Pointcut("execution(* com.yukiyama.spring.aop.anno.dao.UserDao.update(..))") public void pointcut () {} @Before("pointcut()") public void before () { System.out.println("==== before advice ====" ); System.out.println("This method: UserDaoProxy.before()" ); } @Around("pointcut()") public void around (ProceedingJoinPoint pjp) throws Throwable { System.out.println("This method: UserDaoProxy.around()" ); System.out.println("==== around advice: before ====" ); pjp.proceed(); System.out.println("==== around advice: after ====" ); } @AfterReturning(value = "execution(* com.yukiyama.spring.aop.anno.dao.UserDao.update(..))") public void afterReturning () { System.out.println("==== afterReturning advice ====" ); System.out.println("This method: UserDaoProxy.afterReturning()" ); } @AfterThrowing("execution(* com.yukiyama.spring.aop.anno.dao.UserDao.update(..))") public void afterThrowing () { System.out.println("==== afterThrowing advice ====" ); System.out.println("This method: UserDaoProxy.afterThrowing()" ); } @After("execution(void com.yukiyama.spring.aop.anno.*.*.*(..))") public void after () { System.out.println("==== after advice ====" ); System.out.println("This method: UserDaoProxy.after()" ); } }
第3步: 完成通知的配置。
在 XML 配置文件中添加 context 和 aop 命名空间,开启注解扫描,添加生成代理对象的配置。 xml 配置文件 aopAnno.xml。
1
2
3
4
5
6
7
8
9
10
11
12
13
14
15
16
<?xml version="1.0" encoding="UTF-8" ?> <beans xmlns ="http://www.springframework.org/schema/beans" xmlns:context ="http://www.springframework.org/schema/context" xmlns:aop ="http://www.springframework.org/schema/aop" xmlns:xsi ="http://www.w3.org/2001/XMLSchema-instance" xsi:schemaLocation ="http://www.springframework.org/schema/beans http://www.springframework.org/schema/beans/spring-beans.xsd http://www.springframework.org/schema/context http://www.springframework.org/schema/context/spring-context.xsd http://www.springframework.org/schema/aop http://www.springframework.org/schema/aop/spring-aop.xsd" > <context:component-scan base-package ="com.yukiyama.spring.aop.anno.dao" /> <aop:aspectj-autoproxy /> </beans >
在被增强类和增强类上类上添加 @Component 注解,在增强类上添加 @Aspect 注解 (见给出的类代码) 。
第4步: 在增强类的通知方法中添加使用切入点表达式的通知类型注解 (见前面的增强类代码) 。
完成上述步骤后以如下测试代码测试效果。在 TestAOPAnno 中的如下方法。
1 2 3 4 5 6 7 @Test public void testAopAnno () { ApplicationContext context = new ClassPathXmlApplicationContext ("aopAnno.xml" ); UserDao userDao = context.getBean("userDaoImpl" , UserDao.class); userDao.update(); }
无异常时控制台输出如下。
1
2
3
4
5
6
7
8
9
10
This method: UserDaoProxy.around() ==== around advice: before ==== ==== before advice ==== This method: UserDaoProxy.before() This method: UserDaoImpl.update() ==== around advice: after ==== ==== after advice ==== This method: UserDaoProxy.after() ==== afterReturning advice ==== This method: UserDaoProxy.afterReturning()
有异常时控制台输出如下。
1
2
3
4
5
6
7
8
9
This method: UserDaoProxy.around() ==== around advice: before ==== ==== before advice ==== This method: UserDaoProxy.before() This method: UserDaoImpl.update() ==== after advice ==== This method: UserDaoProxy.after() ==== afterThrowing advice ==== This method: UserDaoProxy.afterThrowing()
切入点抽取
前面的例子中,每一个通知的切入点表达式都是相同的,可以利用 @Pointcut 注解抽取相同的表达式。见前面给出的 UserDaoProxy 类的如下方法。
1 2 3 @Pointcut("execution(* com.yukiyama.spring.aop.anno.dao.UserDao.update(..))") public void pointcut () {}
Order注解
当一个类有多个增强类时,可通过在不同增强类上添加类注解 @Order(n) 来设置增强的优先级,整数 n n n VIPUserDaoProxy 类作为 UserDao 类的增强类。
1
2
3
4
5
6
7
8
9
10
11
12
13
14
15
16
package com.yukiyama.spring.aop.anno.dao;import org.aspectj.lang.annotation.*;import org.springframework.core.annotation.Order;import org.springframework.stereotype.Component;@Component @Aspect @Order(1) public class VIPUserDaoProxy { @Before("execution(void com.yukiyama.spring.aop.anno.*.*.*(..))") public void before () { System.out.println("==== VIPUserDaoProxy: before advice ====" ); System.out.println("This method: VIPUserDaoProxy.before()" ); } }
同时在 UserProxy 上添加类注解 @Order(5) ,则 VIPUserDaoProxy 的通知先执行。得到如下结果。
1
2
3
4
5
6
7
8
9
10
11
12
==== VIPUserDaoProxy: before advice ==== This method: VIPUserDaoProxy.before() This method: UserDaoProxy.around() ==== around advice: before ==== ==== before advice ==== This method: UserDaoProxy.before() This method: UserDaoImpl.update() ==== around advice: after ==== ==== after advice ==== This method: UserDaoProxy.after() ==== afterReturning advice ==== This method: UserDaoProxy.afterReturning()
完全注解方式
可以创建配置类实现无需 XML 文件的完全注解方式的 AOP 。配置类如下。
1
2
3
4
5
6
7
8
9
10
package com.yukiyama.spring.aop.anno.config;import org.springframework.context.annotation.ComponentScan;import org.springframework.context.annotation.Configuration;import org.springframework.context.annotation.EnableAspectJAutoProxy;@Configuration @ComponentScan(basePackages = "com.yukiyama.spring.aop.anno") @EnableAspectJAutoProxy(proxyTargetClass = true) public class SpringConfig {}
配置类的三个用于支持纯注解方式的类注解的作用如下。
类注解
描述
@Configuration表明当前类是配置类,代替 xml 的作用。
@ComponentScan属性 basePackages 指定扫描哪个包下的类,装配哪些具有 Bean 注解的类 (如 @Component)。若不指定包,则默认扫描配置类所在包。<context:component-scan base-package=""> 的作用。
@EnableAspectJAutoProxy启用 AspectJ 自动生成代理对象,需要设置属性 proxyTargetClass = true (默认为 false) 。<aop:aspectj-autoproxy> 的作用。
无需 XML ,而是由 AnnotationConfigApplicationContext 获取 ApplicationContext 实例。 在 TestAOPAnno 中添加如下方法。
1 2 3 4 5 6 7 @Test public void testAopCompleteAnno () { ApplicationContext context = new AnnotationConfigApplicationContext (SpringConfig.class); UserDao userDao = context.getBean("userDaoImpl" , UserDao.class); userDao.update(); }
AOP概念具象化
有了前述 AOP 实现的具体例子,对应具体代码,给出如下具像化描述。
概念
具象描述
切面
切面类,由切点和通知组合而成,即 UserDaoProxy 类和 VIPUserDaoProxy 类。
连接点
可以被增强的主题类 (被代理类) 中的方法,即 UserDaoImpl.update() 。
通知 (增强/建议)
切面类中的增强方法,即 UserDaoProxy.before(), UserDaoProxy.after() 等。
切点
连接点的声明,即切面类中的通知注解,例如 @Before(value = "execution()") (若是 XML 方式,则为 <aop:pointcut id="p" expression="execution()" />)。UserDaoImpl.update() 。
引入
对接口的增强的过程,前述例子不涉及。
目标类
主题类 (被代理类),即 UserDaoImpl 。
AOP代理
指经过动态代理后创建出来的代理类的对象,即测试方法中 UserDao userDao = context.getBean("userDaoImpl", UserDao.class); 得到的 userDao 。
织入
创建增强对象 (代理类对象) 的过程。
JdbcTemplate
事务管理
总结
本文主要内容总结如下。
问题
描述 Spring 框架
Spring 的优点
Spring 的模块组成
描述 IoC
描述 IoC 容器
ApplicationContext 的具体实现类
IoC 的实现原理
描述 DI
Bean 的定义
Bean 的管理的含义
Bean 管理的方式
两种 Bean
Bean 的配置元数据
Bean 的作用域
Bean 的生命周期
XML配置文件的内容,主要标签和字段
XML配置文件的命名空间
注入字段 (DI) 的三种方式
注入空值和特殊符号
注入外部 Bean 写法
注入内部 Bean 写法
级联赋值的两种方式