SpringBoot学习实战_yukiyama
学习自: 【尚硅谷】SpringBoot2零基础入门教程(spring boot2干货满满) 。
本文是基于上述视频教程的文字总结,大幅修改了原视频配套文档,并在其基础上及新增部分内容。本文所有代码及其他实验演示素材均存放于 springmvc_in_action 仓库中。
建议先克隆该仓库到本地,一边阅读本文,一边对照每一份代码进行学习。
概述
SpringBoot 是整合 Spring 技术栈的一站式框架,可极大地简化 Web 开发。
在 SpringBoot 官方介绍页 中有如下描述。
Spring Boot makes it easy to create stand-alone, production-grade Spring based Applications that you can “just run”.
官方介绍的 SpringBoot 的特点
特点
英文原文描述
创建独立 Spring 应用
Create stand-alone Spring applications.
内嵌 web 服务器
Embed Tomcat, Jetty or Undertow directly (no need to deploy WAR files).
自动starter依赖,简化构建配置
Provide opinionated ‘starter’ dependencies to simplify your build configuration.
自动配置 Spring 以及第三方功能
Automatically configure Spring and 3rd party libraries whenever possible.
提供生产级别的监控、健康检查及外部化配置
Provide production-ready features such as metrics, health checks, and externalized configuration.
无代码生成、无需编写XML
Absolutely no code generation and no requirement for XML configuration.
入门示例
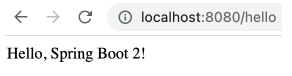
本节展示如何利用 SpringBoot 创建并运行一个 HelloWorld 项目,演示浏览器发送 /hello 请求,页面上响应 Hello, Spring Boot 2! 。
构建和运行环境如下。
1
2
3
4
IDE:IntelliJ IDEA 2022.2.1 (Ultimate Edition) 项目构建工具:apache-maven-3.8.5 SpringBoot2: 2.3.4 浏览器:Chrome
创建maven工程
在 idea 中创建普通工程 springboot_in_action ,接着在该工程下创建 maven 模块 springboot-helloworld ,archetype 选择maven-archetype-quickstart 。
※ Maven 的使用以及父子工程间依赖继承相关的知识可参考 该仓库 的 Maven学习实战_yukiyama 教程。
在 springboot-helloworld 的 pom.xml 中添加如下内容。其中 <parent> 标签是关键,通过该标签指定了该模块的父工程为 spring-boot-starter-parent ,而 <dependencies> 标签中依赖了一个 web 场景的 springboot starter 。
1 2 3 4 5 6 7 8 9 10 11 12 <parent > <groupId > org.springframework.boot</groupId > <artifactId > spring-boot-starter-parent</artifactId > <version > 2.3.4.RELEASE</version > </parent > <dependencies > <dependency > <groupId > org.springframework.boot</groupId > <artifactId > spring-boot-starter-web</artifactId > </dependency > </dependencies >
借助 Maven 中依赖的的传递性,由上述依赖即可导入所有所需依赖。可以看到 Spring、SpringMVC、内嵌的 Tomcat、日志、Jackson等依赖均已引入。
1
2
3
4
5
6
7
8
9
10
11
12
13
14
15
16
17
18
19
20
21
22
23
24
25
26
27
28
29
30
31
32
33
[INFO] com.yukiyama.springboot:springboot-helloworld:jar:1.0-SNAPSHOT [INFO] \- org.springframework.boot:spring-boot-starter-web:jar:2.3.4.RELEASE:compile [INFO] +- org.springframework.boot:spring-boot-starter:jar:2.3.4.RELEASE:compile [INFO] | +- org.springframework.boot:spring-boot:jar:2.3.4.RELEASE:compile [INFO] | +- org.springframework.boot:spring-boot-autoconfigure:jar:2.3.4.RELEASE:compile [INFO] | +- org.springframework.boot:spring-boot-starter-logging:jar:2.3.4.RELEASE:compile [INFO] | | +- ch.qos.logback:logback-classic:jar:1.2.3:compile [INFO] | | | +- ch.qos.logback:logback-core:jar:1.2.3:compile [INFO] | | | \- org.slf4j:slf4j-api:jar:1.7.30:compile [INFO] | | +- org.apache.logging.log4j:log4j-to-slf4j:jar:2.13.3:compile [INFO] | | | \- org.apache.logging.log4j:log4j-api:jar:2.13.3:compile [INFO] | | \- org.slf4j:jul-to-slf4j:jar:1.7.30:compile [INFO] | +- jakarta.annotation:jakarta.annotation-api:jar:1.3.5:compile [INFO] | +- org.springframework:spring-core:jar:5.2.9.RELEASE:compile [INFO] | | \- org.springframework:spring-jcl:jar:5.2.9.RELEASE:compile [INFO] | \- org.yaml:snakeyaml:jar:1.26:compile [INFO] +- org.springframework.boot:spring-boot-starter-json:jar:2.3.4.RELEASE:compile [INFO] | +- com.fasterxml.jackson.core:jackson-databind:jar:2.11.2:compile [INFO] | | +- com.fasterxml.jackson.core:jackson-annotations:jar:2.11.2:compile [INFO] | | \- com.fasterxml.jackson.core:jackson-core:jar:2.11.2:compile [INFO] | +- com.fasterxml.jackson.datatype:jackson-datatype-jdk8:jar:2.11.2:compile [INFO] | +- com.fasterxml.jackson.datatype:jackson-datatype-jsr310:jar:2.11.2:compile [INFO] | \- com.fasterxml.jackson.module:jackson-module-parameter-names:jar:2.11.2:compile [INFO] +- org.springframework.boot:spring-boot-starter-tomcat:jar:2.3.4.RELEASE:compile [INFO] | +- org.apache.tomcat.embed:tomcat-embed-core:jar:9.0.38:compile [INFO] | +- org.glassfish:jakarta.el:jar:3.0.3:compile [INFO] | \- org.apache.tomcat.embed:tomcat-embed-websocket:jar:9.0.38:compile [INFO] +- org.springframework:spring-web:jar:5.2.9.RELEASE:compile [INFO] | \- org.springframework:spring-beans:jar:5.2.9.RELEASE:compile [INFO] \- org.springframework:spring-webmvc:jar:5.2.9.RELEASE:compile [INFO] +- org.springframework:spring-aop:jar:5.2.9.RELEASE:compile [INFO] +- org.springframework:spring-context:jar:5.2.9.RELEASE:compile [INFO] \- org.springframework:spring-expression:jar:5.2.9.RELEASE:compile
创建应用类
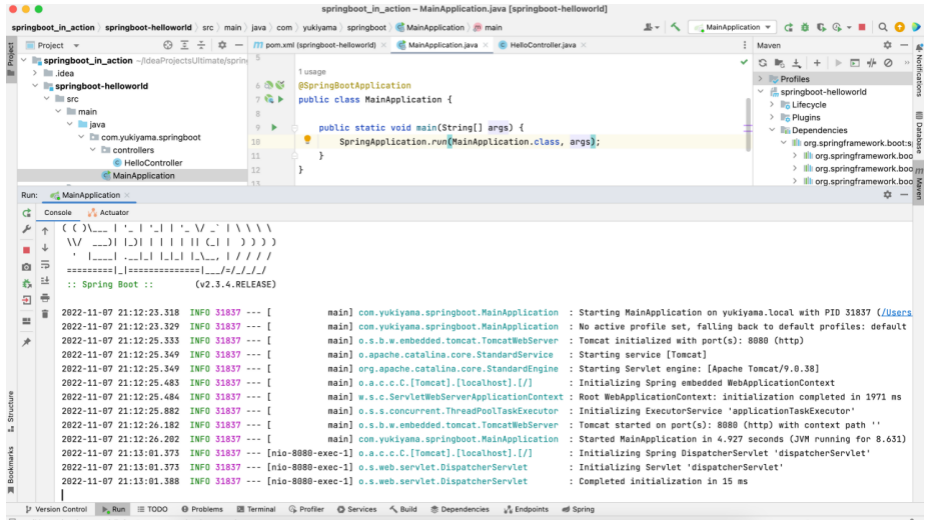
创建如下名为 MainApplication (名字自取) 的类,在其上以 @SpringBootApplication 标识,即表示该类为一个 springboot 应用。
1
2
3
4
5
6
7
8
9
10
11
import org.springframework.boot.SpringApplication;import org.springframework.boot.autoconfigure.SpringBootApplication;@SpringBootApplication public class MainApplication { public static void main (String[] args) { SpringApplication.run(MainApplication.class, args); } }
创建请求控制器
与使用 SpringMVC 类似,编写如下 HelloController 控制器。可以使用 @RestController 来替代 @Controller 和 @ResponseBody 。
1
2
3
4
5
6
7
8
9
10
11
12
13
14
package com.yukiyama.springboot.controllers;import org.springframework.web.bind.annotation.RequestMapping;import org.springframework.web.bind.annotation.RestController;@RestController public class HelloController { @RequestMapping("/hello") public String hello () { return "Hello, Spring Boot 2!" ; } }
测试
运行 MainApplication 类,可以看到 Tomcat 启动、DispatcherServlet、Servlet 初始化的过程。
在浏览器中输入 http://localhost:8080/hello ,成功响应 Hello, Spring Boot 2! 。
配置
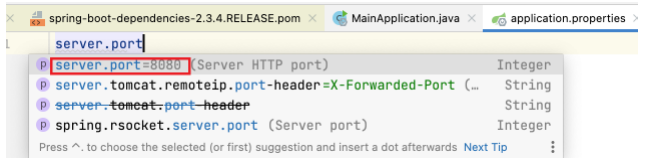
在 springboot-helloworld 工程的 src/main 下新建一个resource 文件夹 (将其设置为 Resources Root),在 resources 中创建 application.properties 文件 (更多配置信息 ) ,可统一在该文件中完成应用相关的所有配置。
例如按如下修改服务器端口号后,重新运行 MainApplication ,就需要通过 http://localhost:8888/hello 来访问了。
打包部署
在 pom.xml 中添加如下内容。
1 2 3 4 5 6 7 8 <build > <plugins > <plugin > <groupId > org.springframework.boot</groupId > <artifactId > spring-boot-maven-plugin</artifactId > </plugin > </plugins > </build >
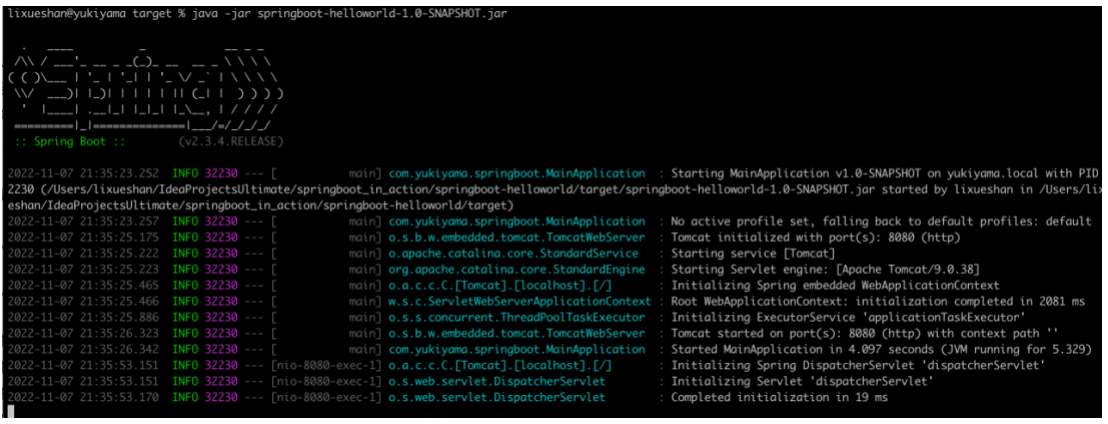
在 IDEA 的 Maven 插件上点击运行 clean 、package,把 helloworld 工程项目的打包成 jar 包。打包好的 jar 包被生成在 helloworld 工程项目的 target 文件夹内。
用 cmd 运行 java -jar springboot-helloworld-1.0-SNAPSHOT.jar ,即可以运行该项目。
在浏览器中输入 http://localhost:8080/hello ,成功响应 Hello, Spring Boot 2! 。
总结
总结 SpringBoot 处理请求的主要过程如下。
创建 maven 工程,并在 pom.xml 中添加 <parent> 标签来使用 springboot ,添加 <dependency> 来指定场景 starter 。
创建应用类,并使用 @SpringBootApplication 注解标识。
创建请求控制器,像利用 SpringMVC 那样编写具体的业务。
通过 resources 中的 application.properties 来定制配置。
最佳实践
引入场景依赖
查看自动配置了哪些(选做)
自己分析,引入场景对应的自动配置一般都生效了
配置文件中 debug=true 开启自动配置报告。
Negative(不生效)
Positive(生效)
是否需要修改
参照文档修改配置项
官方文档 自己分析。xxxxProperties 绑定了配置文件的哪些。
自定义加入或者替换组件
自定义器 XXXXXCustomizer;
…
依赖管理
springboot 应用的 pom.xml 文件均需将 spring-boot-starter-parent 作为 <parent> ,该父项目的父项目为 spring-boot-dependencies (可在 idea 中查看) 。后者声明了几乎所有开发中常用的依赖及其版本号。
starter
不同场景的 starter 包含了该场景开发所需的几乎所有依赖,官方对 starter 的描述如下。
Starters are a set of convenient dependency descriptors that you can include in your application. You get a one-stop shop for all the Spring and related technologies that you need without having to hunt through sample code and copy-paste loads of dependency descriptors. For example, if you want to get started using Spring and JPA for database access, include the spring-boot-starter-data-jpa dependency in your project.
官方提供了不同场景下的 starter ,以 spring-boot-starter-* 形式命名,* 表示场景名,例如前面我们所使用的 web 场景的spring-boot-starter-web 。而第三方的启动器常以 *-spring-boot-starter 形式命名。
如下是所有场景启动器最底层的依赖。
1 2 3 4 5 6 <dependency > <groupId > org.springframework.boot</groupId > <artifactId > spring-boot-starter</artifactId > <version > 2.3.4.RELEASE</version > <scope > compile</scope > </dependency >
由于父工程配置了所管理依赖的版本号,若使用其规定版本依赖,引入依赖时不必书写版本信息 (<version>) ,但若引入其他版本,则需要写明版本号。具体操作为:
查看 spring-boot-dependencies 中依赖的版本用的 key (即 <properties> 标签中表示依赖的标签) 。
在项目 pom.xml 文件中的 <properties> 中指定版本。
如下,在 <dependencies> 中不带版本号引入 mysql-connector-java 之后,在 <properties> 中设置 <mysql.version>5.1.43</mysql.version> 。
1 2 3 4 5 6 7 8 9 10 11 12 13 14 15 16 17 18 19 20 <properties > <project.build.sourceEncoding > UTF-8</project.build.sourceEncoding > <mysql.version > 5.1.43</mysql.version > </properties > <dependencies > <dependency > <groupId > org.springframework.boot</groupId > <artifactId > spring-boot-starter-web</artifactId > </dependency > <dependency > <groupId > mysql</groupId > <artifactId > mysql-connector-java</artifactId > </dependency > </dependencies >
自动配置
Tomcat
通过父工程引入了 Tomcat 依赖,可在 spring-boot-dependencies 父工程中查看到如下依赖。并且 springboot 还完成了 Tomcat 的配置。
1 2 3 4 5 6 <dependency > <groupId > org.springframework.boot</groupId > <artifactId > spring-boot-starter-tomcat</artifactId > <version > 2.3.4.RELEASE</version > <scope > compile</scope > </dependency >
SpringMVC
同样地,springboot 引入了 springmvc 相关依赖,并引入 springmvc 的全套组件。可通过如下方式从 IoC 容器中打印组件名。
1 2 3 4 5 6 7 8 9 public static void main (String[] args) { ConfigurableApplicationContext run = SpringApplication.run(MainApplication.class, args); String[] names = run.getBeanDefinitionNames(); for (String name : names) { System.out.println(name); } }
可以看到 dispatcherServlet 、characterEncodingFilter 、multipartResolver 等组件均已在 IoC 容器中。
1 2 3 4 5 6 7 8 9 10 11 12 13 14 15 16 17 18 19 20 21 22 23 24 25 26 27 28 29 30 31 32 33 34 35 36 37 38 39 40 41 42 43 44 45 46 47 48 49 50 51 52 53 54 55 56 57 58 59 60 61 62 63 64 65 66 67 68 69 70 71 72 73 74 75 76 77 78 79 80 81 82 83 84 85 86 87 88 89 90 91 92 93 94 95 96 97 98 99 100 101 102 103 104 105 106 107 108 109 110 111 112 113 114 115 116 117 118 119 120 121 122 123 124 125 126 org.springframework.context.annotation.internalConfigurationAnnotationProcessor org.springframework.context.annotation.internalAutowiredAnnotationProcessor org.springframework.context.annotation.internalCommonAnnotationProcessor org.springframework.context.event.internalEventListenerProcessor org.springframework.context.event.internalEventListenerFactory mainApplication org.springframework.boot.autoconfigure.internalCachingMetadataReaderFactory helloController org.springframework.boot.autoconfigure.AutoConfigurationPackages org.springframework.boot.autoconfigure.context.PropertyPlaceholderAutoConfiguration propertySourcesPlaceholderConfigurer org.springframework.boot.autoconfigure.websocket.servlet.WebSocketServletAutoConfiguration$TomcatWebSocketConfiguration websocketServletWebServerCustomizer org.springframework.boot.autoconfigure.websocket.servlet.WebSocketServletAutoConfiguration org.springframework.boot.autoconfigure.web.servlet.ServletWebServerFactoryConfiguration$EmbeddedTomcat tomcatServletWebServerFactory org.springframework.boot.autoconfigure.web.servlet.ServletWebServerFactoryAutoConfiguration servletWebServerFactoryCustomizer tomcatServletWebServerFactoryCustomizer org.springframework.boot.context.properties.ConfigurationPropertiesBindingPostProcessor org.springframework.boot.context.internalConfigurationPropertiesBinderFactory org.springframework.boot.context.internalConfigurationPropertiesBinder org.springframework.boot.context.properties.BoundConfigurationProperties org.springframework.boot.context.properties.ConfigurationBeanFactoryMetadata server-org.springframework.boot.autoconfigure.web.ServerProperties webServerFactoryCustomizerBeanPostProcessor errorPageRegistrarBeanPostProcessor org.springframework.boot.autoconfigure.web.servlet.DispatcherServletAutoConfiguration$DispatcherServletConfiguration dispatcherServlet spring.mvc-org.springframework.boot.autoconfigure.web.servlet.WebMvcProperties org.springframework.boot.autoconfigure.web.servlet.DispatcherServletAutoConfiguration$DispatcherServletRegistrationConfiguration dispatcherServletRegistration org.springframework.boot.autoconfigure.web.servlet.DispatcherServletAutoConfiguration org.springframework.boot.autoconfigure.task.TaskExecutionAutoConfiguration taskExecutorBuilder applicationTaskExecutor spring.task.execution-org.springframework.boot.autoconfigure.task.TaskExecutionProperties org.springframework.boot.autoconfigure.web.servlet.error.ErrorMvcAutoConfiguration$WhitelabelErrorViewConfiguration error beanNameViewResolver org.springframework.boot.autoconfigure.web.servlet.error.ErrorMvcAutoConfiguration$DefaultErrorViewResolverConfiguration conventionErrorViewResolver org.springframework.boot.autoconfigure.web.servlet.error.ErrorMvcAutoConfiguration errorAttributes basicErrorController errorPageCustomizer preserveErrorControllerTargetClassPostProcessor spring.resources-org.springframework.boot.autoconfigure.web.ResourceProperties org.springframework.boot.autoconfigure.web.servlet.WebMvcAutoConfiguration$EnableWebMvcConfiguration requestMappingHandlerAdapter requestMappingHandlerMapping welcomePageHandlerMapping mvcConversionService mvcValidator mvcContentNegotiationManager mvcPathMatcher mvcUrlPathHelper viewControllerHandlerMapping beanNameHandlerMapping routerFunctionMapping resourceHandlerMapping mvcResourceUrlProvider defaultServletHandlerMapping handlerFunctionAdapter mvcUriComponentsContributor httpRequestHandlerAdapter simpleControllerHandlerAdapter handlerExceptionResolver mvcViewResolver mvcHandlerMappingIntrospector org.springframework.boot.autoconfigure.web.servlet.WebMvcAutoConfiguration$WebMvcAutoConfigurationAdapter defaultViewResolver viewResolver requestContextFilter org.springframework.boot.autoconfigure.web.servlet.WebMvcAutoConfiguration formContentFilter org.springframework.boot.autoconfigure.jmx.JmxAutoConfiguration mbeanExporter objectNamingStrategy mbeanServer org.springframework.boot.autoconfigure.admin.SpringApplicationAdminJmxAutoConfiguration springApplicationAdminRegistrar org.springframework.boot.autoconfigure.aop.AopAutoConfiguration$ClassProxyingConfiguration org.springframework.boot.autoconfigure.aop.AopAutoConfiguration org.springframework.boot.autoconfigure.availability.ApplicationAvailabilityAutoConfiguration applicationAvailability org.springframework.boot.autoconfigure.context.ConfigurationPropertiesAutoConfiguration org.springframework.boot.autoconfigure.context.LifecycleAutoConfiguration lifecycleProcessor spring.lifecycle-org.springframework.boot.autoconfigure.context.LifecycleProperties org.springframework.boot.autoconfigure.jackson.JacksonAutoConfiguration$Jackson2ObjectMapperBuilderCustomizerConfiguration standardJacksonObjectMapperBuilderCustomizer spring.jackson-org.springframework.boot.autoconfigure.jackson.JacksonProperties org.springframework.boot.autoconfigure.jackson.JacksonAutoConfiguration$JacksonObjectMapperBuilderConfiguration jacksonObjectMapperBuilder org.springframework.boot.autoconfigure.jackson.JacksonAutoConfiguration$ParameterNamesModuleConfiguration parameterNamesModule org.springframework.boot.autoconfigure.jackson.JacksonAutoConfiguration$JacksonObjectMapperConfiguration jacksonObjectMapper org.springframework.boot.autoconfigure.jackson.JacksonAutoConfiguration jsonComponentModule org.springframework.boot.autoconfigure.http.HttpMessageConvertersAutoConfiguration$StringHttpMessageConverterConfiguration stringHttpMessageConverter org.springframework.boot.autoconfigure.http.JacksonHttpMessageConvertersConfiguration$MappingJackson2HttpMessageConverterConfiguration mappingJackson2HttpMessageConverter org.springframework.boot.autoconfigure.http.JacksonHttpMessageConvertersConfiguration org.springframework.boot.autoconfigure.http.HttpMessageConvertersAutoConfiguration messageConverters org.springframework.boot.autoconfigure.info.ProjectInfoAutoConfiguration spring.info-org.springframework.boot.autoconfigure.info.ProjectInfoProperties org.springframework.boot.autoconfigure.task.TaskSchedulingAutoConfiguration taskSchedulerBuilder spring.task.scheduling-org.springframework.boot.autoconfigure.task.TaskSchedulingProperties org.springframework.boot.autoconfigure.web.client.RestTemplateAutoConfiguration restTemplateBuilder org.springframework.boot.autoconfigure.web.embedded.EmbeddedWebServerFactoryCustomizerAutoConfiguration$TomcatWebServerFactoryCustomizerConfiguration tomcatWebServerFactoryCustomizer org.springframework.boot.autoconfigure.web.embedded.EmbeddedWebServerFactoryCustomizerAutoConfiguration org.springframework.boot.autoconfigure.web.servlet.HttpEncodingAutoConfiguration characterEncodingFilter localeCharsetMappingsCustomizer org.springframework.boot.autoconfigure.web.servlet.MultipartAutoConfiguration multipartConfigElement multipartResolver spring.servlet.multipart-org.springframework.boot.autoconfigure.web.servlet.MultipartProperties org.springframework.aop.config.internalAutoProxyCreator
默认包结构
基于 默认的包扫描规则 ,主程序 (即前面例子中的 MainApplication ) 所在包及其下所有子包中的组件都会被扫描,因此无需像使用 SpringMVC 那样配置包扫描。如下是官方文档中的推荐实践,主程序 MyApplication 所在包 example 及其子包中的组件都会被扫描。
1 2 3 4 5 6 7 8 9 10 11 12 13 14 15 16 com +- example +- myapplication +- MyApplication.java | +- customer | +- Customer.java | +- CustomerController.java | +- CustomerService.java | +- CustomerRepository.java | +- order +- Order.java +- OrderController.java +- OrderService.java +- OrderRepository.java
若想要改变扫描路径,可在 @SpringBootApplication 注解中添加 scanBasePackages 属性指定。
1 2 3 4 5 @SpringBootApplication(scanBasePackages="com.lun") 等同于 @SpringBootConfiguration @EnableAutoConfiguration @ComponentScan("com.lun")
默认配置
各种配置都具有默认值。在 application.properties 中输入某个配置,可以根据提示方便地查看当前的默认配置,需要修改时只需要按 key=value 的方式设置即可。
实际上,默认配置最终都是映射到某个类上,如 server.port 是通过ServerProperties 类设置的。配置文件的值最终会绑定每个类上,这个类会在容器中创建对象。此外,自动配置是按需加载的,引入了哪些场景这个场景的自动配置才会开启,SpringBoot 所有的自动配置功能都在 spring-boot-autoconfigure 包确定。
注解
SpringBoot 中的常用注解。
注解
描述
@Configuration
@ComponentScan
@Bean
@Component
@Controller
@Service
@Repository
@Import
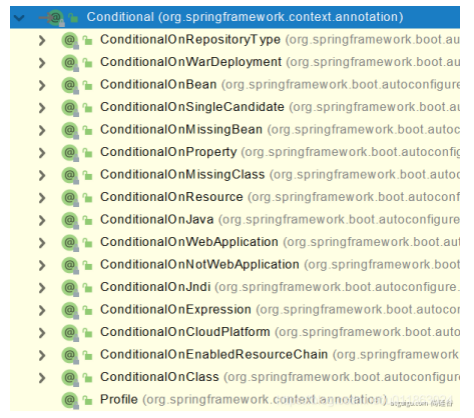
@Conditional
@ImportResource
@ConfigurationProperties
@Configuration
类注解,其所标注的类为配置类,其作用相当于只使用 Spring 时的 xml 配置文件。
在配置类中使用 @Bean 标注方法为容器注册 bean 组件
配置类本身也是 IoC 容器组件。
@Configuration 中的 proxyBeanMethods 属性,表示是否代理 @Bean 标注的方法。
Full 模式: proxyBeanMethods = true,bean 为单例(默认)。
Lite 模式: proxyBeanMethods = false,每次调用 @Bean 标注的方法都会返回新的实例。
1 2 3 4 5 6 7 8 9 10 11 12 13 14 15 16 17 18 19 20 21 22 23 24 package com.yukiyama.springboot.config;import com.yukiyama.springboot.beans.Pet;import com.yukiyama.springboot.beans.User;import org.springframework.context.annotation.Bean;import org.springframework.context.annotation.Configuration;@Configuration public class MyConfig { @Bean public User user01 () { User zhangsan = new User ("张三" , 18 ); zhangsan.setPet(tomcatPet()); return zhangsan; } @Bean("tom") public Pet tomcatPet () { return new Pet ("tomcat" ); } }
最佳实践:
配置类组件之间 无依赖关系 时用 Lite 模式加速容器启动过程,减少判断。
配置类组件之间 有依赖关系 时要用单例模式,使用 Full 模式 (默认) 。
@Import
例如 @Import({User.class, DBHelper.class}) 给容器中 自动创建出指定的两个类型的组件 ,默认组件名为全类名。
1 2 3 4 @Import({User.class, DBHelper.class}) @Configuration(proxyBeanMethods = false) public class MyConfig {}
可以在 MyApplication 的 main 方法中按如下测试。
1 2 3 4 5 6 7 8 9 10 ConfigurableApplicationContext run = SpringApplication.run(MainApplication.class, args);String[] beanNamesForType = run.getBeanNamesForType(User.class); for (String s : beanNamesForType) { System.out.println(s); } DBHelper bean1 = run.getBean(DBHelper.class);System.out.println(bean1);
@Conditional
类和方法注解,根据该组件属性所指定的条件装配或不装配,该注解有许多派生注解。
作为类注解时:满足 Conditional 指定的条件时才注入其标注的类中被 @Bean 注解所标注的组件。
作为方法注解时:满足 Conditional 指定的条件时才注入 @Bean 注解所标注的组件。
用 @ConditionalOnMissingBean 举例说明。
作为方法注解时。
1 2 3 4 5 6 7 8 9 10 11 12 13 14 15 16 17 @Configuration(proxyBeanMethods = false) public class MyConfig { @ConditionalOnMissingBean(name = "tom") @Bean public User user01 () { User zhangsan = new User ("zhangsan" , 18 ); zhangsan.setPet(tomcatPet()); return zhangsan; } @Bean("tom22") public Pet tomcatPet () { return new Pet ("tomcat" ); } }
作为类注解时。
1 2 3 4 5 6 7 8 9 10 11 12 13 14 15 16 17 @Configuration(proxyBeanMethods = false) @ConditionalOnMissingBean(name = "tom") public class MyConfig { @Bean public User user01 () { User zhangsan = new User ("zhangsan" , 18 ); zhangsan.setPet(tomcatPet()); return zhangsan; } @Bean("tom22") public Pet tomcatPet () { return new Pet ("tomcat" ); } }
可以在 MyApplication 中按如下测试。
1 2 3 4 5 6 7 8 9 10 11 12 13 14 15 16 17 18 19 public static void main (String[] args) { ConfigurableApplicationContext run = SpringApplication.run(MainApplication.class, args); String[] names = run.getBeanDefinitionNames(); for (String name : names) { System.out.println(name); } boolean tom = run.containsBean("tom" ); System.out.println("容器中Tom组件:" +tom); boolean user01 = run.containsBean("user01" ); System.out.println("容器中user01组件:" +user01); boolean tom22 = run.containsBean("tom22" ); System.out.println("容器中tom22组件:" +tom22); }
@ImportResource
在 SpringBoot 之前,我们通过 beans.xml 、springmvc.xml 等配置文件实现 bean 注入。但 SpringBoot 无需配置文件,如果仍需使用配置文件,可利用 @ImportResource 标注配置类导入指定的配置文件。
例如在 resources 中有 beans.xml 文件,可通过如下方式使其生效,则该文件中声明的 bean 即可存在与 IoC 容器中。
1 2 3 4 @ImportResource("classpath:beans.xml") public class MyConfig {... }
@ConfigurationProperties
@ConfigurationProperties 即「配置绑定」注解,可将 properties 文件中的内容封装到 bean 中,简化获取 properties 键值的过程。
有两种方式可完成「配置属性」功能。
方式一:@ConfigurationProperties + @Component
方式二:@EnableConfigurationProperties + @ConfigurationProperties
以下演示这两种方式,首先在配置文件 application.properties 中添加如下配置。
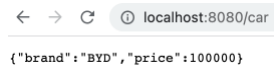
1 2 mycar.brand =BYD mycar.price =100000
方式一
@ConfigurationProperties + @Component
新建 Car bean 如下,以 @ConfigurationProperties 和 @Component 标注。Car 作为 IoC 容器中的 bean 后,在 @ConfigurationProperties 注解的作用下 properties 中以 mycar 为前缀的键值会被获取到装配到 IoC 容器的 Car 实例中。
1 2 3 4 5 6 7 8 9 10 11 12 13 14 15 16 17 18 19 20 21 22 23 24 25 26 27 28 29 30 31 32 33 34 35 36 37 38 39 40 41 42 43 44 package com.yukiyama.springboot.beans;import org.springframework.boot.context.properties.ConfigurationProperties;import org.springframework.stereotype.Component;@Component @ConfigurationProperties("mycar") public class Car { private String brand; private Integer price; public Car (String brand, Integer price) { this .brand = brand; this .price = price; } public Car () { } public String getBrand () { return brand; } public void setBrand (String brand) { this .brand = brand; } public Integer getPrice () { return price; } public void setPrice (Integer price) { this .price = price; } @Override public String toString () { return "Car{" + "brand='" + brand + '\'' + ", price=" + price + '}' ; } }
在 HelloControlle 中添加如下内容。
1 2 3 4 5 6 7 @Autowired Car car; @RequestMapping("/car") public Car car () { return car; }
运行,可以看到 properties 中以 mycar 为前缀的键值对写入到了 Car 对象对应的字段中。
方式二
@EnableConfigurationProperties + @ConfigurationProperties
此方式中的 @EnableConfigurationProperties 注解要标注在配置类上,并指定要作用的 bean,此时不需要方式一中 Car 上的 @Component 注解。
1 2 3 4 @EnableConfigurationProperties(Car.class) public class MyConfig {... }
1 2 3 4 @ConfigurationProperties(prefix = "mycar") public class Car {... }
※ prefix 是 @ConfigurationProperties 注解 value 属性的别名。
源码分析
自动包规则
Spring Boot应用的启动类:
1 2 3 4 5 6 7 8 @SpringBootApplication public class MainApplication { public static void main (String[] args) { SpringApplication.run(MainApplication.class, args); } }
分析下@SpringBootApplication
1 2 3 4 5 6 7 8 9 10 11 12 13 14 15 16 17 18 @Target(ElementType.TYPE) @Retention(RetentionPolicy.RUNTIME) @Documented @Inherited @SpringBootConfiguration @EnableAutoConfiguration @ComponentScan( excludeFilters = {@Filter( type = FilterType.CUSTOM, classes = {TypeExcludeFilter.class} ), @Filter( type = FilterType.CUSTOM, classes = {AutoConfigurationExcludeFilter.class} )} ) public @interface SpringBootApplication { ... }
重点分析@SpringBootConfiguration,@EnableAutoConfiguration,@ComponentScan。
@SpringBootConfiguration
1 2 3 4 5 6 7 8 9 10 @Target(ElementType.TYPE) @Retention(RetentionPolicy.RUNTIME) @Documented @Configuration public @interface SpringBootConfiguration { @AliasFor( annotation = Configuration.class ) boolean proxyBeanMethods () default true ; }
@Configuration代表当前是一个配置类。
@ComponentScan
指定扫描哪些Spring注解。
@ComponentScan 在07、基础入门-SpringBoot-自动配置特性 有用例。
@EnableAutoConfiguration
1 2 3 4 5 6 7 8 9 10 11 12 13 @Target(ElementType.TYPE) @Retention(RetentionPolicy.RUNTIME) @Documented @Inherited @AutoConfigurationPackage @Import(AutoConfigurationImportSelector.class) public @interface EnableAutoConfiguration { String ENABLED_OVERRIDE_PROPERTY = "spring.boot.enableautoconfiguration" ; Class<?>[] exclude() default {}; String[] excludeName() default {}; }
重点分析@AutoConfigurationPackage,@Import(AutoConfigurationImportSelector.class)。
@AutoConfigurationPackage
标签名直译为:自动配置包,指定了默认的包规则。
1 2 3 4 5 6 7 8 9 10 @Target(ElementType.TYPE) @Retention(RetentionPolicy.RUNTIME) @Documented @Inherited @Import(AutoConfigurationPackages.Registrar.class) public @interface AutoConfigurationPackage { String[] basePackages() default {}; Class<?>[] basePackageClasses() default {}; }
利用Registrar给容器中导入一系列组件
将指定的一个包下的所有组件导入进MainApplication所在包下。
初始加载自动配置类
@Import(AutoConfigurationImportSelector.class)
利用getAutoConfigurationEntry(annotationMetadata);给容器中批量导入一些组件
调用List<String> configurations = getCandidateConfigurations(annotationMetadata, attributes)获取到所有需要导入到容器中的配置类
利用工厂加载 Map<String, List<String>> loadSpringFactories(@Nullable ClassLoader classLoader);得到所有的组件
从META-INF/spring.factories位置来加载一个文件。
默认扫描我们当前系统里面所有META-INF/spring.factories位置的文件
spring-boot-autoconfigure-2.3.4.RELEASE.jar包里面也有META-INF/spring.factories
1 2 3 4 5 6 7 org.springframework.boot.autoconfigure.EnableAutoConfiguration =\ org.springframework.boot.autoconfigure.admin.SpringApplicationAdminJmxAutoConfiguration,\ org.springframework.boot.autoconfigure.aop.AopAutoConfiguration,\ ...
虽然我们127个场景的所有自动配置启动的时候默认全部加载,但是xxxxAutoConfiguration按照条件装配规则(@Conditional),最终会按需配置。
如AopAutoConfiguration类:
1 2 3 4 5 6 7 8 9 10 11 12 13 14 @Configuration( proxyBeanMethods = false ) @ConditionalOnProperty( prefix = "spring.aop", name = "auto", havingValue = "true", matchIfMissing = true ) public class AopAutoConfiguration { public AopAutoConfiguration () { } ... }
自动配置【源码分析】-自动配置流程
以DispatcherServletAutoConfiguration的内部类DispatcherServletConfiguration为例子:
1 2 3 4 5 6 7 8 9 @Bean @ConditionalOnBean(MultipartResolver.class) @ConditionalOnMissingBean(name = DispatcherServlet.MULTIPART_RESOLVER_BEAN_NAME) public MultipartResolver multipartResolver (MultipartResolver resolver) { return resolver; }
SpringBoot默认会在底层配好所有的组件,但是如果用户自己配置了以用户的优先 。
总结 :
SpringBoot先加载所有的自动配置类 xxxxxAutoConfiguration
每个自动配置类按照条件进行生效,默认都会绑定配置文件指定的值。(xxxxProperties里面读取,xxxProperties和配置文件进行了绑定)
生效的配置类就会给容器中装配很多组件
只要容器中有这些组件,相当于这些功能就有了
定制化配置
用户直接自己@Bean替换底层的组件
用户去看这个组件是获取的配置文件什么值就去修改。
xxxxxAutoConfiguration —> 组件 —> xxxxProperties里面拿值 ----> application.properties
常用工具
Lombok
Lombok 提供一组注解来代替 bean 类中的构造器、getter/setter、toString() 这样的样板代码,以减少 bean 类的代码冗余。如下是该项目官网中的介绍。
Project Lombok is a java library that automatically plugs into your editor and build tools, spicing up your java.
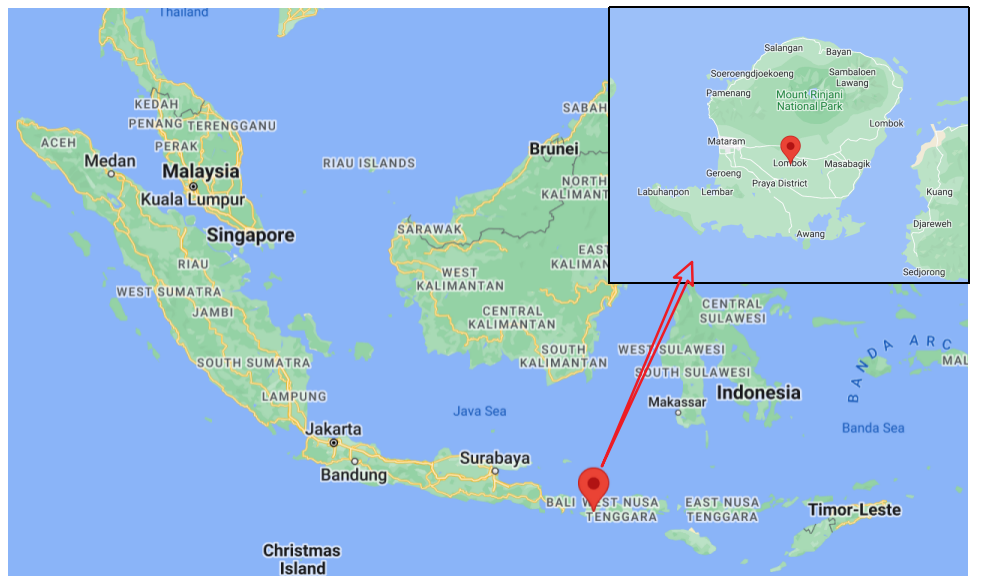
有意思的是,类似于 Java / Jakarta 等名字的来源,Lombok 也是一个地名,而且也与印尼有关,它是印尼的一个小岛的名称。使用地名,尤其是岛屿名称作为项目或计算机语言名似乎已经形成了一种传统,可参考这篇 趣文 。
如下地图中集齐了 Java, Jakarta 以及 Lombok。
要使用 Lombok ,首先要引入该依赖。springboot 已经管理 Lombok。在 springboot-helloworld 的 pom.xml 文件中引入如下依赖。
1 2 3 4 <dependency > <groupId > org.projectlombok</groupId > <artifactId > lombok</artifactId > </dependency >
接着在 idea 中搜索并安装 Lombok 插件。
Lombok 主要注解。
参考
注解
属性
描述
@Getter
AccessLevel
作为类注解时,生成所有字段的 getter
@Setter
AccessLevel
作为类注解时,生成所有字段的 setter
@ToString
exclude
类注解。重写 toString 。
@NoArgsConstructor
类注解。生成无参构造器。
@RequiredArgsConstructor
类注解。生成带参构造器,参数为如下:
@AllArgsConstructor
类注解。生成全参构造器。
@EqualsAndHashCode
exclude
类注解。重写 equals / hashcode 方法。
@Data
类注解。如下注解的集合
@NonNull
作为参数注解时,不允许参数为 null,若为 null 则抛出 NullPoiterException
@Log
类注解。注入日志类 Logger 实例 (字段名 log) 。
@Slf4j
类注解。注入日志类 Slf4j 实例 (字段名 log) 。
@Builder
类注解。在其所标注的类中生成静态方法 build() 和内部建造者类,使得创建类对象时,参数可通过建造者模式写入。
@Cleanup
局部变量注解。对于 InputStream, OutputStream 这样需要关闭资源的局部变量,自动生成 try-finally 代码。
val
作用类似于 Java 10 推出的类型推导新特性 var 。
Spring Boot includes an additional set of tools that can make the application development experience a little more pleasant. The spring-boot-devtools module can be included in any project to provide additional development-time features.
Applications that use spring-boot-devtools automatically restart whenever files on the classpath change. This can be a useful feature when working in an IDE, as it gives a very fast feedback loop for code changes. By default, any entry on the classpath that points to a directory is monitored for changes. Note that certain resources, such as static assets and view templates, do not need to restart the application .
Triggering a restart
As DevTools monitors classpath resources, the only way to trigger a restart is to update the classpath. The way in which you cause the classpath to be updated depends on the IDE that you are using:
In Eclipse, saving a modified file causes the classpath to be updated and triggers a restart.
In IntelliJ IDEA, building the project (Build -> Build Project) (shortcut: Ctrl+F9) has the same effect.
添加依赖:
1 2 3 4 5 6 7 <dependencies > <dependency > <groupId > org.springframework.boot</groupId > <artifactId > spring-boot-devtools</artifactId > <optional > true</optional > </dependency > </dependencies >
在IDEA中,项目或者页面修改以后:Ctrl / Command+F9。
Spring Initailizr
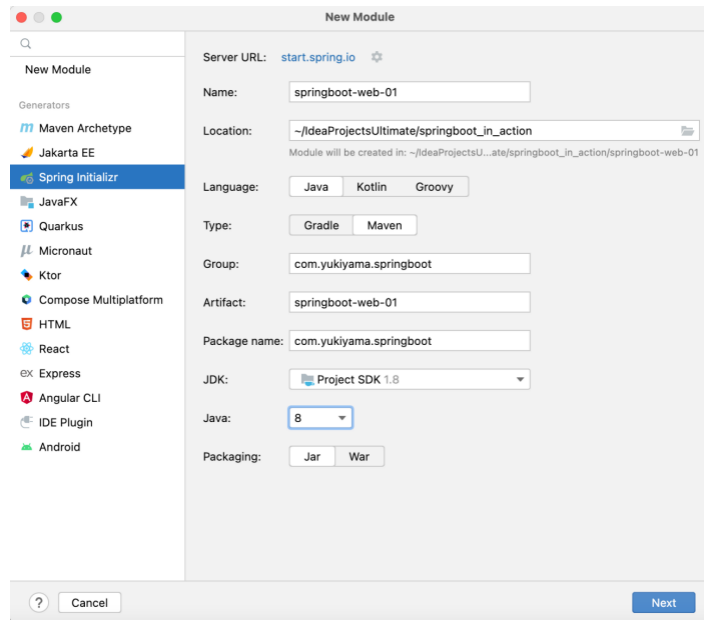
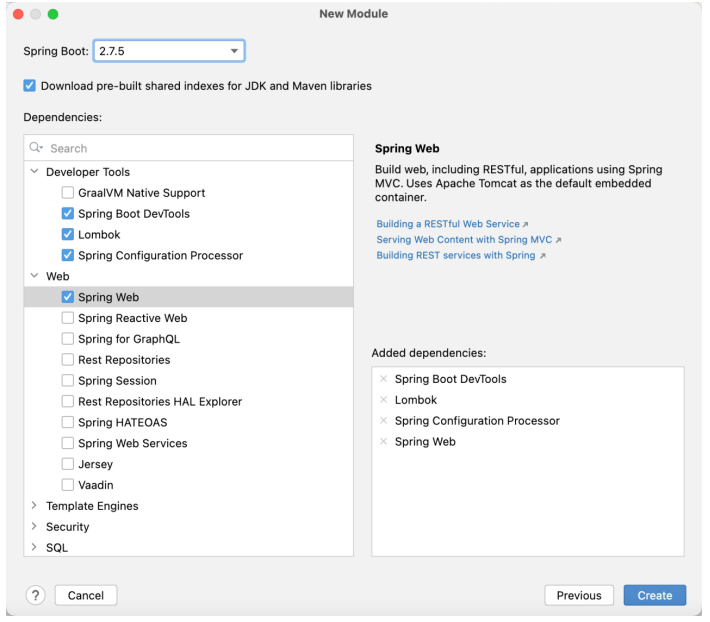
Spring Initailizr 是创建 SpringBoot 工程的向导工具,在 IDEA 中可使用它来方便地创建 SpringBoot 工程。以在 IDEA 中创建 springboot-web-01 Module 为例。
如下,在侧边栏的 Generators 下选择 Spring Initializr ,填入信息,Next 。
接着选择 SpringBoot 版本以及需要的依赖,Create 。
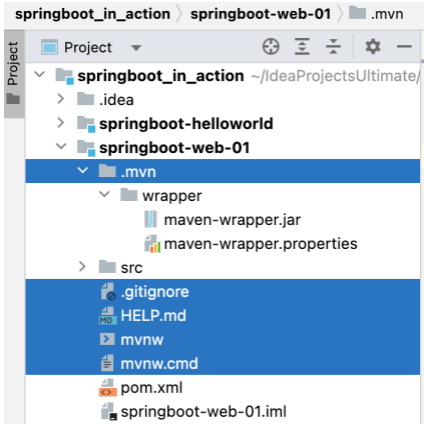
创建后可删除一些不需要的文件。
※ mvnw, .mvn 的作用可参考 Maven 官方说明 。
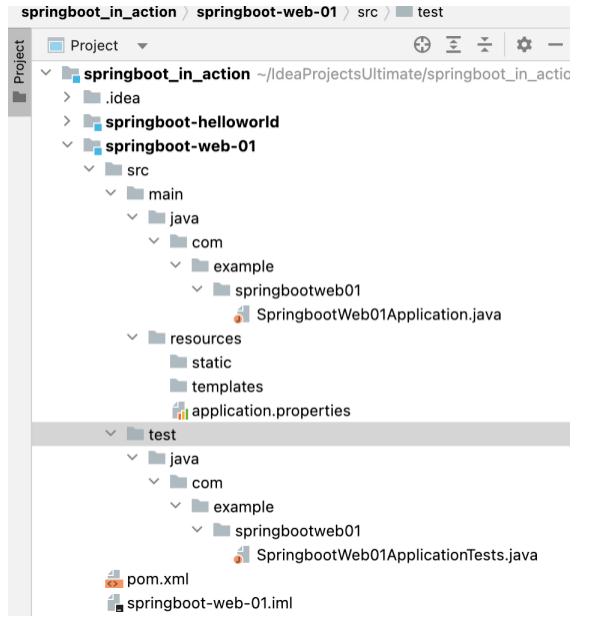
由 SpringBoot Initializr 创建的工程目录结构如下。
可在 resources 下新建 application.yml 作为配置文件。
yaml
最初 YAML 的意思是 “Yet Another Markup Language” (仍是一种标记语言) 。后来表达为递归缩写, “YAML Ain’t Markup Language” (YAML 不是一种标记语言) 。YAML 非常适合用来做以数据为中心的配置文件。
基本语法
key: value;: 后有空格
大小写敏感
使用缩进表示层级关系
缩进不允许使用 tab,只允许空格
缩进的空格数不重要,只要相同层级的元素左对齐即可
# 表示注释字符串无需加引号,如果要加,单引号 '' 中的字符串内容会被转义,而双引号 "" 不转义 (例如 "\n" 表示换行,而 '\n' 会被转义为 \\n )
数据类型
1 2 3 4 5 6 7 8 9 10 k: {k1:v1 ,k2:v2 ,k3:v3 }k: k1: v1 k2: v2 k3: v3
数组:一组按次序排列的值。array、list、queue
1 2 3 4 5 6 7 8 9 10 k: [v1 ,v2 ,v3 ]k: - v1 - v2 - v3
实例
1 2 3 4 5 6 7 8 9 10 11 12 13 14 15 16 17 18 19 @Data public class Person { private String userName; private Boolean boss; private Date birth; private Integer age; private Pet pet; private String[] interests; private List<String> animal; private Map<String, Object> score; private Set<Double> salarys; private Map<String, List<Pet>> allPets; } @Data public class Pet { private String name; private Double weight; }
用yaml表示以上对象
1 2 3 4 5 6 7 8 9 10 11 12 13 14 15 16 17 18 19 20 21 22 23 24 25 person: userName: zhangsan boss: false birth: 2019 /12/12 20 :12:33 age: 18 pet: name: tomcat weight: 23.4 interests: [篮球 ,游泳 ] animal: - jerry - mario score: english: first: 30 second: 40 third: 50 math: [131 ,140 ,148 ] chinese: {first: 128 ,second: 136 } salarys: [3999 ,4999.98 ,5999.99 ] allPets: sick: - {name: tom } - {name: jerry ,weight: 47 } health: [{name: mario ,weight: 47 }]
配置提示
在 application.yaml 中配置参数时,官方文档参考 。
You can easily generate your own configuration metadata file from items annotated with @ConfigurationProperties by using the spring-boot-configuration-processor jar. The jar includes a Java annotation processor which is invoked as your project is compiled.
添加如下依赖到 pom.xml 中,可以在配置参数时提示参数名。
1 2 3 4 5 <dependency > <groupId > org.springframework.boot</groupId > <artifactId > spring-boot-configuration-processor</artifactId > <optional > true</optional > </dependency >
但打包工程时不应打包上述依赖,可通过如下,在打包工程时将 spring-boot-configuration-processor 排除在外。
1 2 3 4 5 6 7 8 9 10 11 12 13 14 15 16 <build > <plugins > <plugin > <groupId > org.springframework.boot</groupId > <artifactId > spring-boot-maven-plugin</artifactId > <configuration > <excludes > <exclude > <groupId > org.springframework.boot</groupId > <artifactId > spring-boot-configuration-processor</artifactId > </exclude > </excludes > </configuration > </plugin > </plugins > </build >